Difference between revisions of "LSI SafeStore"
(Created page with "{{howto_header}} This covers how to use LSI's [http://www.lsi.com/products/raid-controllers/pages/megaraid-safestore-software.aspx SafeStore] controller option along with Seagate [http://www.seagate.com/ca/en/tech-insights/protect-data-with-seagate-secure-self-encrypting-drives-master-ti/ Self-Encrypting Drives] (SED). This provides protection of drive contents at rest and enables [http://www.seagate.com/ca/en/tech-insights/data-protection-instant-secure-erase-master-ti...") |
|||
| Line 198: | Line 198: | ||
Configuring the virtual disk | Configuring the virtual disk | ||
* Choose the RAID level you wish to use. The default is [[TLUG_Talk:_Storage_Technologies_and_Theory#Level_6|RAID level 6]]. | * Choose the RAID level you wish to use. The default is [[TLUG_Talk:_Storage_Technologies_and_Theory#Level_6|RAID level 6]]. | ||
* Assuming you have | * Assuming you have an [[FBU]] option and cache on your controller, change <span class="code">Write Policy</span> to <span class="code">Write Back with BBU</span> | ||
* The <span class="code">Select Size</span> option will be black. You can auto-fill it by clicking on <span class="code">Update Size</span>. Alternatively, manually enter the array size based on the sizes listed under the empty <span class="code">Virtual Drives</span> window. | * The <span class="code">Select Size</span> option will be black. You can auto-fill it by clicking on <span class="code">Update Size</span>. Alternatively, manually enter the array size based on the sizes listed under the empty <span class="code">Virtual Drives</span> window. | ||
* Click on <span class="code">Accept</span> to create the virtual drive. | * Click on <span class="code">Accept</span> to create the virtual drive. | ||
Latest revision as of 02:53, 16 August 2023
|
Alteeve Wiki :: How To :: LSI SafeStore |
This covers how to use LSI's SafeStore controller option along with Seagate Self-Encrypting Drives (SED). This provides protection of drive contents at rest and enables instant secure erase (ISE). This allows for the rapid and irreversible destruction of all data on the array(s) in seconds.
Keys
The first step is to purchase a SafeStore license (hardware or software key). If your controller supports hardware keys, follow the key's installation instructions. Once connected, the feature will immediately become available.
If you are using the software license, the steps are slightly more involved. These steps will be documented in the next section.
Software Key
You will need each controller's serial number and SafeID in order to activate the purchased license.
Getting the Serial Number and SafeID via "BIOS Configuration Utility"
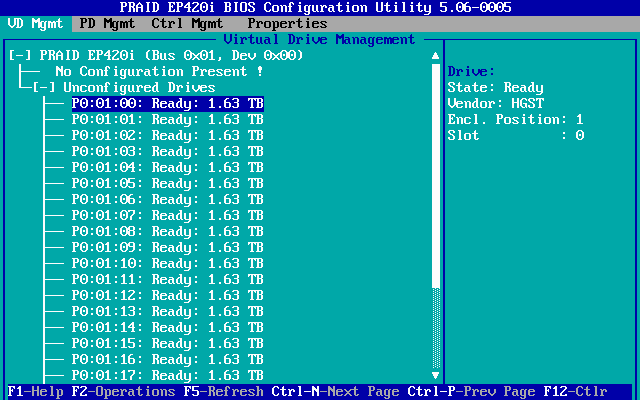
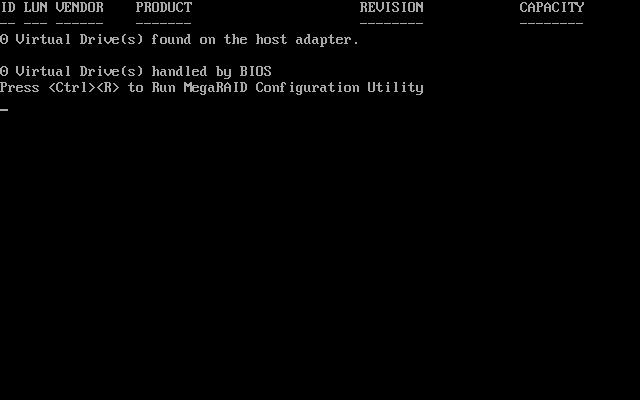
Boot the computer and press ctrl + r when prompted during the boot sequence.
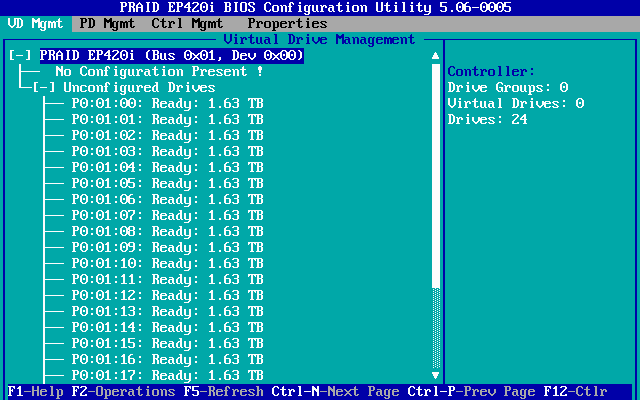
- Press the ↑ (up) key to highlight the controller. In the image below, the controller is 'PRAID EP420i (Bus 0x01, Dev 0x00)'.
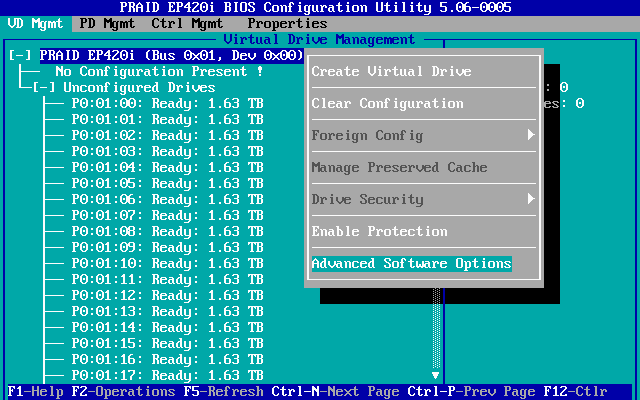
- Press <F2> to select display the "Operations" sub menu and use the (down) arrow key to highlight Advanced Software Options.
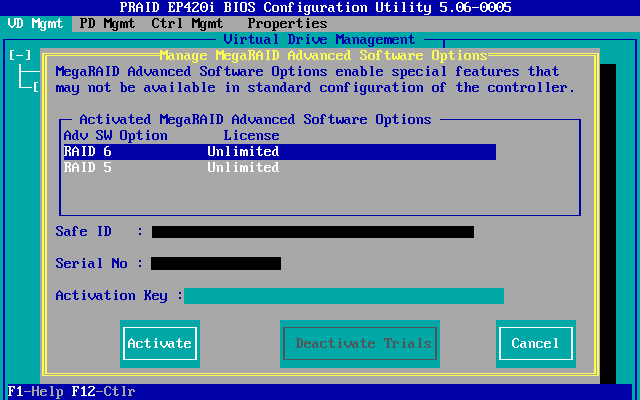
- Press <enter> to display the "Manage MegaRAID Advanced Software Options".
Carefully record the "Safe ID" and "Serial No" values.
Getting the Serial Number and SafeID via WebBIOS
Reboot the computer and press ctrl + h when prompted during the boot sequence.
- Click on Advanced Software Options from the main page.
- The SafeID and Serial Number will be shown below the existing license box.
Carefully record the "Safe ID" and "Serial No" values.
Getting the Serial Number and SafeID via storcli64
| node | storcli64 /c0 show all | grep -e "Safe ID" -e "Serial Number"
Serial Number = xxxxxxxxxxxxxxxx
Safe ID =  yyyyyyyyyyyyyyyyyyyyyyyyyyyyyyyyyyyyyyyy
|
|---|
Getting the License from LSI
After purchasing the software key, you will get a License Authentication Code (LAC). This will be used in a moment.
Log into LSI's Advanced Software License Management Portal.
If you don't have an account, you will need to enter an LAC to start the account creation process.
| Note: For this tutorial, we are using the Fujitsu EP420i controller. |
On the next window, you will be asked to enter the controller description.
- LAC or SCN #: <enter the LAC key given to you when you purchased SafeStore
- RAID Controller Name: <enter a unique name to identify the controller. I like "RX2540 M1 sn: xxxxxx" which is the make and SN of the node with the controller>
Once entered, press "Activate".
If you are a new user, a pop-up will ask you to enter your last name and your email address. Do so. Next you will be asked more information about you and your company, provide the information.
If you are an existing user, you will enter your registered email address and password.
Once logged in, you will be presented with the entitlement and a form to enter the controller's "Serial Number" and "Safe ID". To get this information, you can either look at the controller's information it the controller's BIOS or you can retrieve it via "storcli64".
- Enter the Serial Number and Safe ID into the form and the press Next.
- Read and agree to the EULA, enter the email address you want the key(s) sent to, enter a note if you wish and then click "Finish".
- You will see the new activation key on the screen, and a copy will also be emailed to you. You will enter this key to enable SafeStore on your controller.
Entering the SafeStore Activation Key in the WebBIOS
You need to be in the "Advanced Software Options" screen. If you were there already to gather the serial number and Safe ID, you are already in the right place.
- Click on Advanced Software Options from the main page.
- At the bottom of the screen, carefully type in the Activation Key that was sent to you (or that you recorded from the LSI website). When entered, click Activate.
- The new license(s) will be displayed in the review window. Confirm that this is what you expect and then click Finish.
- You are warned that you must restart the server for the changes to take effect. Click on OK.
Exit and reboot your server now. Re-enter the WebBIOS with ctrl + h when prompted to begin encryption configuration.
Entering the SafeStore Activation Key via storcli64
You will get an email with the activation key. This is what we will enter into the controller to enable the SafeStore option. You can either manually enter this key into the controller via the controller's BIOS, or you can enter it using the storcli64 tool, which we will do.
| node | storcli /c0 set aso key=zzzzzzzzzzzzzzzzzzzzzzzzzzzzzzzzzzzzzzzz
<TODO: get sample output>
|
|---|
Done! You will now need to reboot to configure encryption.
| Note: Your data is *NOT* encrypted at this stage. |
| Warning: In order to encrypt data, existing virtual disks will need to be destroyed and recreated. Make sure your data is backed up! |
Using Encryption
Until now, we covered enabling the SafeStore function. Now we'll cover it's use.
Enabling Encryption
Reboot into the LSI WebBIOS by pressing ctrl + h during the boot sequence.
Click on Advanced Software Options.
Confirm that the SafeStore option is enabled, then click Back.
Now we can setup encryption.
First, we need to enable drive encryption.
- Click on Controller Properties
- Click Next through the first three pages.
- On the fourth page, on the bottom-left, you see Drive Security. Click on Enable.
- A dialogue box will tell you about the encryption process. Read it and, when ready, click Next.
- The controller will next suggest a Security key identifier. You can use it as-is or replace it with your own string. When ready, click Next.
- Next, enter (or click Suggest to generate) a key to encrypt and decrypt the data with. Once entered, click Next.
| Warning: If you set a Pass Phrase in the next section, you will need to enter it on every reboot. |
| Warning: If you do NOT set a Pass Phrase in the next section, the data will not be protected if an attacker gains physical access to the server (or at least the controller). In this case, the benefit of the encrypted configuration is that drives alone can not be read and ISE (instant secure erase) can be used. |
- Next, if you want to require that a pass phrase be used to unlock the controller on boot, enter it on this window. If you want the server to be able to boot autonomously, do not set a pass phrase here.
- You will now see a dialogue explaining you configuration. Read it, understand it and then click Yes.
Proceed to the next section to create the encrypted partition.
Encrypting the Data
Depending on your model of controller, you will use either the older graphical 'WebBIOS' utility or the newer text-based 'BIOS Configuration Utility'. If your controller prompts you to press "<ctrl> + <h>", you will use 'WebBIOS'. If your controller prompts you to press "<ctrl> + <r>", you will enter the 'BIOS Configuration Utility'.
Using BIOS Configuration Utility
Press '<ctrl> + <r>' to enter the "BIOS Configuration Utility".
The first screen will show the list of drives under the first controller. If you have two controllers, be sure to press '<f12>' to be sure you are working on the desired controller.
Press the up arrow to navigate to the controller.
Press '<f2>' to open the "Operations" menu and navigate to the "Advanced Software Options" menu item and press '<enter>'.
Verify that the "SafeStore" option is listed and that its license shows as "Unlimited".
| Note: There are two ways to get "SafeStore"; Either as a software key or using a physical key plugged into the controller directly. If you do not see "SafeStore" in the list, please consult your hardware vendor on the best way to purchase "SafeStore". |
Using WebBIOS
| Note: Any existing virtual disks that you wish to encrypt will need to be recreated, causing their data to be lost. |
- Click on Configuration Wizard.
- Click on New Configuration.
- Read the warning, understand that your existing data will be lost, and then click on Yes.
- Make sure that Manual Configuration is selected and then clock Next.
| Note: If you plan to configure Hot-Spare drives, so not select them in the next step. They will be configured later. |
Selecting Drives for the Virtual Disk:
- Ensure that Encryption is set to Full Disk Encryption.
- Click on the first drive under the Drives column. With the first drive highlighted, press and hold the ctrl key and click to select the rest of the drives.
- With the desired drives highlights, click Add to Array.
- The right Drive Group will now show the selected drives. Confirm that this is correct and then click Accept DG.
- The screen will reload, but the Accept DG button will now be gone. Click on Next to proceed.
- On the left column will be a drop-down select box showing the new drive group. If you have multiple drive groups, be sure the new one is selected. Click on Add to Span.
- The drive group will now be listed under the right Span column. Click on Next.
Configuring the virtual disk
- Choose the RAID level you wish to use. The default is RAID level 6.
- Assuming you have an FBU option and cache on your controller, change Write Policy to Write Back with BBU
- The Select Size option will be black. You can auto-fill it by clicking on Update Size. Alternatively, manually enter the array size based on the sizes listed under the empty Virtual Drives window.
- Click on Accept to create the virtual drive.
- A dialogue box explaining the Write Back with BBU implication will be shown. Read it, understand it and the click Yes.
- You will return to the virtual drive configuration screen, but now your new virtual drive will be shown. Click Next to proceed.
- The virtual drive will now be shown in the right Virtual Drives column. Click on Accept to proceed.
- You will be asked to save the configuration. Click on Yes.
- You will be warned that any existing data on the drive will be lost. Click Yes to confirm and proceed.
| Note: In some occasions, you will get a warning that the Initialization process failed to start. This is OK, but it does mean that you will have to wait until the initialization of the drive has completed. You can track the progress by clicking in Virtual Drives from the main menu. |
| Note: In some occasions, you will get a warning that you 'must wait for the current operation to complete'. This is OK, but it does mean that you will have to wait until the initialization of the drive has completed. You can track the progress by clicking in Virtual Drives from the main menu. |
- The last radio button show now show Set Boot Drive (Current=0).
If you had to wait for the initialization to complete, you can come back and set the boot drive by clicking on Virtual Drives from the main page.
- If you didn't get the warning mentioned above, you will see a summary of the new virtual disk. The last radio button will show Set Boot Drive (current=NONE). Click to select this option and then click on Go.
- The configuration is complete. Click Home to return to the main page.
Configuring Hot Spares
A "hot spare" is a disk connected to a RAID controller that is marked as being ready to immediately replace a failed drive. Should a drive fail, the controller will (logically) eject the failed disk and replace it with the hot-spare. This begins the rebuild process immediately and keeps the time in which an array is degraded to a minimum.
From the home page of the WebBIOS:
- Click on the Unconfigured Good disk.
- Click to select the radio button to the left of Make Global HSP and then click the Go button.
- Click on Home to return to the main page.
Repeat as needed if you want to configure multiple hot-spare drives.
Using the Encryption
| Note: The example process below assumes one controller is in the server and that it's ID number is 0. So you will see /c0 used in the examples below. If you have multiple controllers (or your controllers are at different ID numbers), repeat the commands for each controller and/or adjust /c0 to use your controller ID(s). |
If you configured the system to require a pass phrase, you will need to manually enter it during the system boot in order to unlock the drives.
If you didn't use a pass phrase, then there is nothing more to do on a day to day bases. If you remove a drive (be it because it was defective or what have you), the contents of that data will not be recoverable by anyone unless they have the key you entered when you setup the encryption.
Self-Destruct - aka; Instant Secure Erase
| Warning: This process is irreversible (that's kind of the point...)! |
A major benefit of the encryption setup is the ability to very rapidly destroy the data. There are many reasons this feature might be needed, but those reasons are outside the scope of this document.
All you strictly need to do is ISE the drives. However, being paranoid, we want to do a few extra things to make sure that even a very dedicated attacker can't recover data.
- Create a ramdisk and copy /opt/MegaRAID/storcli/storcli64 to it.
- Switch the virtual disk caching policy to write-through.
- Flush the controller's cache.
- Delete the virtual disk.
- ISE the drives.
- Delete the encryption key from the controller.
- Power off the server.
To identify your controller ID(s), run:
| node | storcli64 show
Status Code = 0
Status = Success
Description = None

Number of Controllers = 1
Host Name = an-a05n01.alteeve.ca
Operating System  = Linux2.6.32-504.el6.x86_64

System Overview :
===============

-------------------------------------------------------------------------------------
Ctl Model                    Ports PDs DGs DNOpt VDs VNOpt BBU sPR DS  EHS ASOs Hlth
-------------------------------------------------------------------------------------
  0 RAIDCtrlSAS6G1GB(D3116C)     8  16   1     0   1     0 Opt On  1&2 N      3 Opt
-------------------------------------------------------------------------------------

Ctl=Controller Index|DGs=Drive groups|VDs=Virtual drives|Fld=Failed
PDs=Physical drives|DNOpt=DG NotOptimal|VNOpt=VD NotOptimal|Opt=Optimal
Msng=Missing|Dgd=Degraded|NdAtn=Need Attention|Unkwn=Unknown
sPR=Scheduled Patrol Read|DS=DimmerSwitch|EHS=Emergency Hot Spare
Y=Yes|N=No|ASOs=Advanced Software Options|BBU=Battery backup unit
Hlth=Health|Safe=Safe-mode boot
|
|---|
Above, we see that our controller is using ID 0.
Create a ramdisk
This is needed because we will lose the file system before we're done using storcli64. Putting it in a RAM disk helps it remain available until we're done.
| node | /bin/mkdir /ram && mount -o size=1G -t tmpfs none /ram
/bin/cp /opt/MegaRAID/storcli/storcli64 /ram/
|
|---|
Switch the virtual disk caching policy to write-through
This step isn't strictly required, but without this and the next steps, it is possible data might remain in the RAID controller's on-board RAM and/or the flash backup unit after the self-destruct completes.
By switching the cache policy to Write-Through, we tell the controller to stop using the cache on the controller entirely. This prevents any future writes from using the controller's RAM.
| node | /ram/storcli64 /c0 /vall set wrcache=wt
Controller = 0
Status = Success
Description = None

Detailed Status :
===============

---------------------------------------
VD Property Value Status  ErrCd ErrMsg
---------------------------------------
 0 wrCache  WT    Success     0 -
---------------------------------------
|
|---|
Flush the controller's cache
Simply switching the controller's cache policy to Write-Through doesn't ensure the data previously in cache has been flushed out to disk yet. So this step explicitly tells the controller to do so now.
| node | /ram/storcli64 /c0 flushcache
Controller = 0
Status = Success
Description = Adapter and/or disk caches flushed successfully.
|
|---|
Delete the virtual disk
We can't ISE drives that are part of a virtual disk, so the first thing we have to do is delete the virtual disk.
| Note: The data on the server is gone after this stage. |
| Warning: The data is still technically recoverable at this stage! |
| node | /ram/storcli64 /c0 /vall del force
Controller = 0
Status = Success
Description = Delete VD succeeded
|
|---|
You may see:
| node | Message from syslogd@an-a05n01 at Dec 3 11:58:53 ...
kernel:journal commit I/O error
|
|---|
This is a side-effect of destroying the storage.
ISE the drives
This is the most important step. This is the process that securely deletes the drives. Once this process is completed, that data will be safely destroyed.
| node | /ram/storcli64 /c0 /eall /sall secureerase force
Controller = 0
Status = Success
Description = Drive Secure Erase Succeeded.
|
|---|
Delete the encryption key from the controller
To be safe, we will delete the encryption key from the controller. This isn't strictly required, but it certainly can't hurt to purge the key. If a future vulnerability is found in ISE, having the key may prove useful for recovering the data. This removes that possibility.
| node | /ram/storcli64 /c0 delete securitykey
Controller = 0]
Status = Success
Description = None


Controller Properties :
=====================

------------------------
Ctrl Method     Result
------------------------
   0 delete Key Success
------------------------
|
|---|
Power off the server
This ensures that, within a few minutes, any data in the system RAM is lost, preventing freeze attacks.
Note that you can't use software any more to power down the server. So either do it manually or use IPMI to force the server off.
Anvil! Self-Destruct
All of the steps listed above have been automated as part of the anvil-self-destruct program.
| node | wget -c https://raw.githubusercontent.com/digimer/striker/master/tools/anvil-self-destruct
chmod 755 anvil-self-destruct
./anvil-self-destruct
Initiating self-destruct sequence...
- Creating ramdisk.
- Copying required binaries to ramdisk: [/ram/].
  - storcli64: [/ram/storcli64]
- Changing cache policy to 'write-through' on adapter: [0]
- Flushing cache on adapter: [0]
- Deleting virtual disks on adapter: [0]
- ISE'ing drives on adapter: [0]

Message from syslogd@an-a05n01 at Dec  3 13:19:53 ...
 kernel:journal commit I/O error
- Deleting encryption keys from adapter: [0]
Self destruct completed in: [34] seconds.

Horatio, I am dead;
Thou livest; report me and my cause aright
To the unsatisfied...

[root@an-a05n01 ~]# Timeout, server 10.20.9.23 not responding.
|
|---|
| Any questions, feedback, advice, complaints or meanderings are welcome. | ||||
| Us: Alteeve's Niche! | Support: Mailing List | IRC: #clusterlabs on Libera Chat | ||
| © Alteeve's Niche! Inc. 1997-2023 | Anvil! "Intelligent Availability™" Platform | |||
| legal stuff: All info is provided "As-Is". Do not use anything here unless you are willing and able to take responsibility for your own actions. | ||||
