Difference between revisions of "Build an M3 Anvil! Cluster"
| (43 intermediate revisions by the same user not shown) | |||
| Line 1: | Line 1: | ||
{{howto_header}} | {{howto_header}} | ||
{{warning|1=This is a work in progress document. While this header is here, please do not consider this article complete or accurate.}} | |||
First off, what is an [[Anvil!]]? | First off, what is an [[Anvil!]]? | ||
| Line 247: | Line 249: | ||
<syntaxhighlight lang="bash"> | <syntaxhighlight lang="bash"> | ||
dnf install https:// | dnf install https://alteeve.com/an-repo/m3/alteeve-release-latest.noarch.rpm | ||
</syntaxhighlight> | </syntaxhighlight> | ||
<syntaxhighlight lang="text"> | <syntaxhighlight lang="text"> | ||
| Line 591: | Line 593: | ||
Complete! | Complete! | ||
</syntaxhighlight> | </syntaxhighlight> | ||
Done! | |||
==== Setting the Anvil! Password ==== | |||
{{note|1=This step is required on Striker dashboards only. There will be a chance to change the password on the other machines later.}} | |||
On Striker dashboards, you need to set the initial password. Generally this will be the same as what you set for the <span class="code">root</span> user during the OS install earlier. It doesn't have to be, of course, but if you use a different password in this step, note that the <span class="code">root</span> user password will change to the new password. | |||
To update the password, run the <span class="code">anvil-change-password</span> too. | |||
<syntaxhighlight lang="bash"> | |||
anvil-change-password --new-password "super secret password" | |||
</syntaxhighlight> | |||
<syntaxhighlight lang="text"> | |||
About to update the local passwords (shell users, database and web interface). | |||
</syntaxhighlight> | |||
<syntaxhighlight lang="text"> | |||
Proceed? [y/N] y | |||
</syntaxhighlight> | |||
<syntaxhighlight lang="text"> | |||
Updating the Striker user: [admin] password... Set-Cookie:anvil_user_uuid=; expires=-1d; | |||
Set-Cookie:anvil_user_hash=; expires=-1d; | |||
Done. | |||
Updating the database user: [postgres] password... Done. | |||
Updating the database user: [admin] password... Done. | |||
Updating the local config file: [super secret password] database password... Done. | |||
Updating the shell user: [admin] password... Done. | |||
Updating the shell user: [root] password... Done. | |||
Finished! | |||
NOTE: You must update the password of any other system using this host's | |||
database manually! | |||
</syntaxhighlight> | |||
This is the same tool you will use later on if you ever want to change the password for the Striker Dashboard, or for any Anvil! node (using the <span class="code">--anvil <name></span> switch). | |||
Done! | Done! | ||
| Line 781: | Line 820: | ||
</syntaxhighlight> | </syntaxhighlight> | ||
= Configuring the Striker Dashboards= | |||
{{note|1=The <span class="code">admin</span> user will automatically be created by <span class="code">anvil-daemon</span> after <span class="code">anvil-striker</span> is installed. You don't need to create this account manually.}} | |||
There are no default passwords on Anvil! systems. So the first step is to set the password for the <span class="code">admin</span> user. | |||
<syntaxhighlight lang="bash"> | <syntaxhighlight lang="bash"> | ||
passwd admin | |||
</syntaxhighlight> | </syntaxhighlight> | ||
<syntaxhighlight lang="text"> | <syntaxhighlight lang="text"> | ||
Changing password for user admin. | |||
</syntaxhighlight> | </syntaxhighlight> | ||
= | Enter the password you want to use twice. | ||
<syntaxhighlight lang="text"> | |||
New password: | |||
Retype new password: | |||
</syntaxhighlight> | |||
<syntaxhighlight lang="text"> | |||
passwd: all authentication tokens updated successfully. | |||
</syntaxhighlight> | |||
Now we can switch to the graphical interface! | |||
== Striker Dashboard == | |||
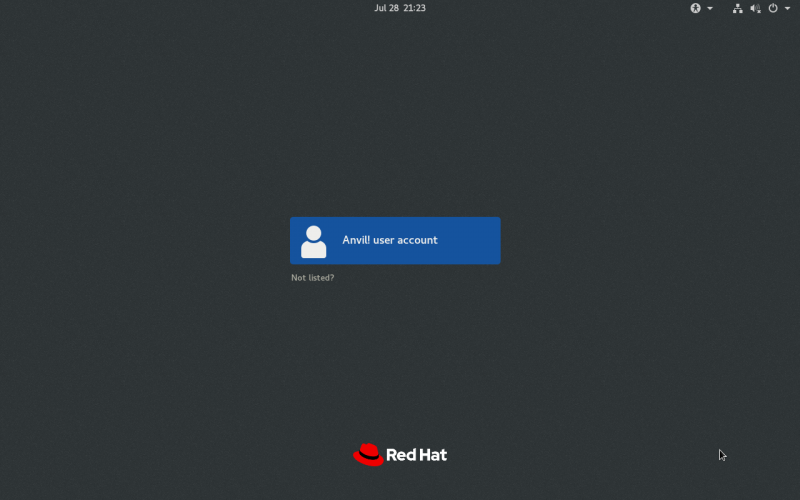
{{note|1=If you don't see the graphical login, either reboot the machine, or run <span class="code">systemctl isolate graphical.target</span>.}} | |||
[[image:an-striker01-rhel8-m3-initial-setup-01.png|thumb|center|800px|Striker graphical login.]] | |||
Log in to the ''Anvil! user account'' with the password you set above. | |||
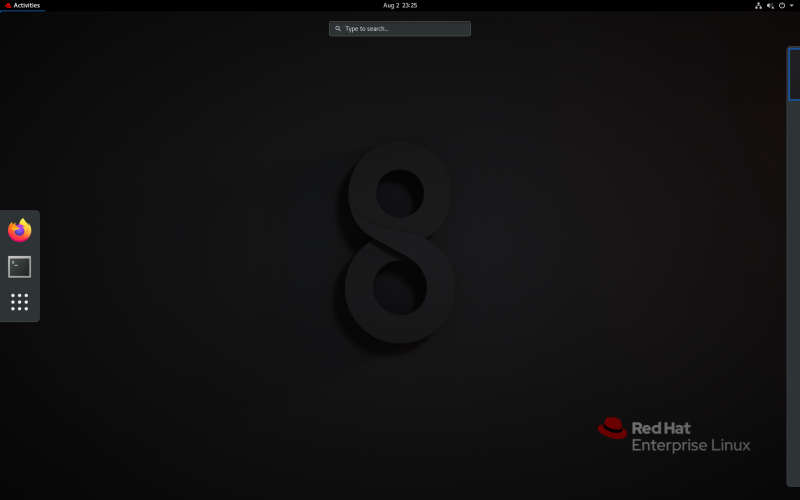
[[image:an-striker01-rhel8-m3-initial-setup-02.png|thumb|center|800px|Activities menu and Firefox icon.]] | |||
Click on ''Activities'' on the top-left corner, and then click on the Firefox icon to open the browser. | |||
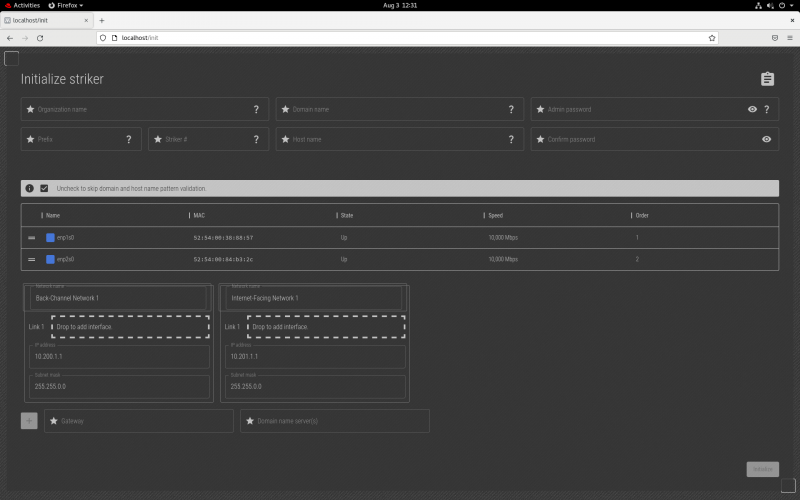
[[image:an-striker01-rhel8-m3-initial-setup-03.png|thumb|center|800px|Connecting to ''localhost'' to start the configuration.]] | |||
In Firefox, enter the URL <span class="code">http://localhost</span>. This will load the initial Striker configuration page where we'll start configuring the dashboard. | |||
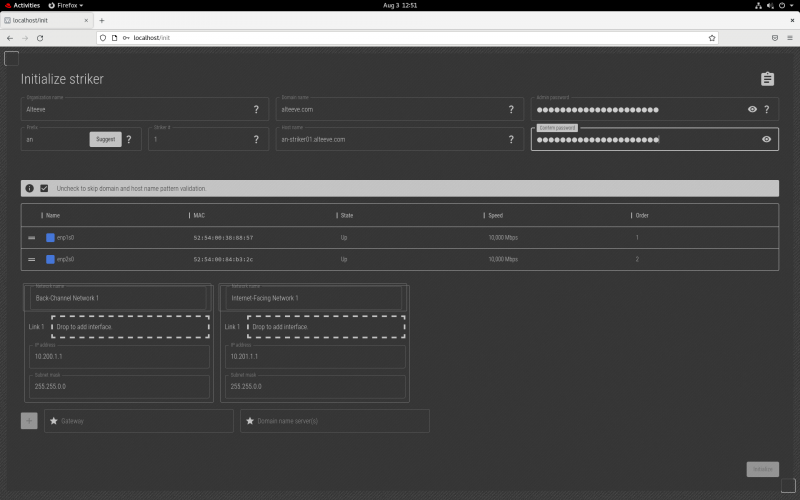
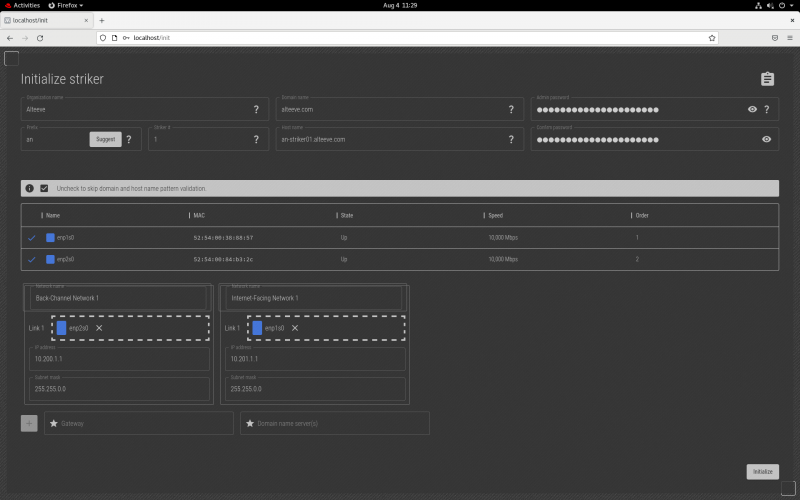
[[image:an-striker01-rhel8-m3-initial-setup-04.png|thumb|center|800px|Filling out the configuration form.]] | |||
Fields; | |||
{| class="wikitable" | |||
!style="white-space:nowrap; text-align:left;"|Organization name | |||
|This is a descriptive name for the given Anvil! cluster. Generally this is a company, organization or site name. | |||
|- | |||
!style="white-space:nowrap; text-align:left;"|Domain name | |||
|This is the domain name that will be used when setting host names in the cluster. Generally this is the domain of the organization who use the Anvil! cluster. | |||
|- | |||
!style="white-space:nowrap; text-align:left;"|Prefix | |||
|This is a short, generally 2~5 characters, descriptive prefix for a given Anvil! cluster. It is used as the leading part of a machine's short host name. | |||
|- | |||
!style="white-space:nowrap; text-align:left;"|Striker # | |||
|Most Anvil! clusters have two Striker dashboards. This sets the sequence number, so the first is '1' and the second is '2'. If you have multiple Anvil! clusters, the first Striker on the second Anvil! cluster would be '3', etc. | |||
|- | |||
!style="white-space:nowrap; text-align:left;"|Host name | |||
|This is the host name for this striker. Generally it's in the format of <prefix>-striker0<sequence>.<domain>. | |||
|- | |||
!style="white-space:nowrap; text-align:left;"|Admin Password | |||
|This is the cluster's password, and should generally be the same password set when you set the password for the 'admin' user. | |||
|- | |||
!style="white-space:nowrap; text-align:left;"|Confirm Password | |||
|Re-enter the password to confirm the typo you entered doesn't have a typo. | |||
|} | |||
{{note|1=It is strongly recommended that you keep the "Organization Name", "Domain Name", "Prefix" and "Admin Passwords" the same on Strikers that will be peered together.}} | |||
=== Network Configuration === | |||
One of the "trickier" parts of configuring an Anvil! machine is figuring out which physical network interface are to be used for which job. | |||
There are found networks used in Anvil! clusters. If you're not familiar with the networks, you may want to read this first; | |||
* [[Anvil! Networking]] | |||
The middle section shows the existing network interfaces, <span class="code">enp1s0</span> and <span class="code">enp2s0</span> in the example above. In the screenshot above, both interfaces show their <span class="code">State</span> as "<span class="code">On</span>". This shows that both interfaces are physically connected to a network switch. | |||
Which physical interface you want to use for a given task will be up to you, but above is an article explaining how Alteeve does it, and why. | |||
* [[Network Interface Planning]] | |||
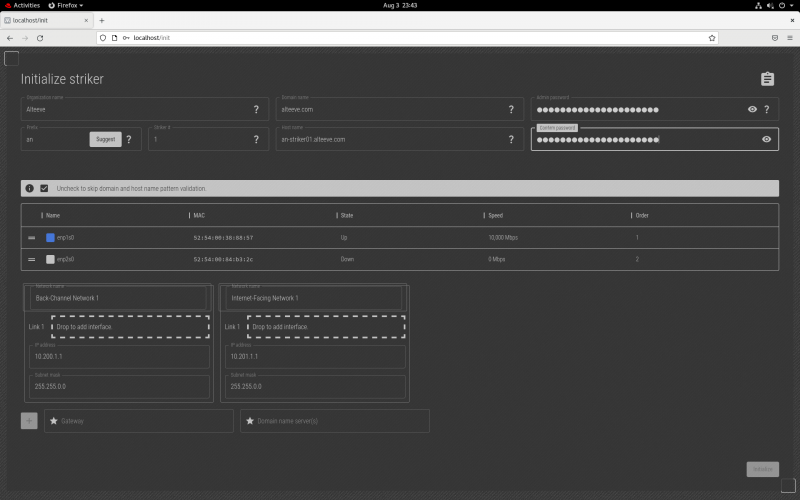
In this example, the Striker has two interfaces, one plugged into the [[BCN]], and one plugged into the [[IFN]]. To find which one is which, we'll unplug the cable going to the interface connected to the BCN, and we'll watch to see which interface state changes to "<span class="code">Down</span>". | |||
[[image:an-striker01-rhel8-m3-initial-setup-05.png|thumb|center|800px|BCN link down, <span class="code">enp2s0</span> showing as "<span class="code">Down</span>".]] | |||
When we unplug the network cable going to the BCN interface, we can see that the <span class="code">enp2s0</span> interface has changed to show that it is "<span class="code">Down</span>". Now that we know which interface is used to connect to the BCN, we can reconnect the network cable. | |||
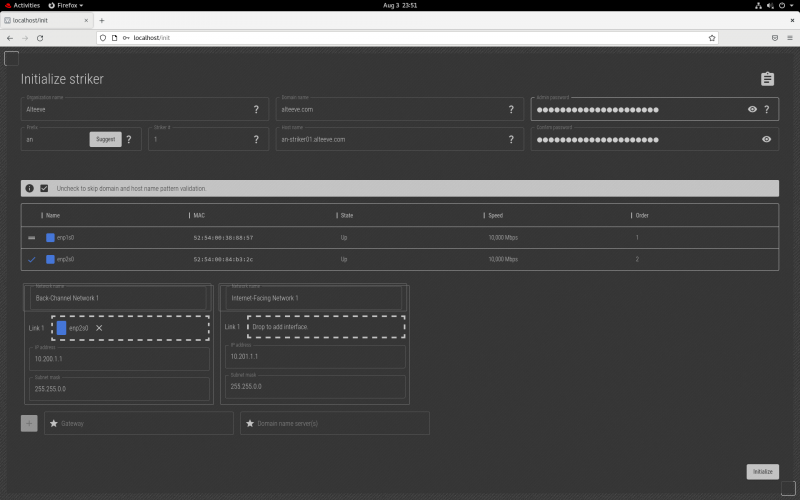
[[image:an-striker01-rhel8-m3-initial-setup-06.png|thumb|center|800px|Interface <span class="code">enp2s0</span> configured for use as the BCN 1 link.]] | |||
< | To configure the <span class="code">enp2s0</span> interface for use as the "''Back-Channel Network 1''" interface, click or press on the lines to the left of the interface name, and drag it, into the <span class="code">Link 1</span> box. | ||
</ | [[image:an-striker01-rhel8-m3-initial-setup-07.png|thumb|center|800px|Interface <span class="code">enp1s0</span> configured for use as the IFN 1 link.]] | ||
This striker dashboard only has two network interfaces, so we know that obviously <span class="code">enp1s0</span> must be the IFN interface. | |||
{{note|1=If you want redundancy on the Striker dashboard, you can use four interfaces, and you will see two links per network. Unplug the cables connected to the first switch, and they become '''Link 1'''. The interface for the second switch will go to '''Link 2'''. Configuring bonds this way will be covered when we configure subnodes.}} | |||
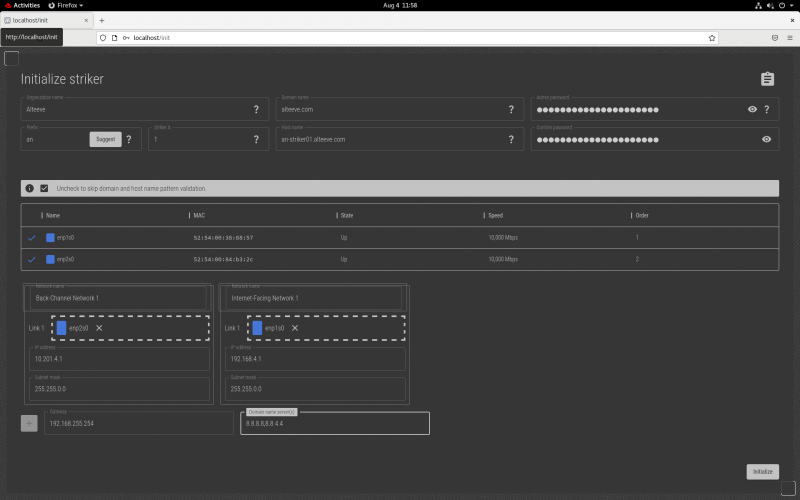
[[image:an-striker01-rhel8-m3-initial-setup-08.png|thumb|center|800px|Assigning IPs, default gateway and DNS servers.]] | |||
Once you're sure that the IPs you want are set, click on '''Initialize''' to send the new configuration. | |||
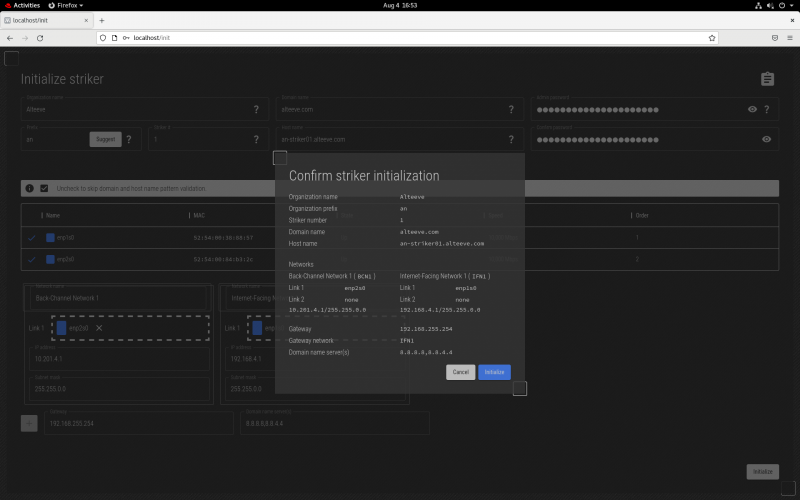
[[image:an-striker01-rhel8-m3-initial-setup-09.png|thumb|center|800px|New configuration confirmation page.]] | |||
If you're happy with the values set, click '''Initialize''' again, and it will send | |||
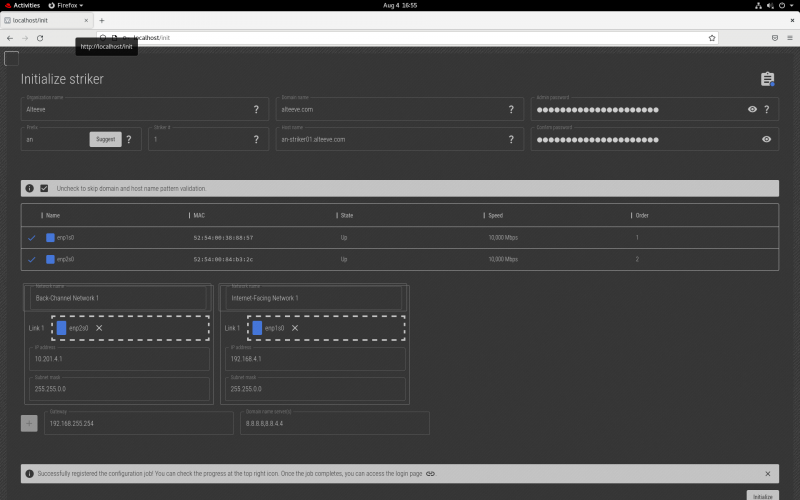
[[image:an-striker01-rhel8-m3-initial-setup-10.png|thumb|center|800px|New configuration job has been registered.]] | |||
After a moment, the Striker will reboot! | |||
=== First Login === | |||
After the dashboard reboots, log back in as you did before and restart Firefox. | |||
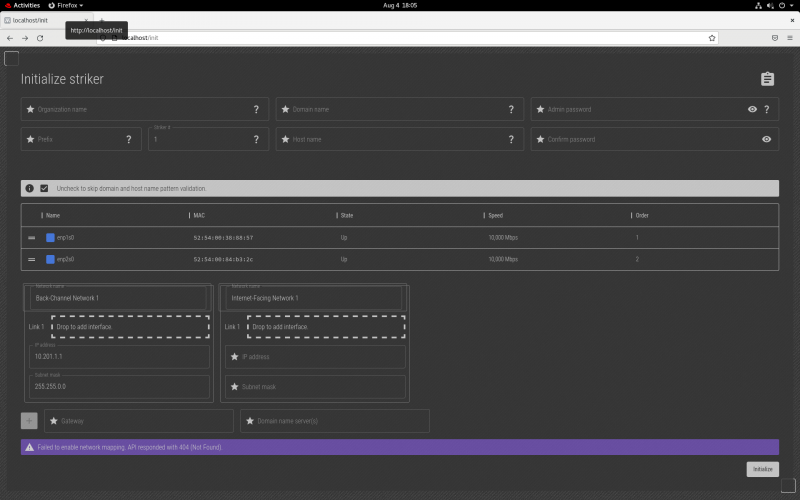
{{note|1=If the browser tries to reload the last page, it will go back to the configuration page (note the '''Failed to enable the network mapping API''' message and the url being <span class="code">http://localhost/init</span>). If this happens, ignore the page. The data will be stale an inaccurate.}} | |||
[[image:an-striker01-rhel8-m3-initial-setup-11.png|thumb|center|800px|Example of the reloaded, stale, cached config page, '''ignore this tab'''.]] | |||
Example of the old config page being loaded. Ignore this and go to the base url <span class="code">http://localhost</span>. | |||
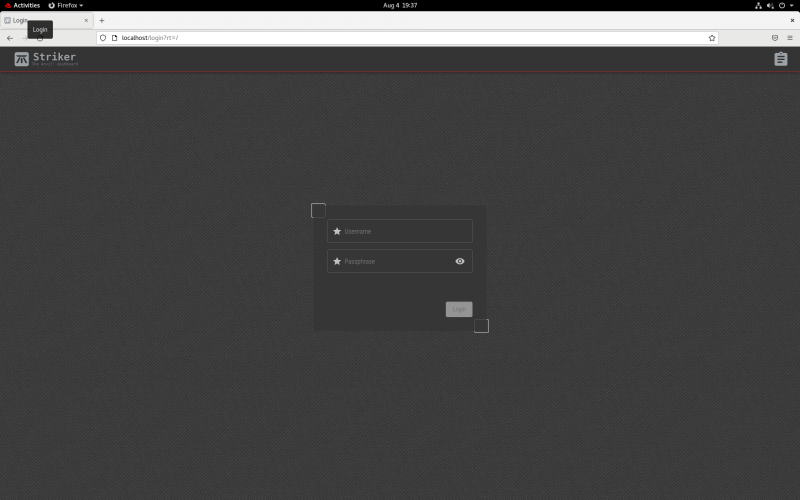
[[image:an-striker01-rhel8-m3-initial-setup-12.png|thumb|center|800px|The Striker Dashboard login page.]] | |||
Login with the user name <span class="code">admin</span> and use the password you set earlier. | |||
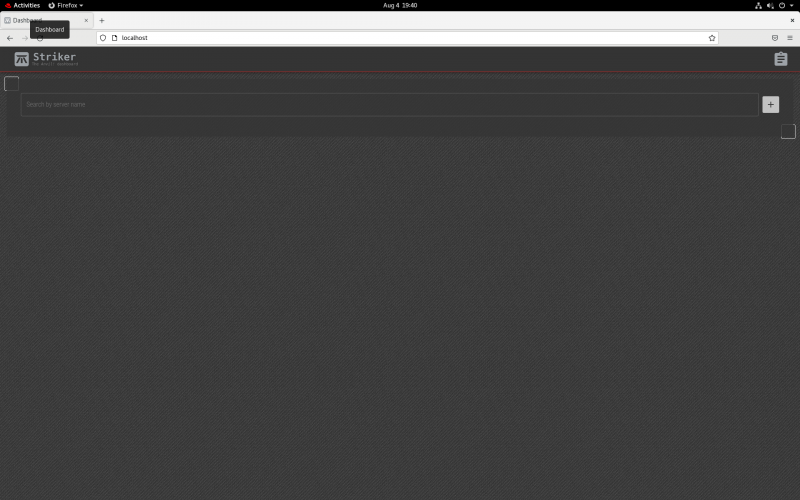
[[image:an-striker01-rhel8-m3-initial-setup-13.png|thumb|center|800px|The Striker Dashboard main page.]] | |||
The main page looks really spartan at first, but later this is where you'll find all the servers hosted on you Anvil! node(s). | |||
= Peering Striker Dashboards = | |||
{{note|1=For redundancy, we recommend having two Striker dashboards. Repeat the steps above to configure the other dashboard. Once both are configured, we will peer them together. Once peered, you can use either dashboard, they will be kept in sync and one will always be redundant for the other.}} | |||
With two configured strikers ready, lets peer them. For this example, we'll be working on <span class="code">an-striker01</span>, and peering with <span class="code">an-striker02</span> which has the [[BCN]] IP address <span class="code">10.201.4.2</span>. | |||
[[image:an-striker01-rhel8-m3-peering-01.png|thumb|center|516px|Clicking the '''Striker''' logo to open the menu.]] | |||
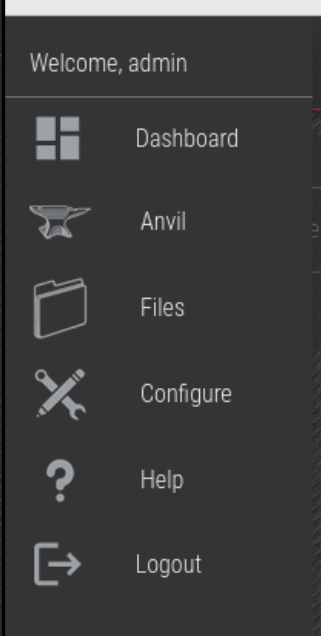
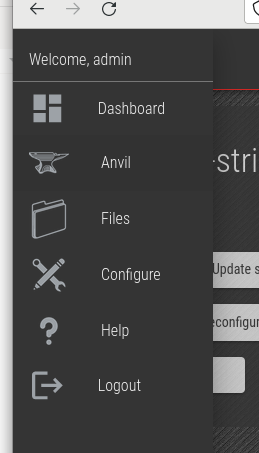
Click on the ''Striker'' logo at the top left, which opens the Striker menu. | |||
[[image:an-striker01-rhel8-m3-peering-02.png|thumb|center|321px|Click on '''Configure'''.]] | |||
Click on the ''Configure'' menu item. | |||
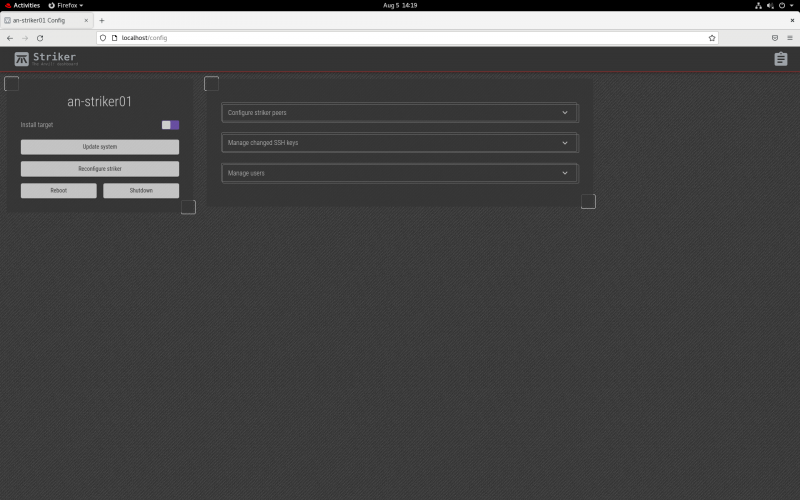
[[image:an-striker01-rhel8-m3-peering-03.png|thumb|center|800px|The Striker configuration menu.]] | |||
Here we see the menu for configuring (or reconfiguring) the Striker dashboard. | |||
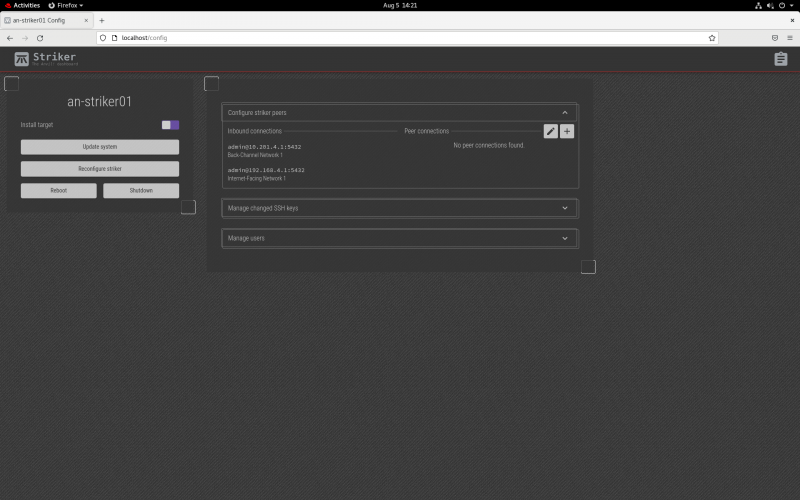
[[image:an-striker01-rhel8-m3-peering-04.png|thumb|center|800px|Expanded '''Configure Striker Peers''' menu.]] | |||
Click on the title of '''Configure Striker Peers''' to expand the peer menu. | |||
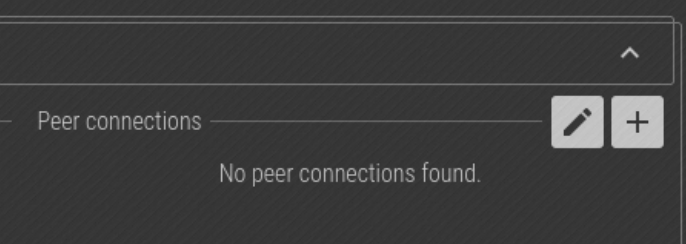
[[image:an-striker01-rhel8-m3-peering-05.png|thumb|center|686px|The '''+''' icon to add a peer.]] | |||
Click on the "+" icon on the top-right to open the new peer menu. | |||
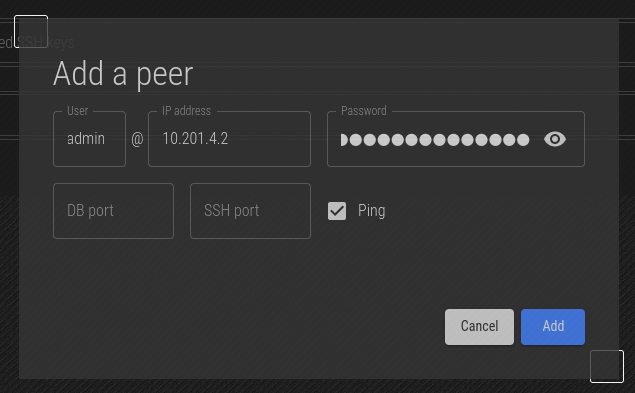
[[image:an-striker01-rhel8-m3-peering-06.png|thumb|center|635px|Peer striker form.]] | |||
In almost all cases, the Striker being peered is on the same BCN as the other. As such, we'll connect as the <span class="code">admin</span> user to the peer striker's BCN IP address, <span class="code">10.201.4.2</span> in this example. We can leave the (postgres) database and ssh ports blank (which then default to <span class="code">5432</span> and <span class="code">22</span>, respectively). | |||
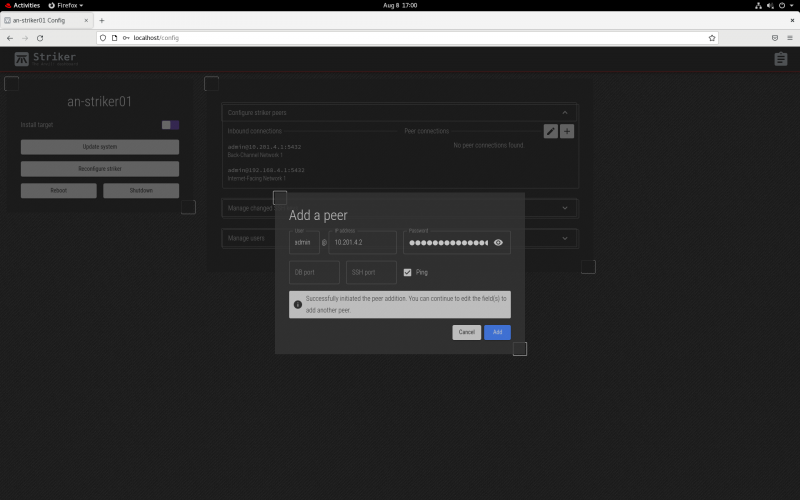
[[image:an-striker01-rhel8-m3-peering-07.png|thumb|center|800px|Save the job.]] | |||
Once filled out, click '''Add''' and the job to peer will be saved. Give it a minute or two, and the peering should be complete. | |||
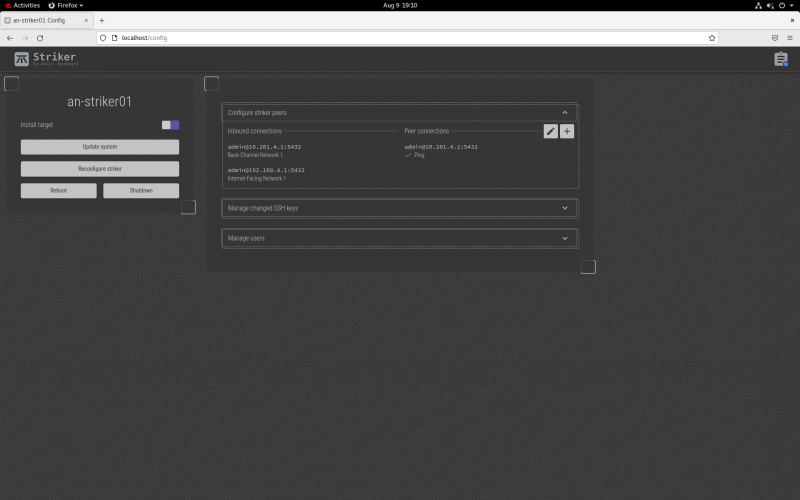
[[image:an-striker01-rhel8-m3-peering-08.png|thumb|center|800px|The peer Striker is now displayed.]] | |||
After a couple minutes, you will see the peer striker appear in the list. At this point, the two Strikers now operate as one. Should one ever fail, the other can be used in its place. | |||
= Configuring the First Node = | |||
An Anvil! node is a pair of subnodes acting as one machine, providing full redundancy to hosted servers. | |||
The process of configuring a node is; | |||
1. Initialize each subnode | |||
2. Configure backing UPSes/PDUs | |||
3. Create an "Install Manifest" | |||
4. Run the Manifest | |||
== Initializing Subnodes == | |||
To initialize a node (or DR host), we need to enter it's current IP address and current <span class="code">root</span> password. This is used to allow striker to log into it and update the subnode's configuration to use the databases on the Striker dashboards. Once this is done, all further interaction with the subnodes will be via the database. | |||
[[image:an-striker01-rhel8-m3-initialize-subnode-01.png|thumb|center|259px|Striker Menu -> Anvil]] | |||
Click on the '''Striker''' logo to open the menu, and then click on '''Anvil'''. | |||
{{note|1=There are two options below, '''Node''' and '''Disaster Recovery (DR) Host'''. We're working on creating an Anvil! node, which is a matched pair of subnodes, so we'll select that. We'll look at DR hosts later.}} | |||
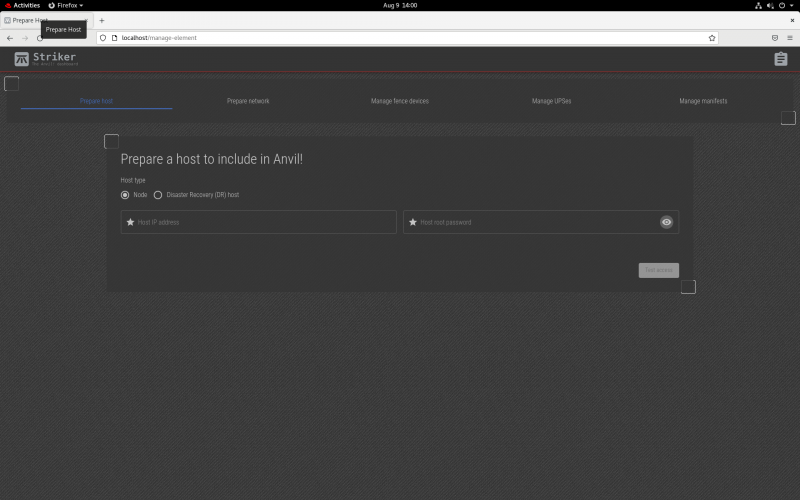
[[image:an-striker01-rhel8-m3-initialize-subnode-02.png|thumb|center|800px|"Prepare a host" menu.]] | |||
We're initializing a subnode, so click on '''Node'''. | |||
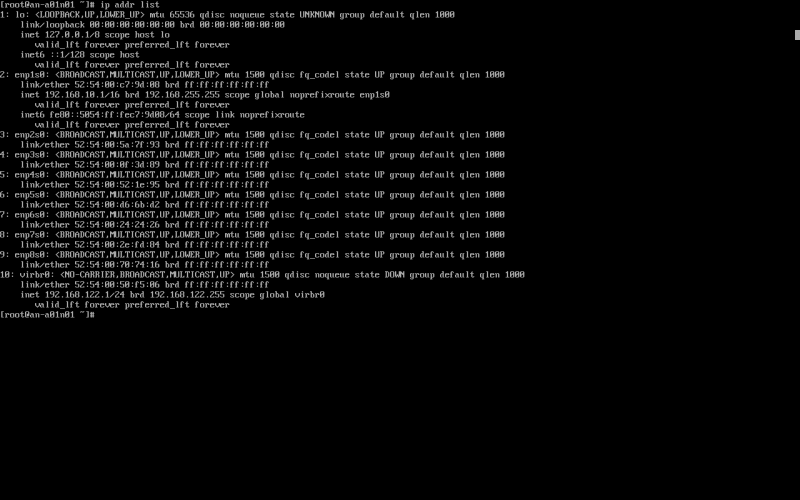
[[image:an-striker01-rhel8-m3-initialize-subnode-03.png|thumb|center|800px|Showing the IP assigned to the freshly installed subnode.]] | |||
The IP address is the one that you assigned during the initial install of the OS on the subnode. If you left it as DHCP, you can check to see what the IP address is using the <span class="code">ip addr list</span> command on the target subnode. In the example above, we see the IP is set to <span class="code">192.168.10.1</span>. | |||
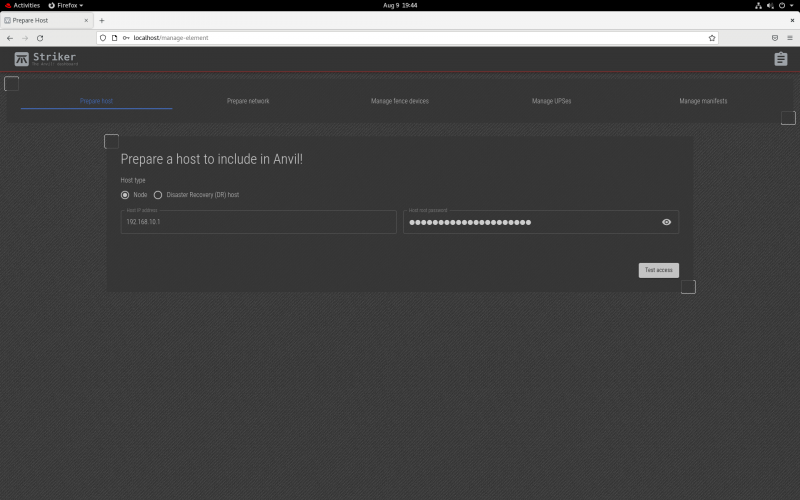
[[image:an-striker01-rhel8-m3-initialize-subnode-04.png|thumb|center|800px|Preparing the subnode for initialization.]] | |||
Enter the IP address and password, and then click '''Test Access'''. | |||
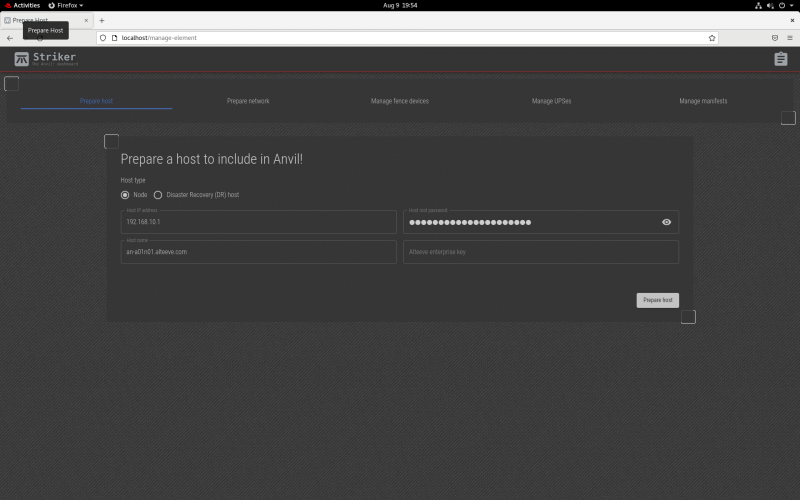
[[image:an-striker01-rhel8-m3-initialize-subnode-05.png|thumb|center|800px|Subnode access confirmed.]] | |||
In this example, the existing hostname is, <span class="code">an-a01n01.alteeve.com</span> which helps to confirm that we connected to node 1's first subnode. If you have an enterprise support key, enter it in this form. In our example, we'll be using the Alteeve community repo. | |||
We're happy with this, click on '''Prepare Host'''. | |||
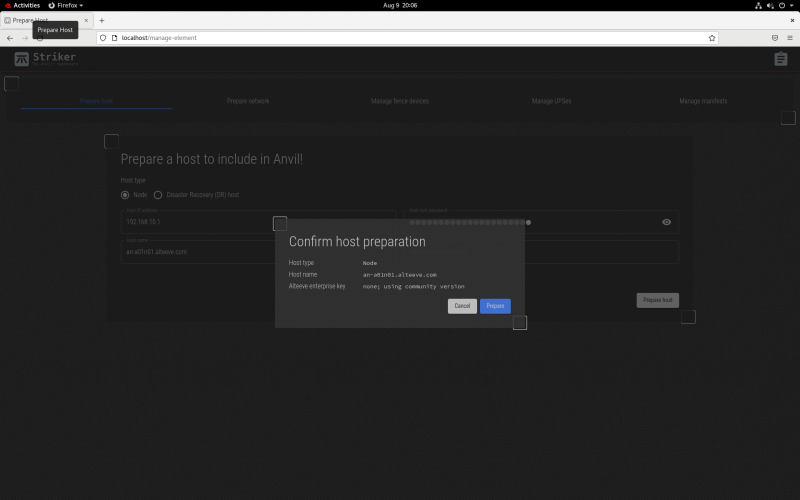
[[image:an-striker01-rhel8-m3-initialize-subnode-06.png|thumb|center|800px|Subnode initialization confirmation screen.]] | |||
The plan to initialize is present, if you're happy, click on '''Prepare'''. The job will be saved, and you can then repeat until your subnodes are initialized. | |||
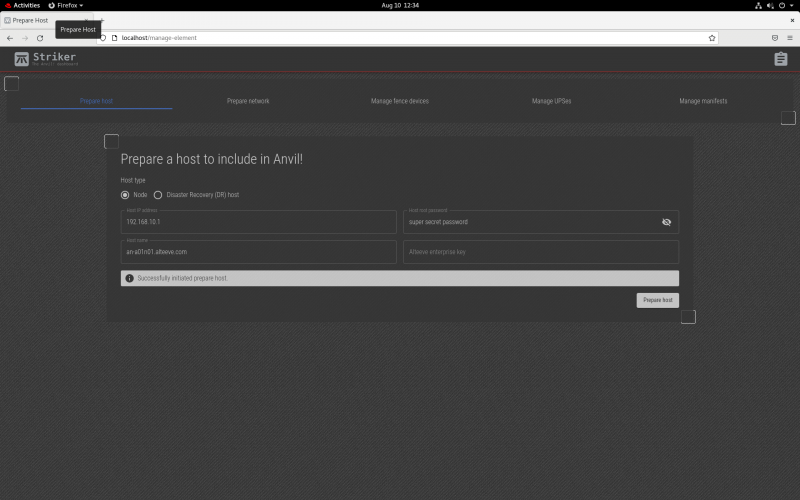
[[image:an-striker01-rhel8-m3-initialize-subnode-07.png|thumb|center|800px|Subnode initialization job saved.]] | |||
You'll see that the job has been saved! | |||
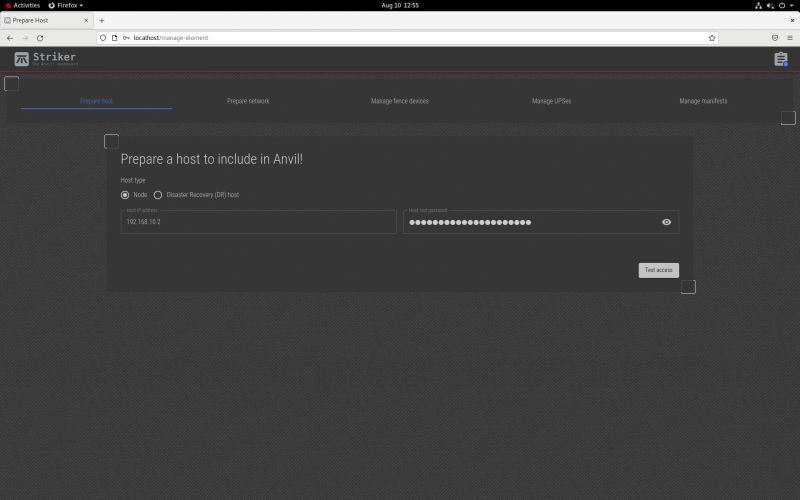
[[image:an-striker01-rhel8-m3-initialize-subnode-08.png|thumb|center|800px|Initialization another subnode.]] | |||
To initialize a new subnode, just change the <span class="code">Host IP Address</span> to the next IP, and the form will revert to test the new connection. | |||
From there, you proceed as you did above. | |||
== Mapping Configuration == | |||
{{note|1=In the examples below, you will see <span class="code">an-a01dr01</span>. This is a DR node that will be discussed later in the tutorial.}} | |||
With the two subnodes initialized, we can now configure their networks! | |||
Subnodes must used redundant (specifically, <span class="code">active-passive</span> bonds). They must have a network connections in the Back-Channel, Internet-Facing and Storage Networks. In our example here, we're going to also create a connection in the Migration Network as wel, as we've got 8 interfaces to work with. | |||
[[image:an-striker01-rhel8-m3-mapping-node-network-01.png|thumb|center|800px|Prepare Network menu]] | |||
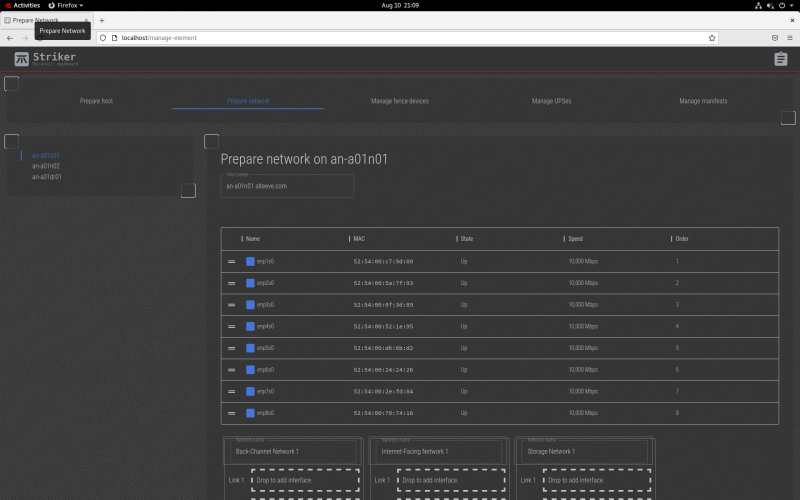
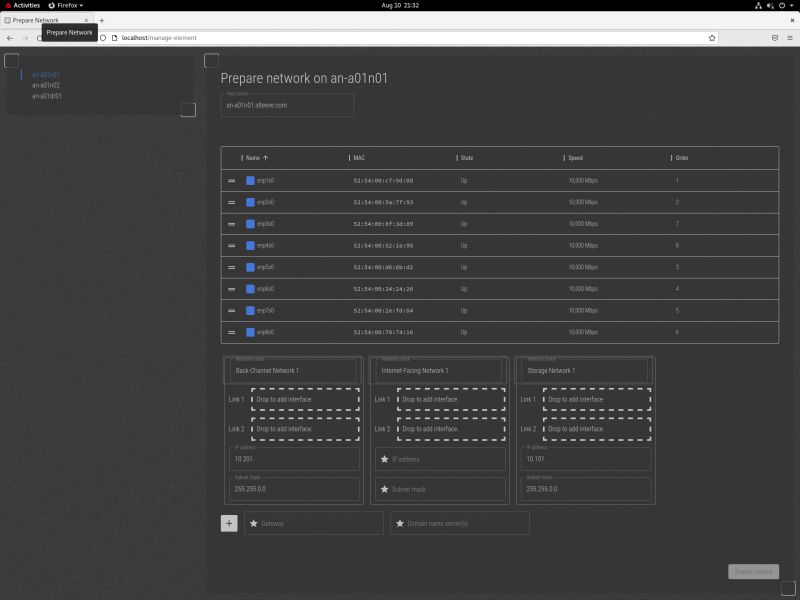
With our subnodes initialized, we can now click on '''Prepare Network'''. This opens up a list of subnodes and DR hosts that are unconfigured. In our case, there are three unconfigured hosts; <span class="code">an-a01n01</span>, <span class="code">an-a01n02</span> and the DR host <span class="code">an-a01dr01</span>. The subnode <span class="code">an-a01n01</span> is already selected, so we'll begin with it. | |||
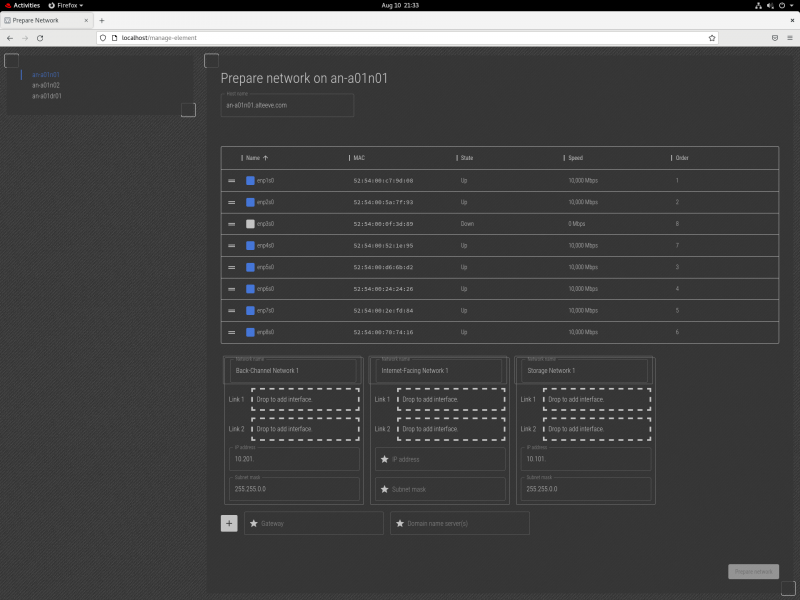
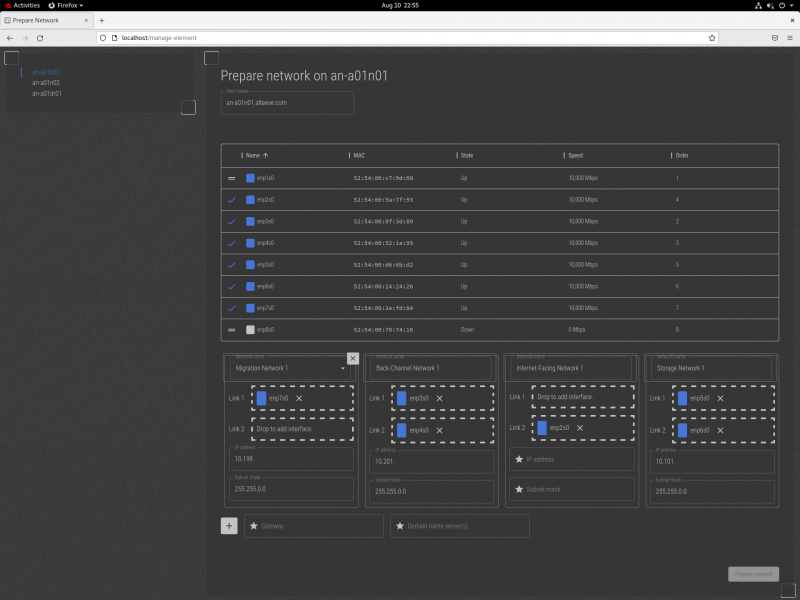
[[image:an-striker01-rhel8-m3-mapping-node-network-02.png|thumb|center|800px|List of network interfaces on 'an-a01n01'.]] | |||
This works the same way as how we configured the Striker, except for two things. First, and most obvious, there are a lot more interfaces to work with. | |||
{{todo|1=The ordering should show you which interface most recently link cycled, allowing the user to see which interface cycled during loss of connection. See github [https://github.com/ClusterLabs/anvil/issues/424 issue #424].}} | |||
Second, and more importantly, when we unplug the cable that the Striker dashboard is using to talk to the node, we will lose communication for a while. If that happens, you will not see the interface go '''down'''. When this happens, plug the interface back in, and move on to the next interface. When you're done mapping the network, only one interface and one slot will be left. | |||
Knowing this, if you want to unplug and plug in all interfaces in a known order (ie, "BCN1 - Link 1", "BCN 1 - Link 2", "IFN 1 - Link 1", "IFN 1 - Link 2" ... etc), you can do so, then return to the web interface and map the Order number to the order you cycled interfaces, and know which is which. | |||
For this tutorial though, we're going to plug cycle the interfaces one at a time. | |||
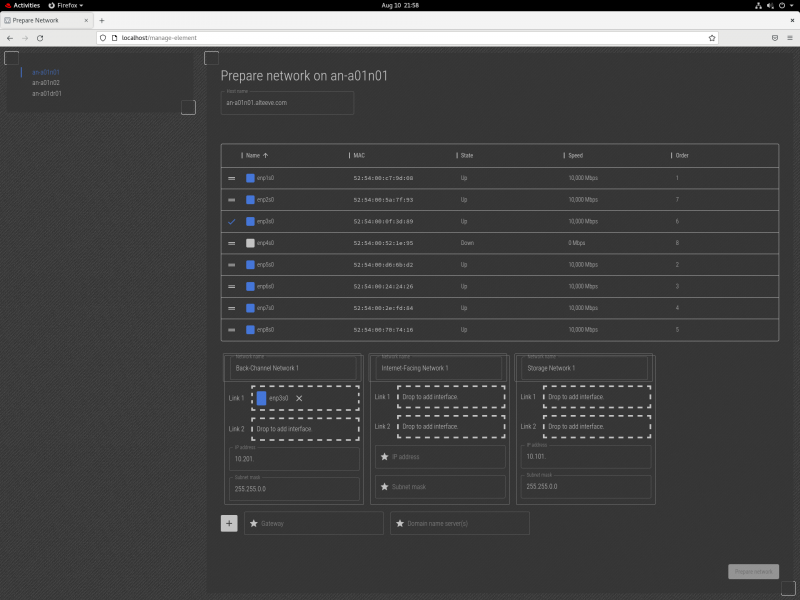
[[image:an-striker01-rhel8-m3-mapping-node-network-03.png|thumb|center|800px|The interface to set as "BCN 1 - Link 1" is unplugged.]] | |||
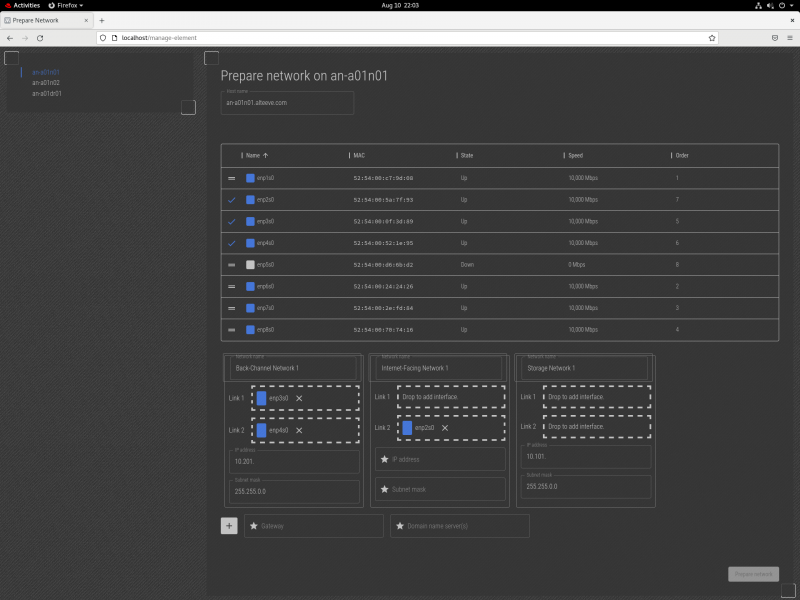
Lets start! Here, the network interface we want to make "BCN 1 - Link 1" is unplugged. With the cable unplugged, we can see that the <span class="code">enp3s0</span> interface is down. So we know that is the link we want. Click and drag it to the "Back-Channel Network 1" -> "Link 1" slot. | |||
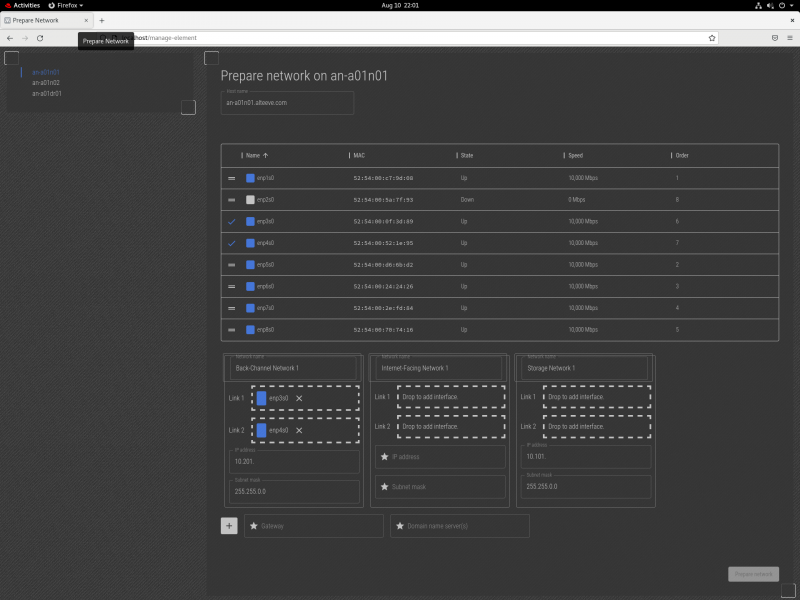
[[image:an-striker01-rhel8-m3-mapping-node-network-04.png|thumb|center|800px|The interface to set as "BCN 1 - Link 2" is unplugged.]] | |||
Next we see that <span class="code">enp4s0</span> is unplugged. So now we can drag that to the "Back-Channel Network 1" -> "Link 2" slot. | |||
[[image:an-striker01-rhel8-m3-mapping-node-network-05.png|thumb|center|800px|The interface to set as "IFN 1 - Link 2" is unplugged.]] | |||
Now, we ran into the issue mentioned above. When we unplugged the cable to the interface we want to make "Internet-Facing Network, Link 1", we lost connection to the subnode, and could not see the interface go offline. For now, we'll skip it, plug it back in, and unplug the interface we want to be "Internet-Facing Network, Link 2". | |||
Next we see that <span class="code">enp2s0</span> is unplugged. So now we can drag that to the "Internet-Facing Network 1" -> "Link 2" slot. | |||
[[image:an-striker01-rhel8-m3-mapping-node-network-06.png|thumb|center|800px|The interface to set as "SN 1 - Link 1" is unplugged.]] | |||
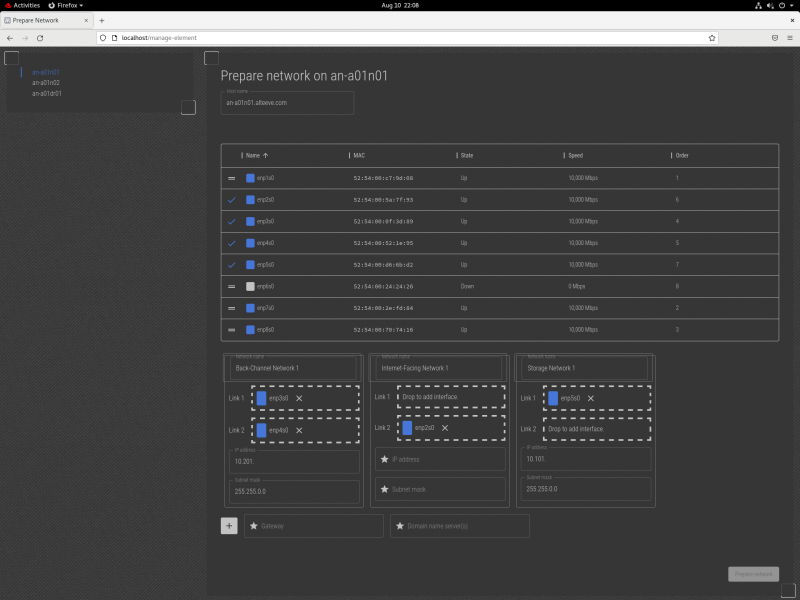
Next, we'll unplug the cable going to the network interface we want to use as "Storage Network, Link 1". We see that <span class="code">enp5s0</span> is down, so we'll drag that to the "Internet-Facing Network 1" -> "Link 1" slot. | |||
[[image:an-striker01-rhel8-m3-mapping-node-network-07.png|thumb|center|800px|The interface to set as "SN 1 - Link 2" is unplugged.]] | |||
Next, we'll unplug the cable going to the network interface we want to use as "Storage Network, Link 2". We see that <span class="code">enp6s0</span> is down, so we'll drag that to the "Internet-Facing Network 1" -> "Link 2" slot. | |||
{{Note|1=In the near future, the ''Migration Network'' panel will auto-display when 8+ interfaces exist.}} | |||
[[image:an-striker01-rhel8-m3-mapping-node-network-08.png|thumb|center|800px|Adding the "Migration Network" Menu.]] | |||
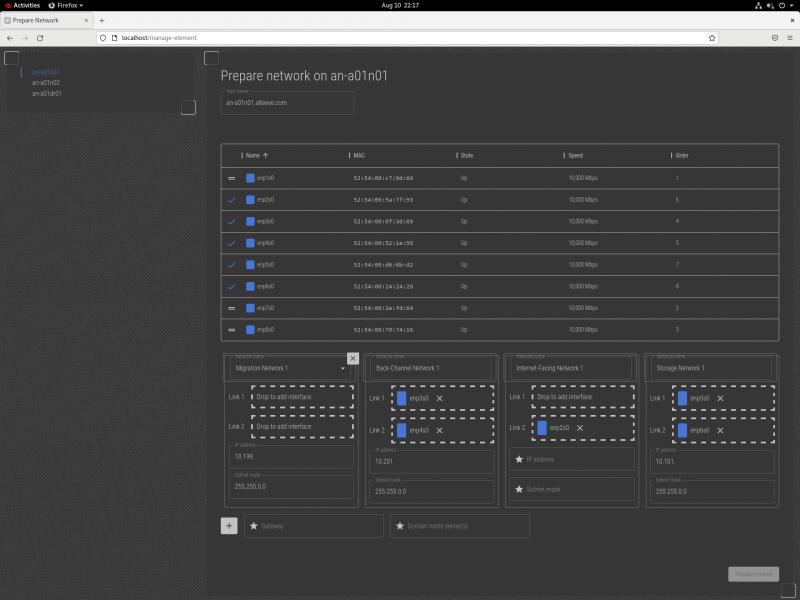
We need to add the "Migration Network" panel, and to do that, click on the "+" icon at the lower left. It will add the panel, and then click on the "Network Name" to select "Migration Network 1". | |||
[[image:an-striker01-rhel8-m3-mapping-node-network-09.png|thumb|center|800px|The interface to set as "MN 1 - Link 1" is unplugged.]] | |||
Now we can get back to mapping, and here we've unplugged the network cable going to the "Migration Network, Link 1" and we see <span class="code">enp7s0</span> is down. So we can drag that into the "Migration Network 1" -> "Link 1" slot. | |||
[[image:an-striker01-rhel8-m3-mapping-node-network-10.png|thumb|center|800px|The interface to set as "MN 1 - Link 2" is unplugged.]] | |||
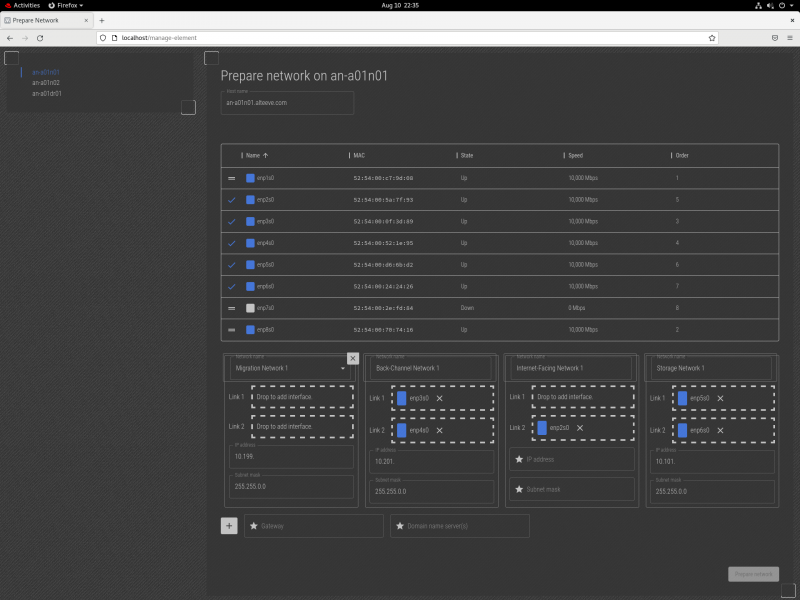
Lastly, we unplugged the network cable going to the "Migration Network, Link 2" and we see <span class="code">enp8s0</span> is down. So we can drag that into the "Migration Network 1" -> "Link 2" slot. | |||
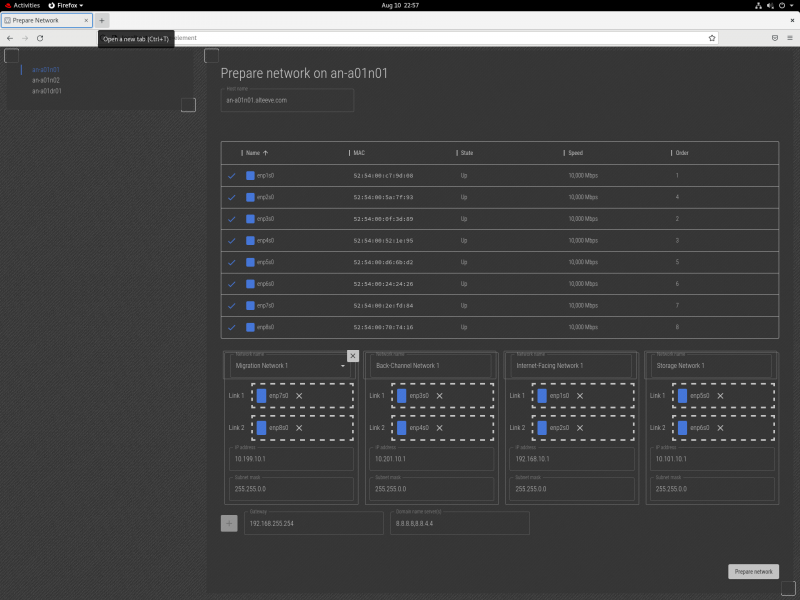
With that, the only interface still not mapped is <span class="code">ens1p0</span>, so we can confirm that it is the interface we couldn't map earlier, and so it can be dragged into the "Internet-Facing Network" -> "Link 1" slot. | |||
[[image:an-striker01-rhel8-m3-mapping-node-network-11.png|thumb|center|800px|All interfaces are mapped and IPs are assigned!]] | |||
The last step is to assign IP addresses. The subnet prefixes for all but the IFN are set, so you can add the IPs you want. Given this is Anvil! node 1, the IPs we want to set are: | |||
{| class="wikitable" style=" | {| class="wikitable" | ||
!style="white-space:nowrap; text-align:center;"|host | |||
!style="white-space:nowrap; text-align:center;"|Back-Channel Network 1 | |||
!style="white-space:nowrap; text-align:center;"|Internet-Facing Network 1 | |||
!style="white-space:nowrap; text-align:center;"|Storage Network 1 | |||
!style="white-space:nowrap; text-align:center;"|Migration Network 1 | |||
|- | |- | ||
! | !style="white-space:nowrap; text-align:left;"|<span class="code">an-a01n01</span> | ||
|style="white-space:nowrap; text-align:left;"|<span class="code">10.201.10.1/16</span> | |||
|style="white-space:nowrap; text-align:left;"|<span class="code">192.168.10.1/16</span> | |||
|style="white-space:nowrap; text-align:left;"|<span class="code">10.101.10.1/16</span> | |||
|style="white-space:nowrap; text-align:left;"|<span class="code">10.199.10.1/16</span> | |||
|- | |- | ||
| | !style="white-space:nowrap; text-align:left;"|<span class="code">an-a01n02</span> | ||
|style="white-space:nowrap; text-align:left;"|<span class="code">10.201.10.2/16</span> | |||
|style="white-space:nowrap; text-align:left;"|<span class="code">192.168.10.2/16</span> | |||
|style="white-space:nowrap; text-align:left;"|<span class="code">10.101.10.2/16</span> | |||
|style="white-space:nowrap; text-align:left;"|<span class="code">10.199.10.2/16</span> | |||
|- | |- | ||
| | !style="white-space:nowrap; text-align:left;"|<span class="code">an-a01dr01</span> | ||
|style="white-space:nowrap; text-align:left;"|<span class="code">10.201.10.3/16</span> | |||
|style="white-space:nowrap; text-align:left;"|<span class="code">192.168.10.3/16</span> | |||
|style="white-space:nowrap; text-align:left;"|<span class="code">10.101.10.3/16</span> | |||
|style="white-space:nowrap; text-align:left;"|<span class="code">n/a</span> | |||
|} | |} | ||
If you | {{note|1=You don't need to specify which network is the default gateway. The IP you enter will be matched against the IP and subnet masks automatically to determine which network the gateway belongs to.}} | ||
{{note|1=You can specify multiple DNS servers using a comma to separate them, like <span class="code">8.8.8.8,8.8.4.4</span>. The order they're written will become the order they're searched.}} | |||
[[image:an-striker01-rhel8-m3-mapping-node-network-12.png|thumb|center|800px|Ready to configure.]] | |||
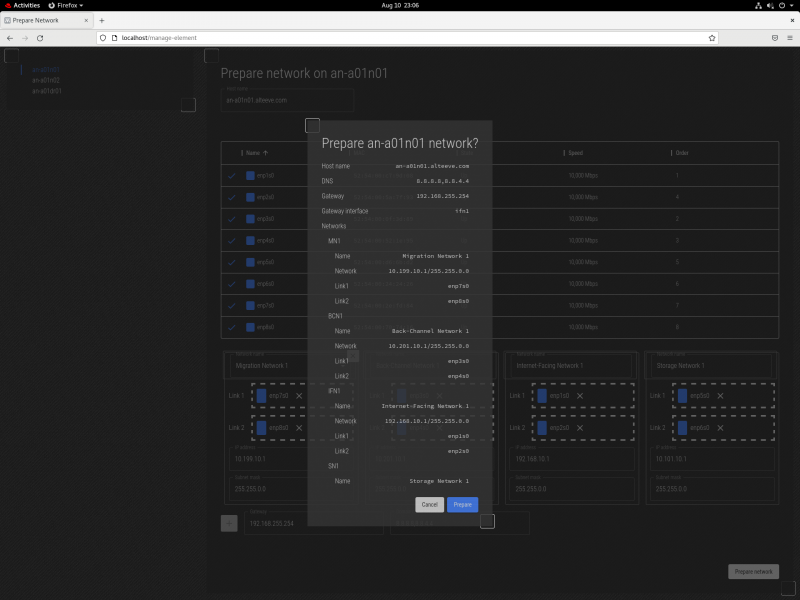
Double-check everything, and when you're happy, click on '''Prepare Network'''. You will be given a summary of what will be done. | |||
[[image:an-striker01-rhel8-m3-mapping-node-network-13.png|thumb|center|800px|Confirm and configure!]] | |||
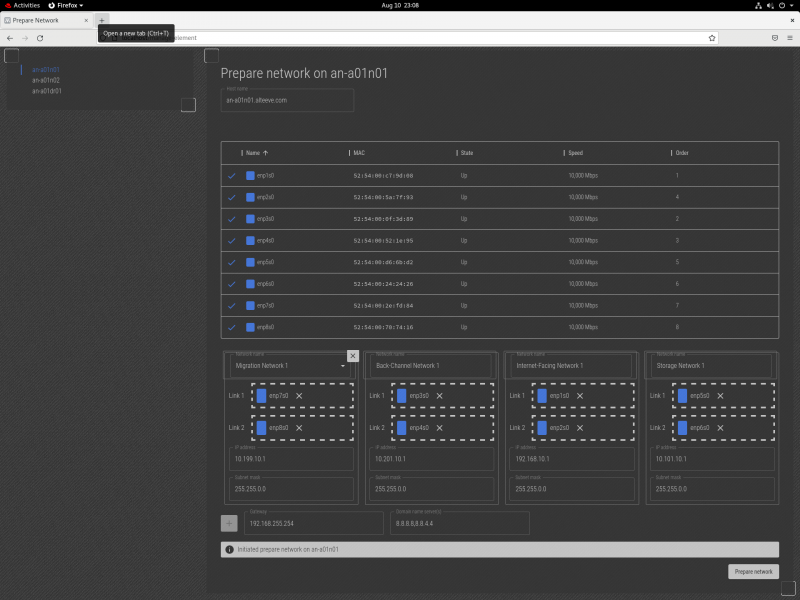
After a few moments, you should see the mapped machine, <span class="code">an-a01n01</span> in this case, reboot. | |||
[[image:an-striker01-rhel8-m3-mapping-node-network-14.png|thumb|center|800px|Confirming the new network config on 'an-a01n01'.]] | |||
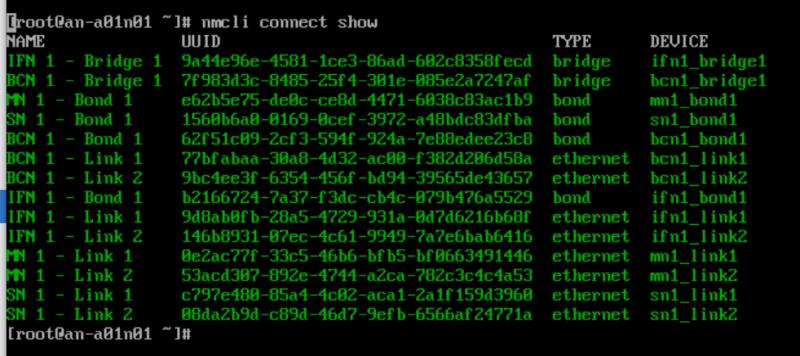
You do not need to log into it or do anything else at this point. If you're curious or want to confirm though, you can log into <span class="code">an-a01n01</span> and run either <span class="code">nmcli connection show</span> (as seen above) or <span class="code">ip addr list</span> to see the new configuration. | |||
{{note|1=Map the network on the other subnode(s) and DR host(s). Once all are mapped, we're ready to move on!}} | |||
== Adding Fence Devices == | |||
Before we begin, lets review why fence devices are so important. Here's an article talking about fencing and why it's important; | |||
* [[Fencing]] | |||
If you've working with High-Availability Clusters before, you may have heard that you need to have a third "[[quorum]]" node for vote tie breaking. We humbly argue this is wrong, and explain why here; | |||
* [[The 2-Node Myth]] | |||
In our example Anvil! cluster, the subnodes have [[IPMI]] [[BMC]]s, and those will be the primary fence method. IPMI are special in that the Anvil! cluster can auto-detect and auto-configure BMCs. So even though we're going to configure fence devices here, we do '''not''' need to configure them manually. | |||
So our secondary method of fencing is using APC branded [[PDU]]s. These are basically smart power bars which, via a network connection, can be logged into and have individual outlets (ports) powered down or up on command. So, if for some reason the IPMI fence failed, the backup would be to log into a pair of PDUs (one per [[PSU]] on the target subnode) and cut the power. This way, we can sever all power to the target node, forcing it off. | |||
{{warning|1=PDUs do not have a mechanism for confirming that down-stream devices are off. So it's critical that the subnodes are actually plugged into the given PDU and outlet that we configure them to be on!}} | |||
At this point, we're not going to configure nodes and ports. The purpose of this stage of the configuration is simply to define which PDUs exist. So lets add a pair. | |||
We're going to be configuring a pair of [[APC]] [[AP7900B]] PDUs. | |||
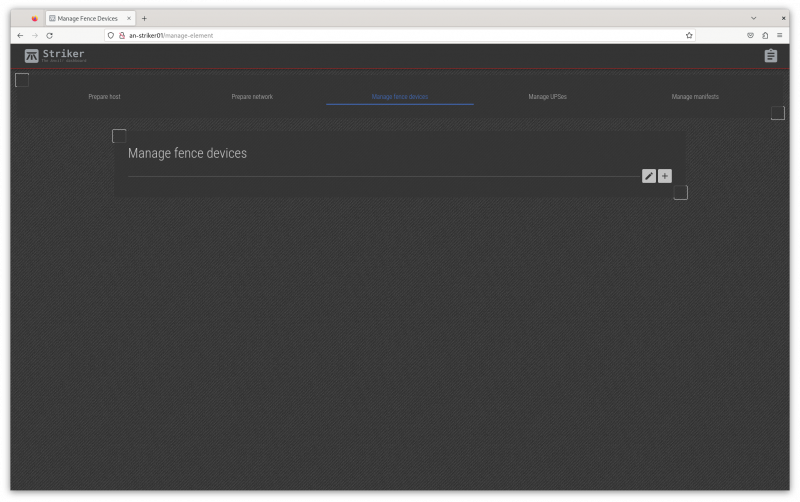
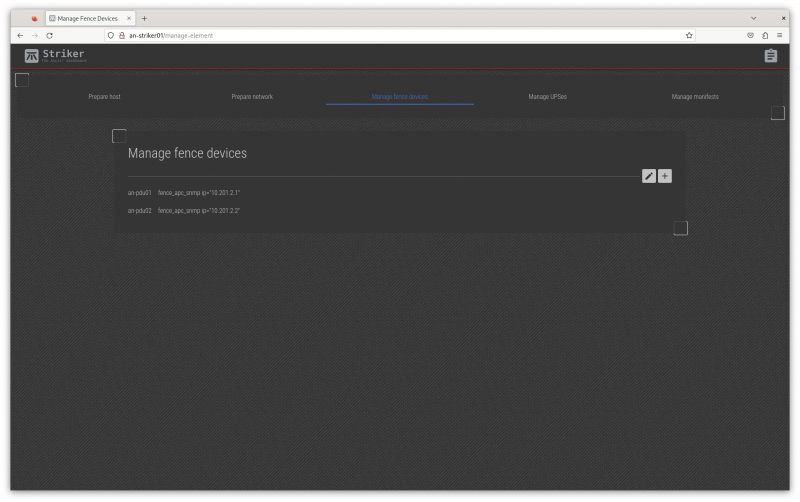
[[image:an-striker01-rhel8-m3-fence-setup-01.png|thumb|center|800px|The Fence device page.]] | |||
Clicking on the '''Manage Fence Devices''' section of the top bar will open the Fence menu. | |||
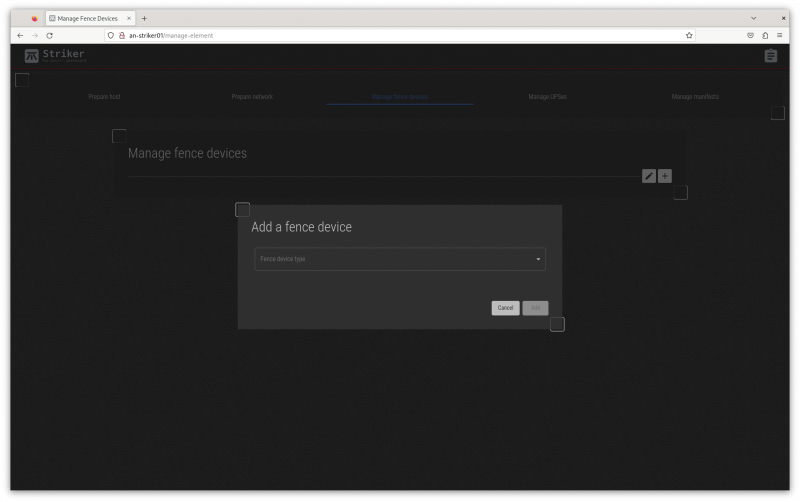
[[image:an-striker01-rhel8-m3-fence-setup-02.png|thumb|center|800px|The new fence device menu.]] | |||
Click on the '''+''' icon on the right to open the new fence device menu. | |||
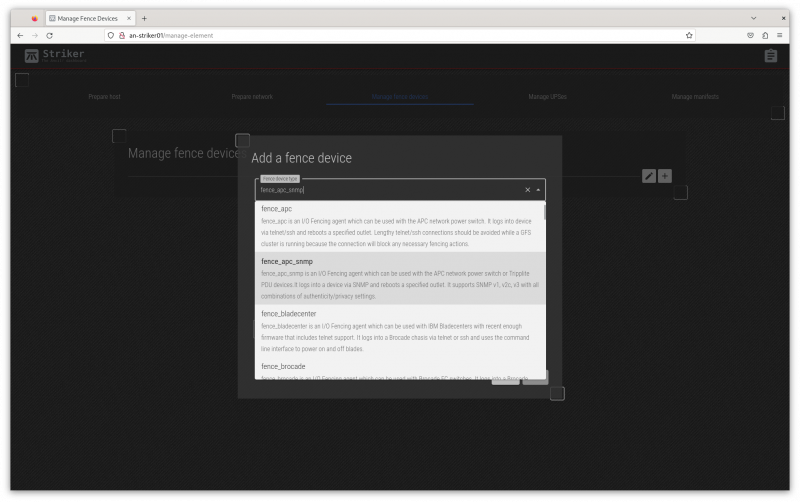
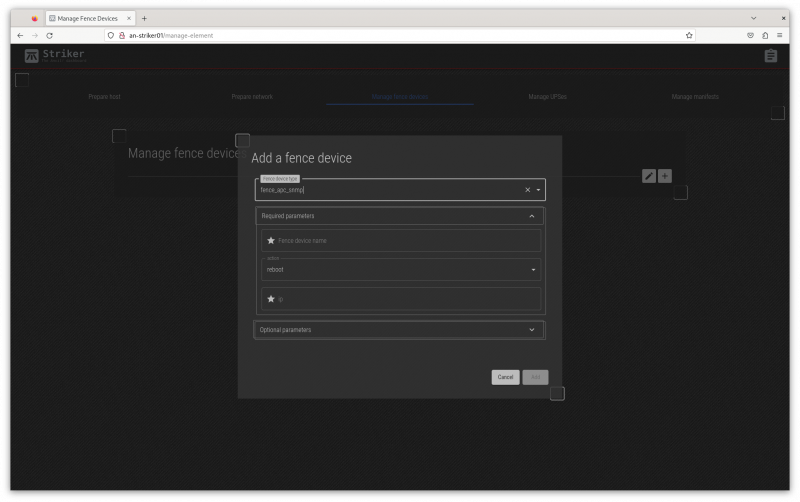
{| class="wikitable" style=" | [[image:an-striker01-rhel8-m3-fence-setup-04.png|thumb|center|800px|The <span class="code">fence_apc_snmp</span> option.]] | ||
{{note|1=There are two fence agents for APC PDUs. Be sure to select '<span class="code">scan_apc_snmp</span>'!}} | |||
[[image:an-striker01-rhel8-m3-fence-setup-03.png|thumb|center|800px|The <span class="code">fence_apc_snmp</span> parameter menu.]] | |||
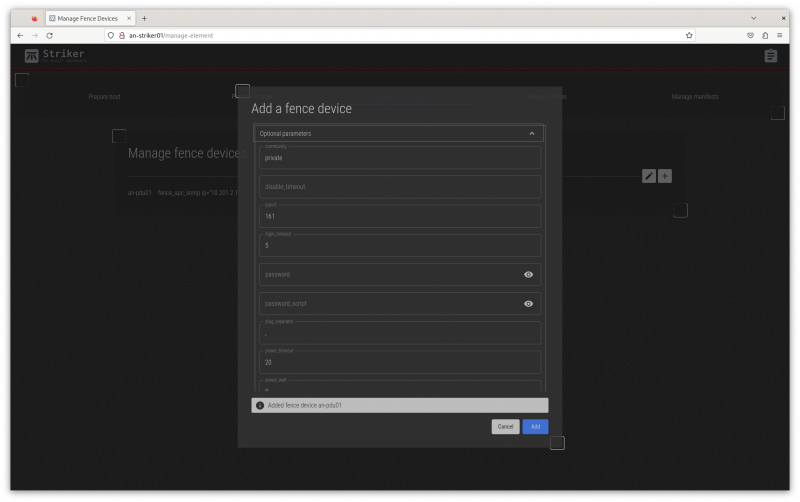
Every fence agent has a series of parameters that are required, and some that are optional. The required fields are displayed first, and the optional fields can be displayed by clicking on '''Optional Parameters''' to expand the list of those parameters. | |||
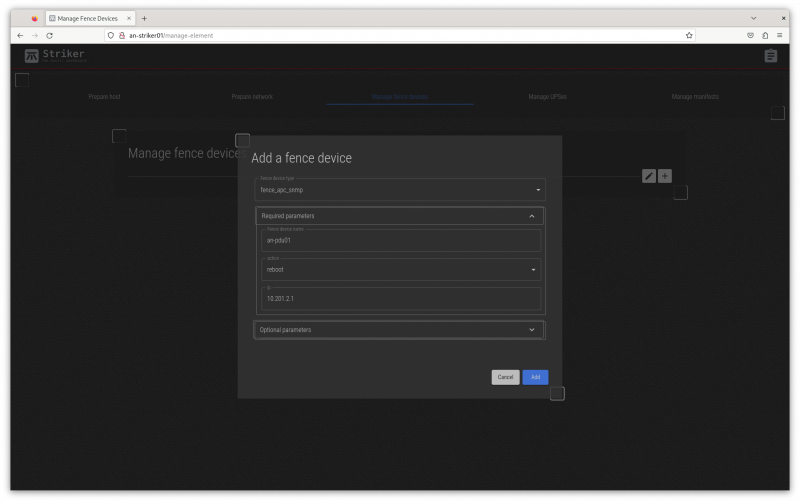
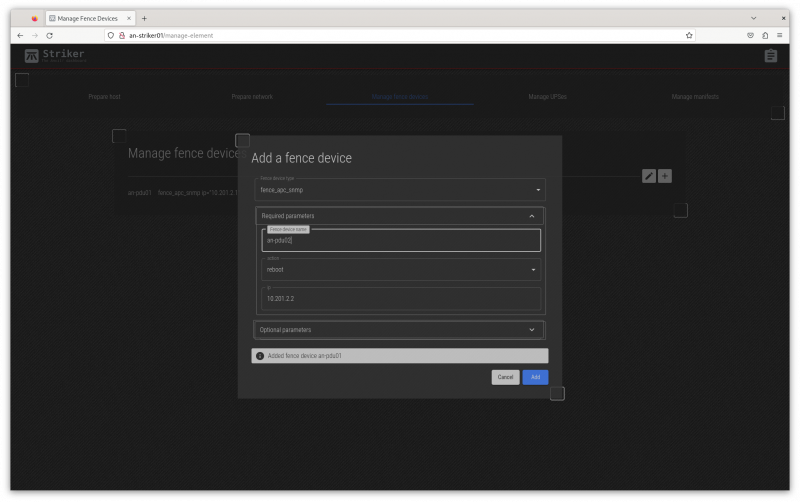
[[image:an-striker01-rhel8-m3-fence-setup-05.png|thumb|center|800px|Required parameters set.]] | |||
In our example, we'll first add ''<span class="code">an-pdu01</span>'' as the name, we will leave ''<span class="code">action</span>'' as <span class="code">reboot</span>, and we'll set the IP address to <span class="code">10.201.2.1</span>. | |||
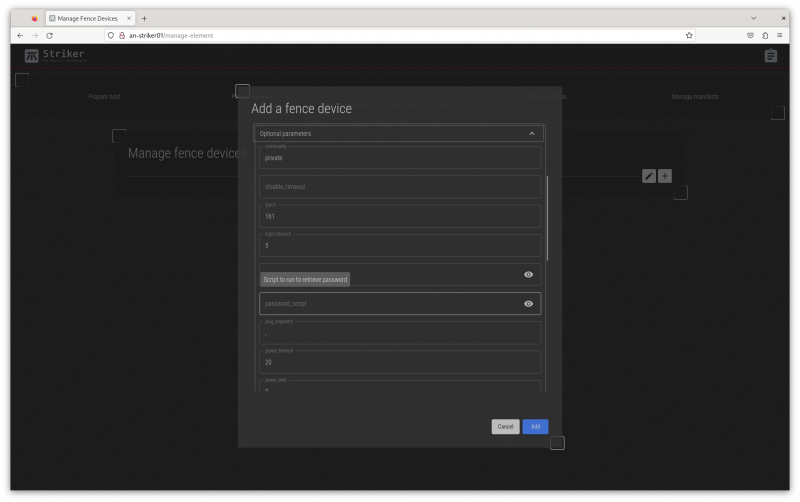
[[image:an-striker01-rhel8-m3-fence-setup-06.png|thumb|center|800px|Showing some of the optional parameters.]] | |||
We do not need to set any of the optional parameters, but above we show what the menu looks like. Note how mousing over a field will display it's help (as provided by the fence agent itself). | |||
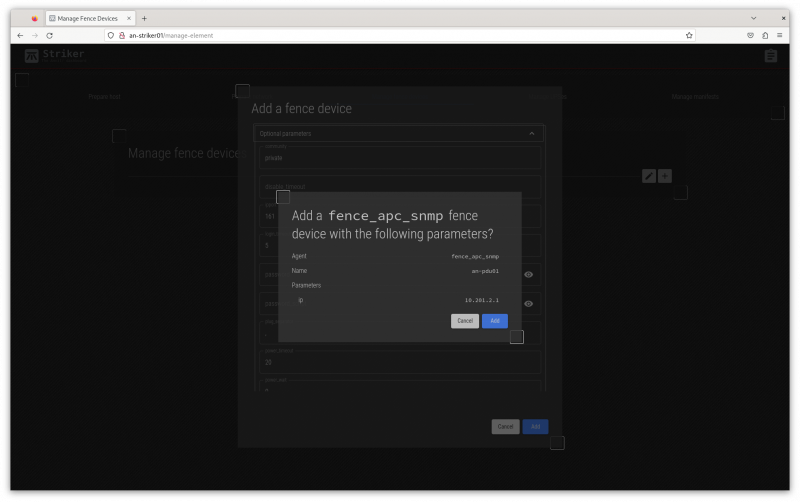
[[image:an-striker01-rhel8-m3-fence-setup-07.png|thumb|center|800px|Showing the summary.]] | |||
Click on '''Add''' and the summary of what you entered. Check it over, and if you're happy, click on '''Add''' to save it. | |||
[[image:an-striker01-rhel8-m3-fence-setup-08.png|thumb|center|800px|The new fence device has been saved.]] | |||
The new device is saved! | |||
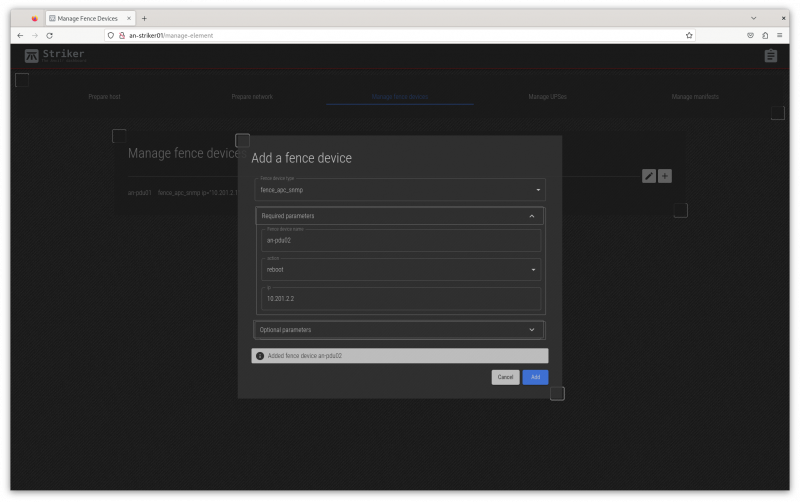
[[image:an-striker01-rhel8-m3-fence-setup-09.png|thumb|center|800px|Updating the field for <span class="code">an-pdu02</span>.]] | |||
Go back up and change the name and IP, and we can save the second PDU. | |||
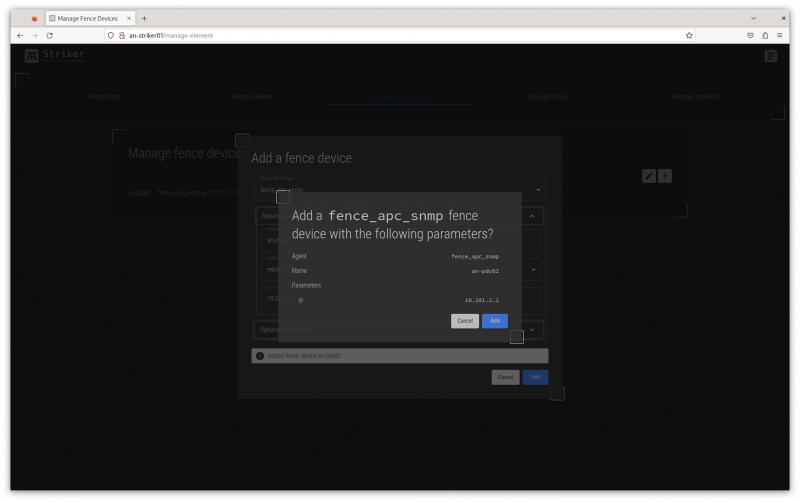
[[image:an-striker01-rhel8-m3-fence-setup-10.png|thumb|center|800px|Confirming the new <span class="code">an-pdu02</span> parameters.]] | |||
As before, review and confirm the new values are correct. | |||
[[image:an-striker01-rhel8-m3-fence-setup-11.png|thumb|center|800px|Saving the new <span class="code">an-pdu02</span> fence device.]] | |||
And saved! Now click ''Cancel'' to close the menu. | |||
[[image:an-striker01-rhel8-m3-fence-setup-12.png|thumb|center|800px|The two new fence devices are now visible.]] | |||
Now we can see the two new fence devices that we added! | |||
== Adding UPSes == | |||
The UPSes provide emergency power in the case mains power is lost. As important though, Scancore uses the power status to monitor for power problems before they turn to power outages. | |||
We're going to be configuring a pair of [[APC]] [[SMT1500RM2U]] UPSes. | |||
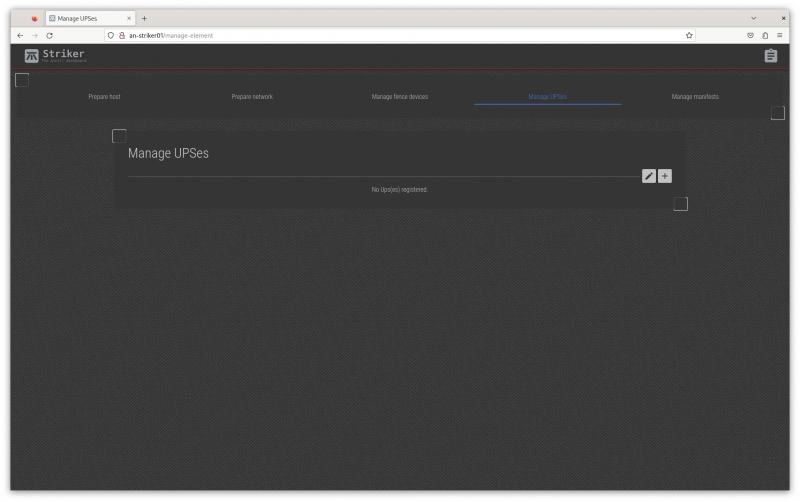
[[image:an-striker01-rhel8-m3-ups-setup-01.png|thumb|center|800px|The "Manage UPSes" page.]] | |||
Clicking on the '''Manage UPSes''' tab brings up the UPSes menu. | |||
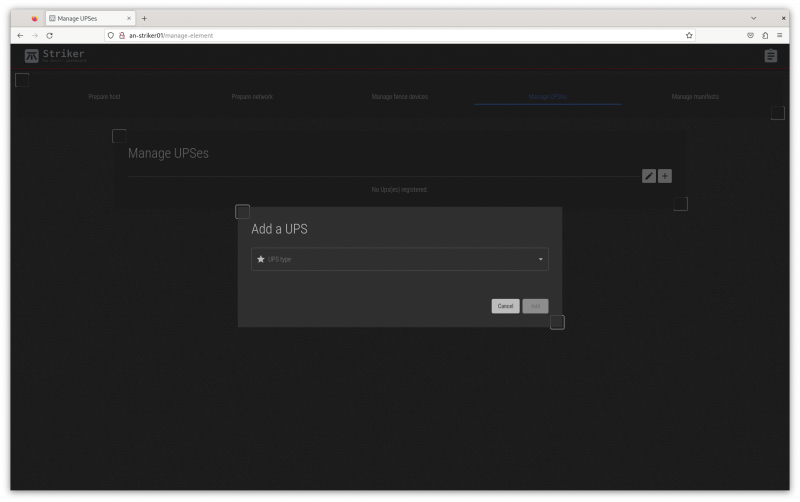
[[image:an-striker01-rhel8-m3-ups-setup-02.png|thumb|center|800px|The new UPS type select option.]] | |||
Click on '''+''' to add a new UPS. | |||
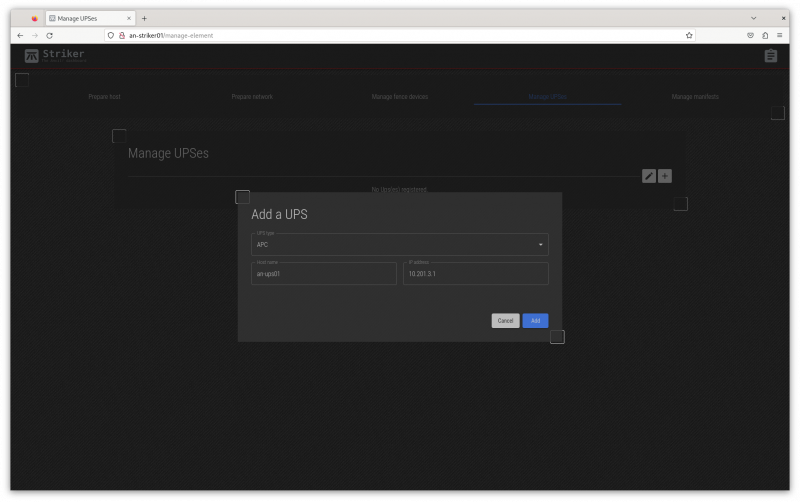
[[image:an-striker01-rhel8-m3-ups-setup-03.png|thumb|center|800px|Adding a new APC UPS.]] | |||
{{note|1=At this time, only APC brand UPSes are supported. If you would like a certain brand to be supported, please [[contact us]] and we'll try to add support.}} | |||
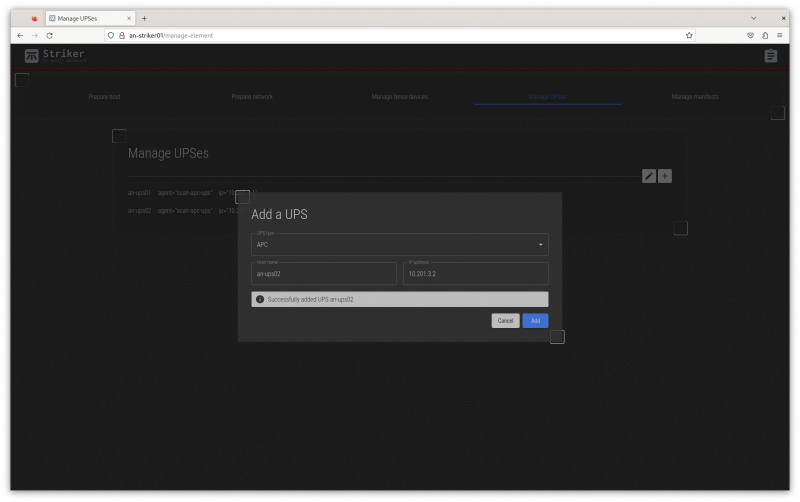
Select the ''APC'' and then enter the name and IP address. For our first UPS, we'll use the name <span class="code">an-ups01</span> and the IP address <span class="code">10.201.3.1</span>. | |||
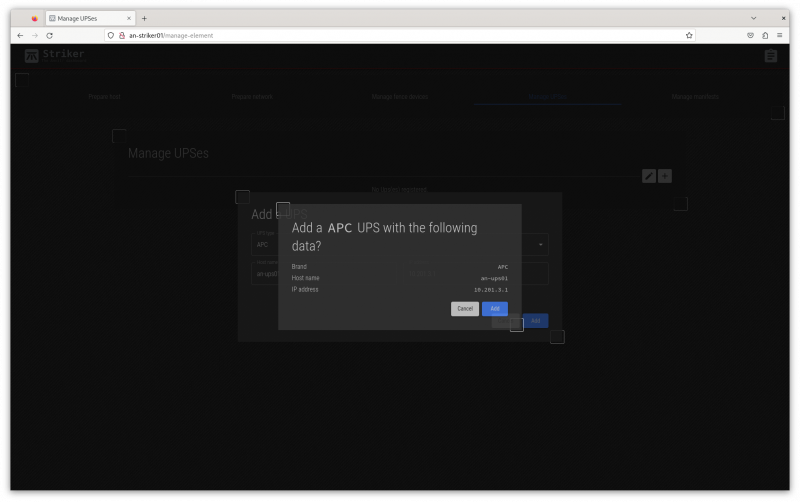
[[image:an-striker01-rhel8-m3-ups-setup-04.png|thumb|center|800px|Confirming the new UPS.]] | |||
Click on ''Add'' and confirm that what you entered it accurate. | |||
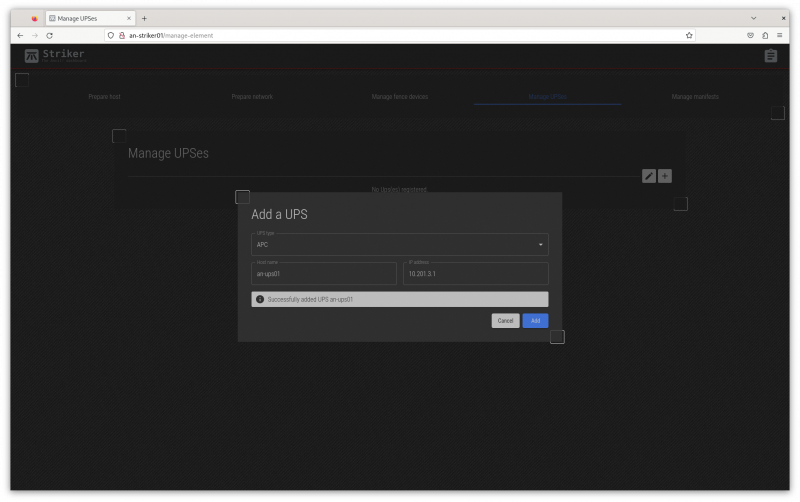
[[image:an-striker01-rhel8-m3-ups-setup-05.png|thumb|center|800px|Saving the new UPS.]] | |||
Click on ''Add'' again to save the new UPS. | |||
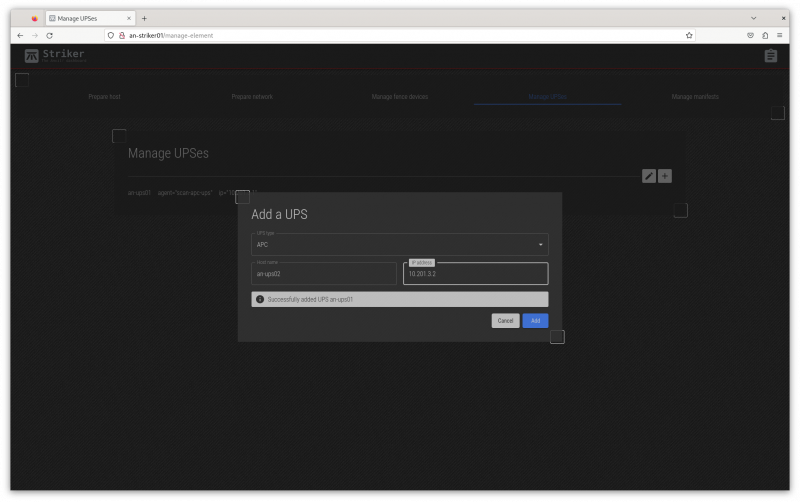
[[image:an-striker01-rhel8-m3-ups-setup-06.png|thumb|center|800px|Updating the form for the second UPS.]] | |||
Edit the name and IP for the second UPS. | |||
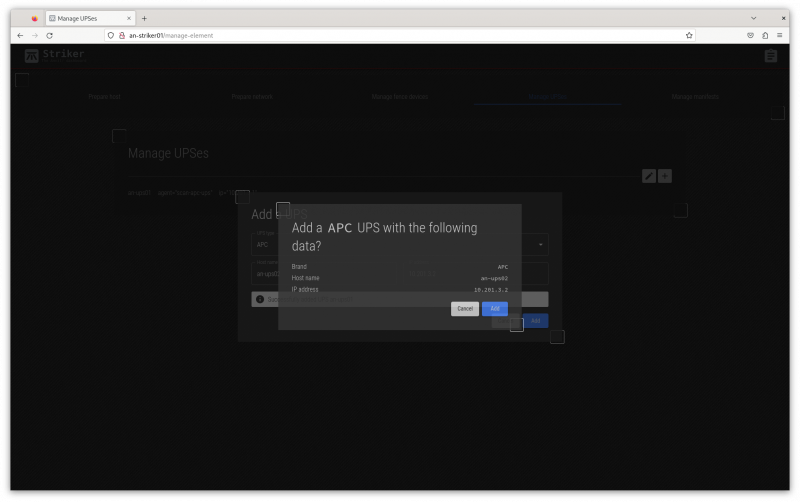
[[image:an-striker01-rhel8-m3-ups-setup-07.png|thumb|center|800px|Confirm the second UPS.]] | |||
Confirm the data for the second UPS is accurate, the click ''Add'' again to save. | |||
[[image:an-striker01-rhel8-m3-ups-setup-08.png|thumb|center|800px|The second UPS is saved.]] | |||
The second UPS has been saved! | |||
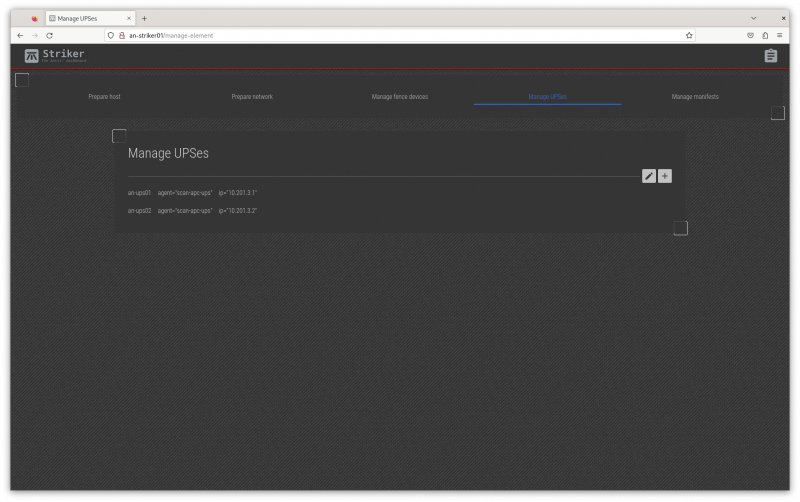
[[image:an-striker01-rhel8-m3-ups-setup-09.png|thumb|center|800px|The UPSes are now recorded.]] | |||
Press ''Cancel'' to close the form and you will see your new UPSes! | |||
== Creating an 'Install Manifest' == | |||
Before we start, we need to discuss what an "Install Manifest" is. | |||
In the simplest form, an Install Manifest is a "recipe" that defines how a node is to be configured. It links specific machines to be subnodes, sets their host names and IPs, and links subnodes to fence devices and UPSes. | |||
So lets start. | |||
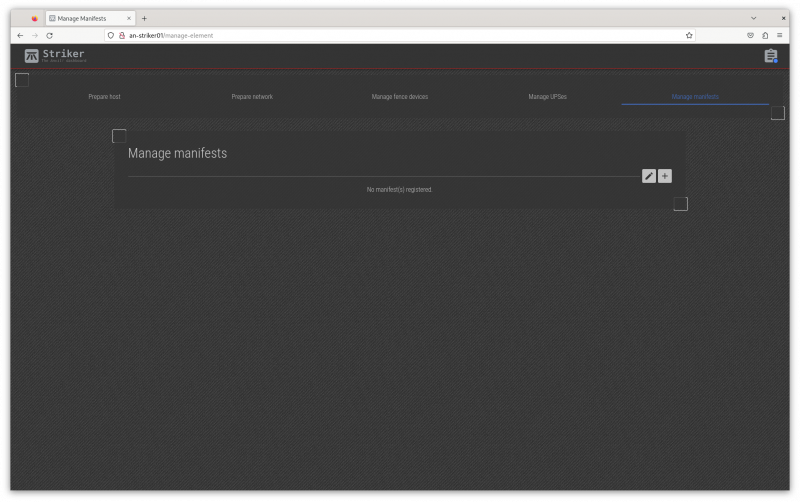
[[image:an-striker01-rhel8-m3-create-install-manifest-01.png|thumb|center|800px|The "Install Manifest" tab.]] | |||
Click on the "Install Manifest" tab to open the manifest menu. | |||
[[image:an-striker01-rhel8-m3-create-install-manifest-02.png|thumb|center|800px|The "Install Manifest" menu.]] | |||
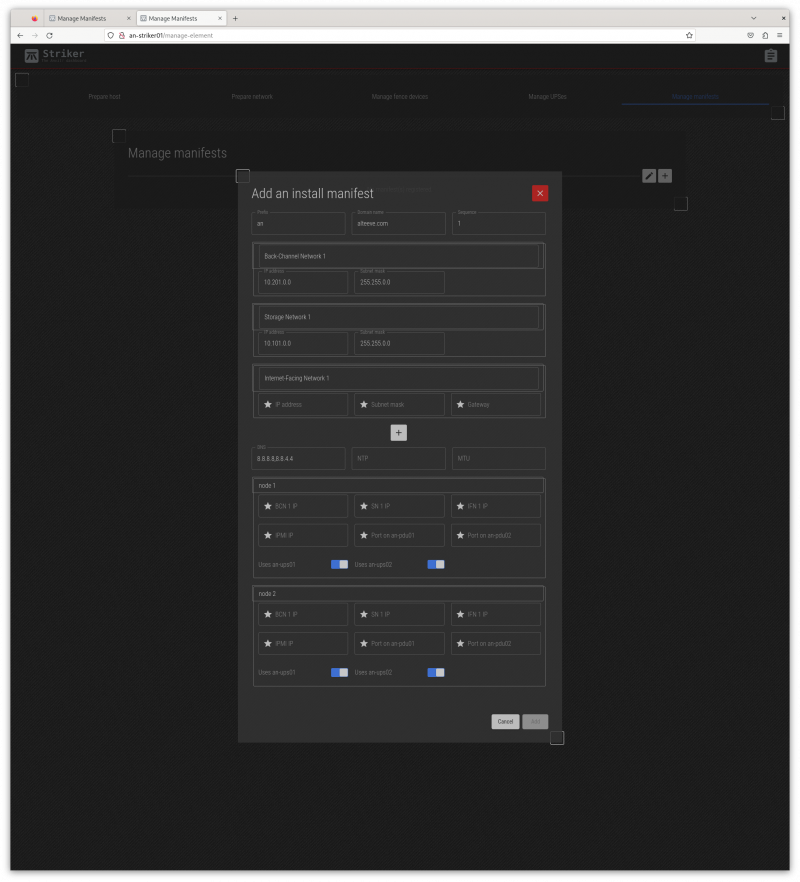
The manifest menu has several fields. Lets look at them; | |||
Fields; | |||
{| class="wikitable" | |||
!style="white-space:nowrap; text-align:left;"|Prefix | |||
|This is a prefix, 1 to 5 characters long, used to identify where the node will be used. It's a short, descriptive string attached to the start of short host names. | |||
|- | |||
!style="white-space:nowrap; text-align:left;"|Domain Name | |||
|This is the domain name used to describe the owner / operator of the node. | |||
|- | |||
!style="white-space:nowrap; text-align:left;"|Sequence | |||
|Starting at '1', this indicated the node's sequence number. This will be used to determine the IP addresses assigned to the subnodes. See [[Anvil! Networking]] for how this works in detail. | |||
|- | |||
!style="white-space:nowrap; text-align:left;"|Networks Group | |||
|The first three network fields define the subnets, and are not where actual IPs are assigned. Below the default three networks is a '''+''' button to add additional networks. | |||
|- | |||
!style="white-space:nowrap; text-align:left;"|DNS | |||
|This is where the DNS IP(s) can be assigned. You can specify multiple by using a comma-separated list, with no spaces. (ie: <span class="code">8.8.8.8,8.8.4.4</span>). | |||
|- | |||
!style="white-space:nowrap; text-align:left;"|NTP | |||
|If you run your own [[NTP]] server, particularly if you restrict access to outside time servers, define your NTP servers here, as a comma-separated list if there are multiple. | |||
|- | |||
!style="white-space:nowrap; text-align:left;"|MTU | |||
|If you are certain that your network supports MTUs over 1500, you can set the desired MTU here. '''NOTE''': This is not well tested yet, and it's use is not yet advised. It is planned to add per-network MTU support later. See [https://github.com/ClusterLabs/anvil/issues/435 Issue #435]. | |||
|- | |- | ||
! | !style="white-space:nowrap; text-align:left;"|Subnode 1 and 2 | ||
|This section is where you can set the IP address, a selection of which UPSes power the subnodes, and where needed, fence device ports used to isolate the subnode in an emergency. | |||
|} | |||
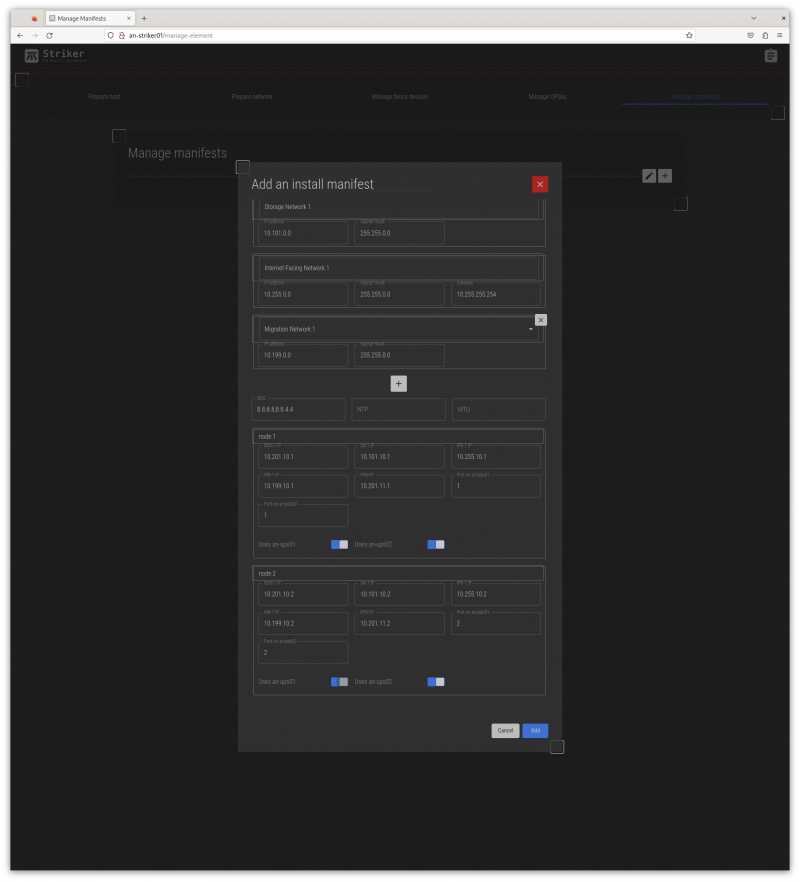
[[image:an-striker01-rhel8-m3-create-install-manifest-03.png|thumb|center|800px|The completed "Install Manifest" menu for node 1, "an-anvil-01".]] | |||
Below this are the networks being used on this Anvil! node. The [[BCN]], [[SN]] and [[IFN]] are always defined. In our case, we also have a [[MN]], so we'll click on the '''+''' to add it. | |||
{{note|1=In our example, we're using APC PDUs. It's critical that the ports entered into the fence device port correspond accurately to the numbered outlets on the PDUs! The ports specified '''must''' map to the outlets powering the subnode.}} | |||
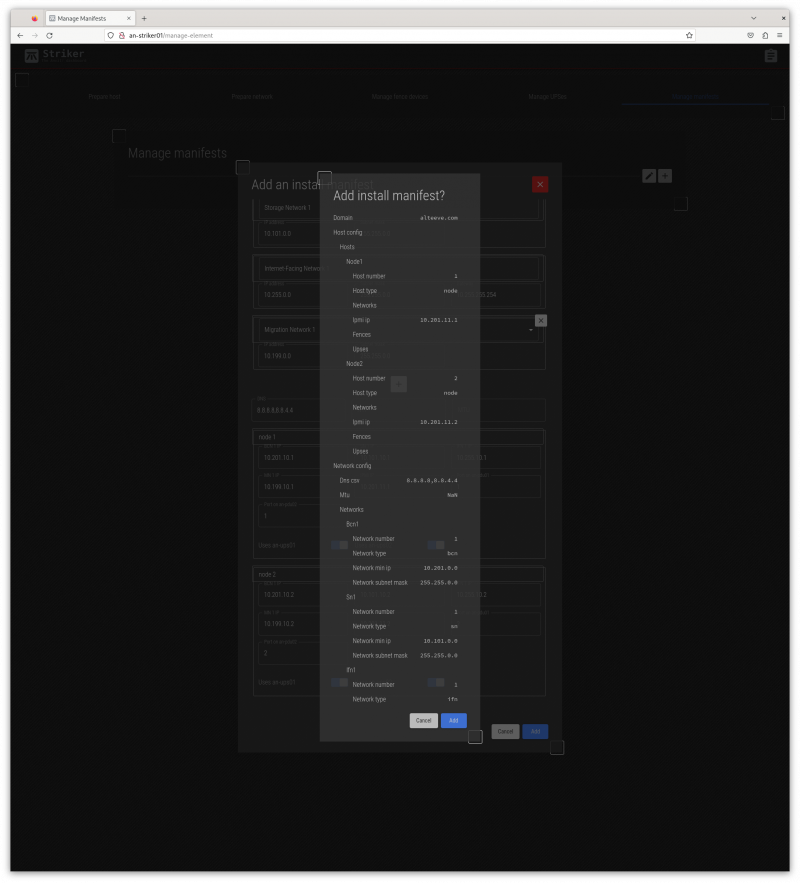
[[image:an-striker01-rhel8-m3-create-install-manifest-04.png|thumb|center|800px|The new "Install Manifest" confirmation.]] | |||
Click ''Add'', and you'll see a summary of the manifest. Review the summary carefully. | |||
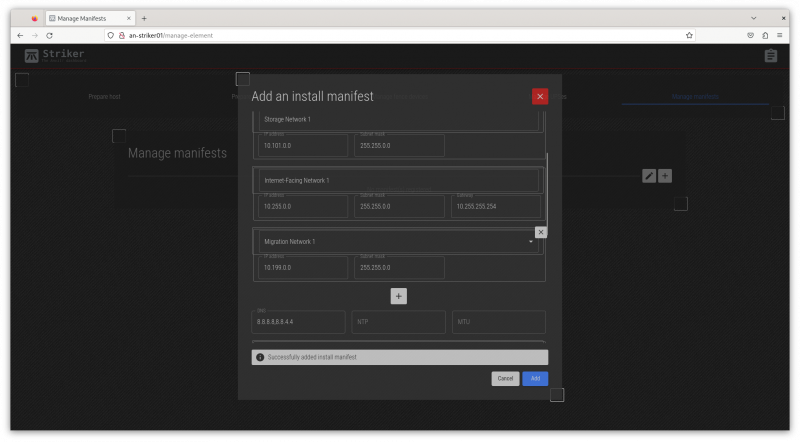
[[image:an-striker01-rhel8-m3-create-install-manifest-05.png|thumb|center|800px|The new "Install Manifest" is saved.]] | |||
If you're happy, click ''Add''. You'll see the saved message, and then you can click on the red '''X''' to close the menu. | |||
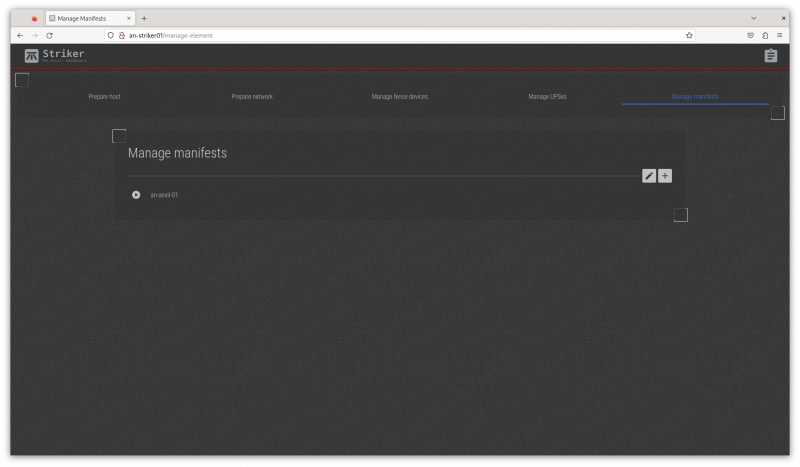
[[image:an-striker01-rhel8-m3-create-install-manifest-06.png|thumb|center|800px|The new manifest exists.]] | |||
Now we see the new <span class="code">an-anvil-01</span> install manifest! | |||
== Running an Install Manifest == | |||
Now we're ready to create our first Anvil! node! | |||
To build an Anvil! node, we use the manifest to take the config we want, and apply them to the physical subnodes we prepared earlier. This will take those two unassigned subnodes and tie them together into an Anvil! node. | |||
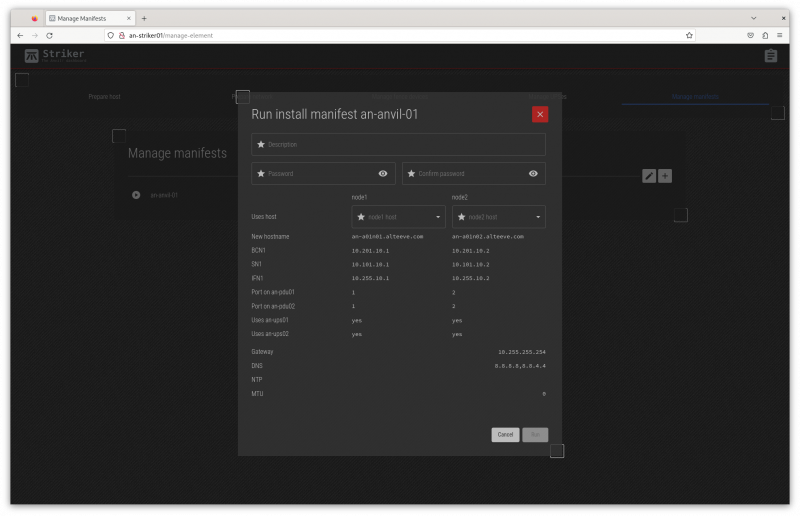
[[image:an-striker01-rhel8-m3-run-install-manifest-01.png|thumb|center|800px|The 'run manifest' menu]] | |||
Click on the ''play'' icon to the left of the manifest you want to run. In our case, there's only <span class="code">an-anvil-01</span>. This will open the manifest menu. | |||
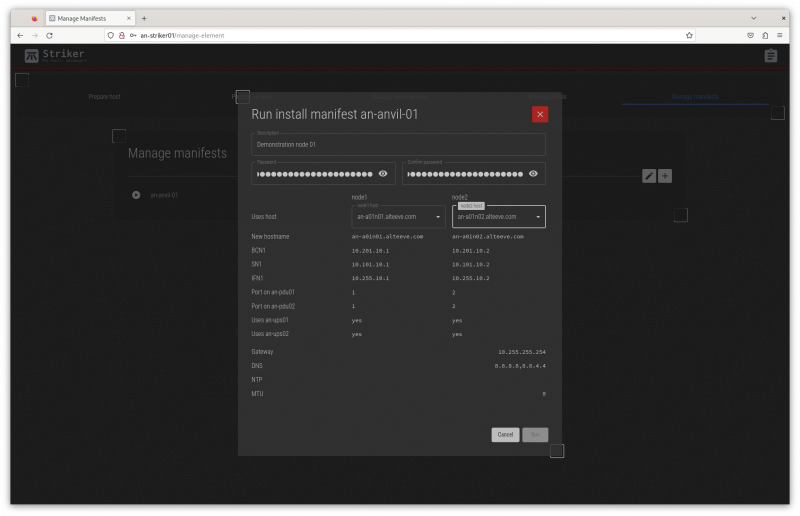
[[image:an-striker01-rhel8-m3-run-install-manifest-02.png|thumb|center|800px|Filling out the 'run manifest' menu.]] | |||
Fields; | |||
{| class="wikitable" | |||
!style="white-space:nowrap; text-align:left;"|Description | |||
|This is a free-form field where you can describe this node. | |||
|- | |- | ||
!style="white-space:nowrap; text-align:left;"|(Confirm) Password | |||
|Enter the password you want to set for this node. In general, you should use the same password on all nodes. | |||
|- | |- | ||
| | !style="white-space:nowrap; text-align:left;"|Subnode 1/2 | ||
|There are two drop-down boxes where you can choose with subnodes will be in this node. All machines initialized as "nodes" (that is, have <span class="code">anvil-node</span> installed) will be available. If you are building a new node, as we are here, select the two newly initialized nodes. If you're rebuilding a node, select the two subnodes already in the node to rebuild. If you're replacing a subnode, select the surviving subnode and the replacement subnode. | |||
</ | |||
|} | |} | ||
{{note|1=When running a manifest to rebuild a failed node, the existing node with servers will not be modified, save for updating access information for the replacement node. This is designed to run on a production node. That said, understanding nothing is perfect, when a maintenance window is available, rebuilding during that window is recommended.}} | |||
This form is pretty simple, because most of our work was done in previous steps. Simply enter a description, the password to set, and select the two subnodes we prepared earlier. | |||
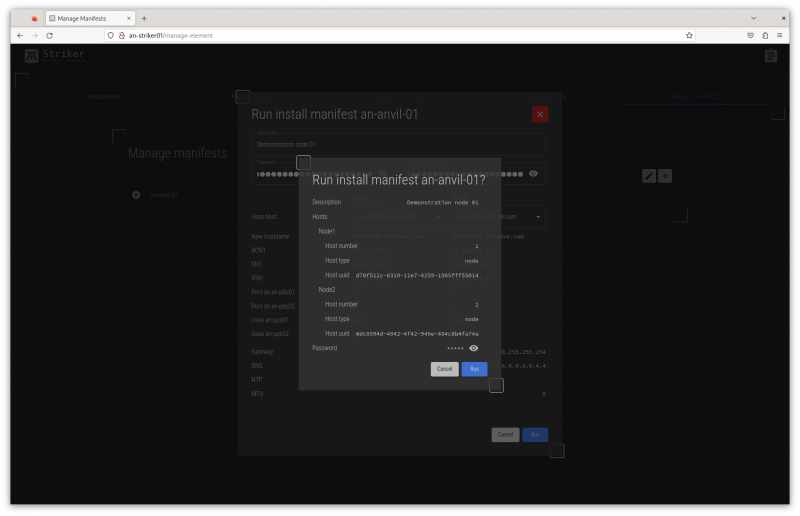
[[image:an-striker01-rhel8-m3-run-install-manifest-03.png|thumb|center|800px|Confirm the manifest run.]] | |||
Verify that you're about to run the right manifest against the right subnodes. When done, click ''Run''. | |||
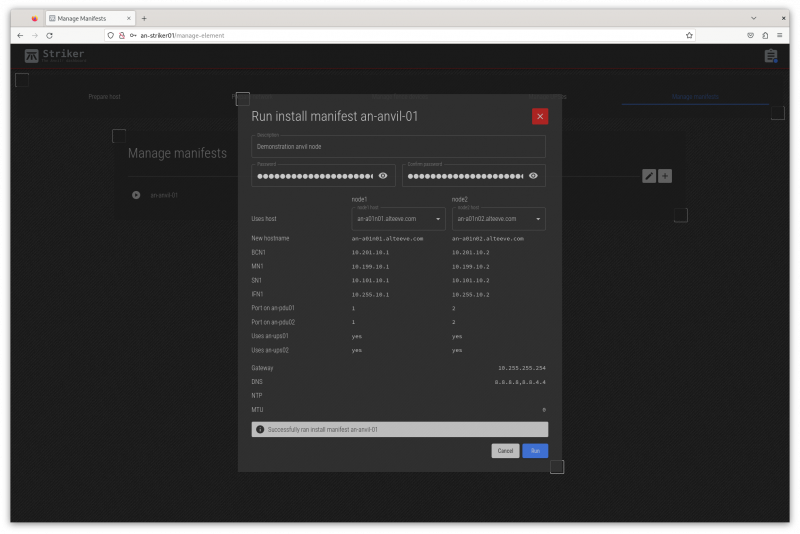
[[image:an-striker01-rhel8-m3-run-install-manifest-04.png|thumb|center|800px|The manifest job is recorded]] | |||
The job to run the manifest and assemble the two subnods into a node is now saved. It will take a few minutes for the job to complete, but it should now be underway. | |||
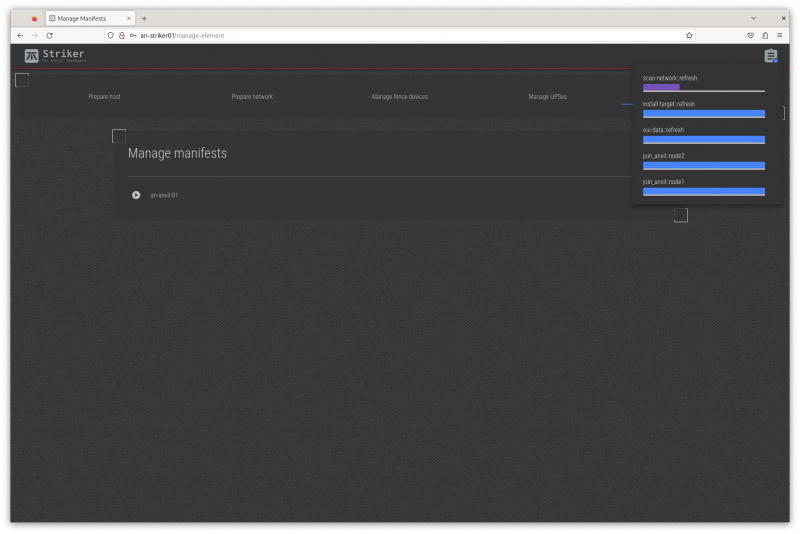
[[image:an-striker01-rhel8-m3-run-install-manifest-05.png|thumb|center|800px|Job progress.]] | |||
Something we've not looked at yet, but that is useful here, is the job progress icon. At the top-right, there's a clipboard icon with a blue dot. Clicking on it shows the progress of running jobs. This shows all jobs that are running, or that finished in the last five minutes. | |||
In the example above, the ''join anvil node 1'' and ''join anvil node 2'' are already complete! | |||
We're now ready to provision servers! | |||
= Provision Servers = | |||
The fundamental goal has been to build servers, and now with our first node built, we're ready to do so! | |||
== Uploading Install Media == | |||
Before we can build our first server, we need to upload the install media the OS will install from. | |||
The vast majority of Anvil! users run windows, so we're going to install a [https://www.microsoft.com/en-us/windows-server Windows Server 2022] machine. For this, we'll also need the latest [https://github.com/virtio-win/kvm-guest-drivers-windows virtio] drivers. | |||
Getting the Windows 2022 [[ISO]] (DVD image) will require purchasing or getting an evaluation version from Microsoft at the link above. | |||
Getting the latest stable virtio drivers can be downloaded from [https://fedorapeople.org/groups/virt/virtio-win/direct-downloads/stable-virtio/ here], which is version ''0.1.229'' at the time of writing. | |||
With these two files downloaded on your local computer, we're ready to upload them to the cluster. | |||
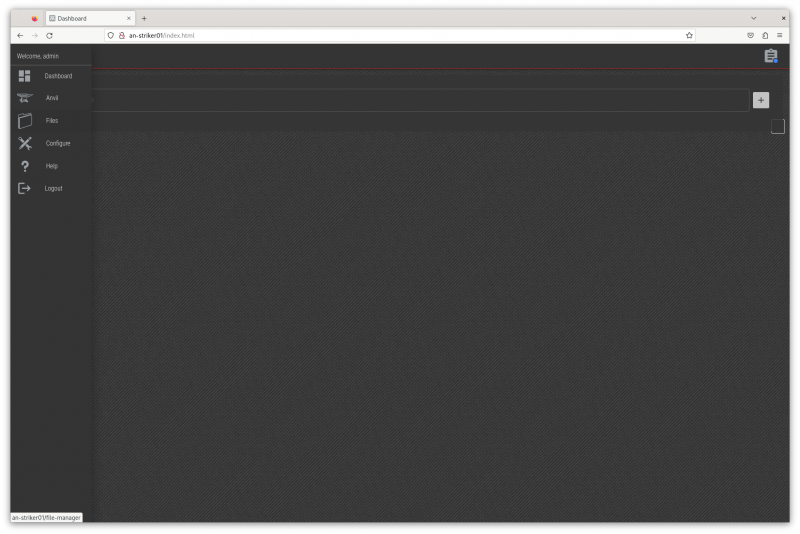
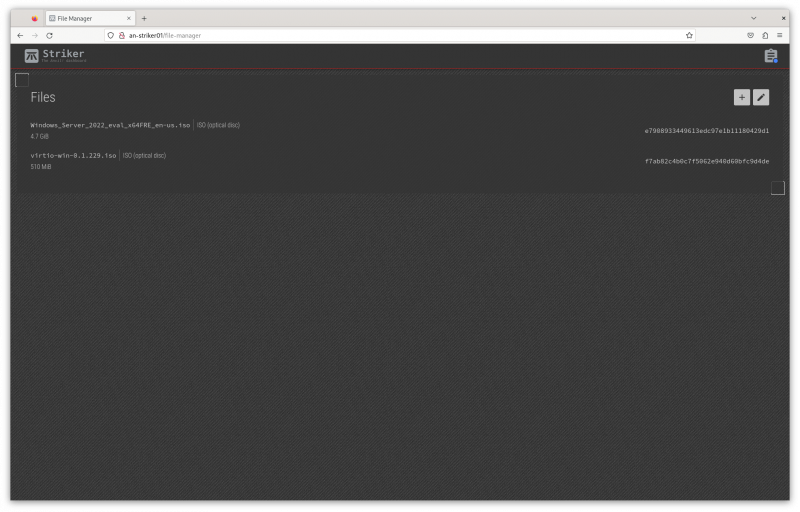
[[image:an-striker01-rhel8-m3-file-upload-01.png|thumb|center|800px|'Files' in the Striker menu]] | |||
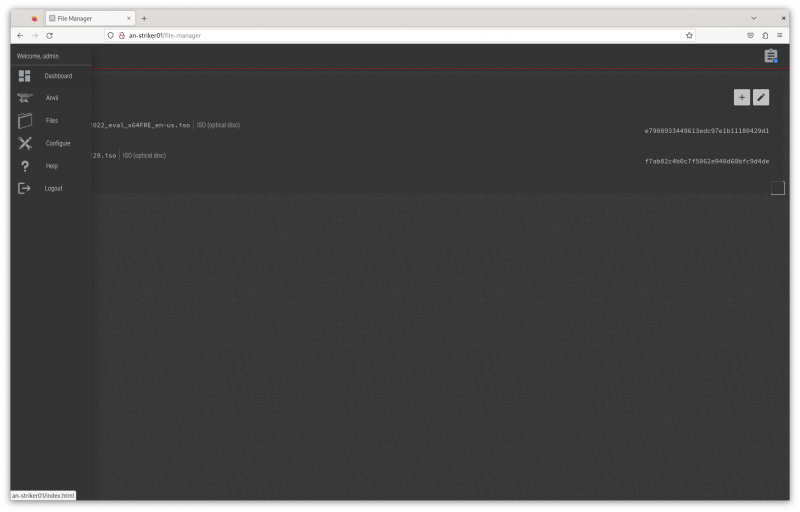
Click on the Striker logo to open the menu, and then click on the ''Files'' option. | |||
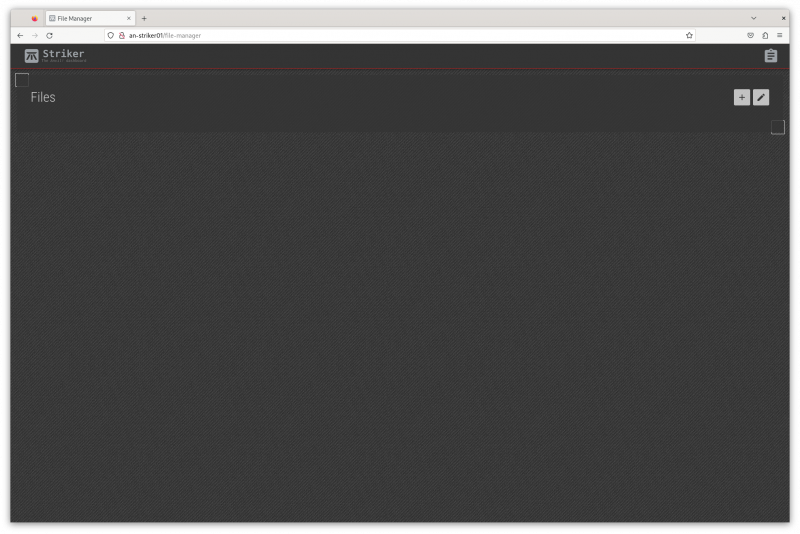
[[image:an-striker01-rhel8-m3-file-upload-02.png|thumb|center|800px|The 'Files' menu.]] | |||
Click on the ''+'' on the right to upload the first file. | |||
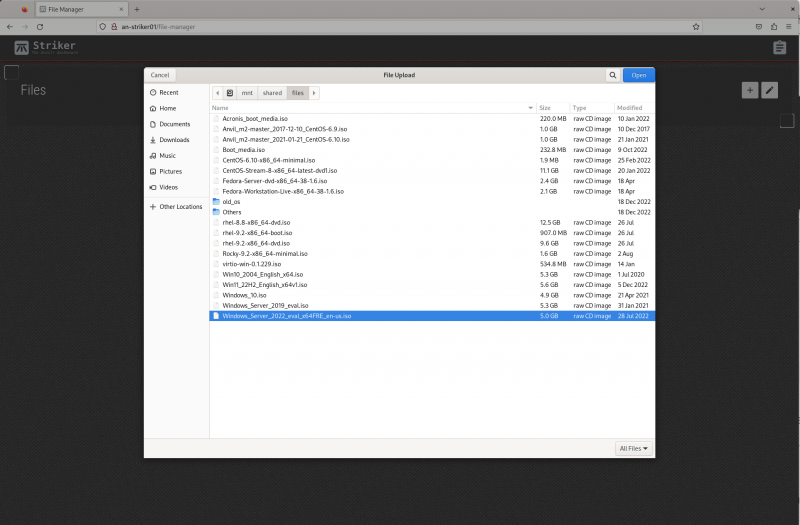
[[image:an-striker01-rhel8-m3-file-upload-03.png|thumb|center|800px|Selecting the file to upload.]] | |||
Clicking the ''+'' button, your operating system's file browser. Use it to find the Windows ISO you will upload. | |||
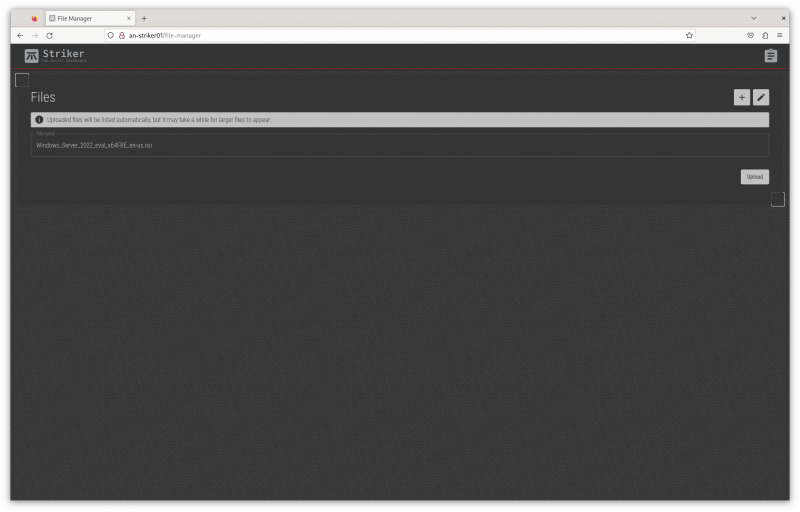
[[image:an-striker01-rhel8-m3-file-upload-04.png|thumb|center|800px|The file is ready to upload]] | |||
Once you select the file to upload, you will see what's going to be uploaded. If you're happy, click ''Upload''. | |||
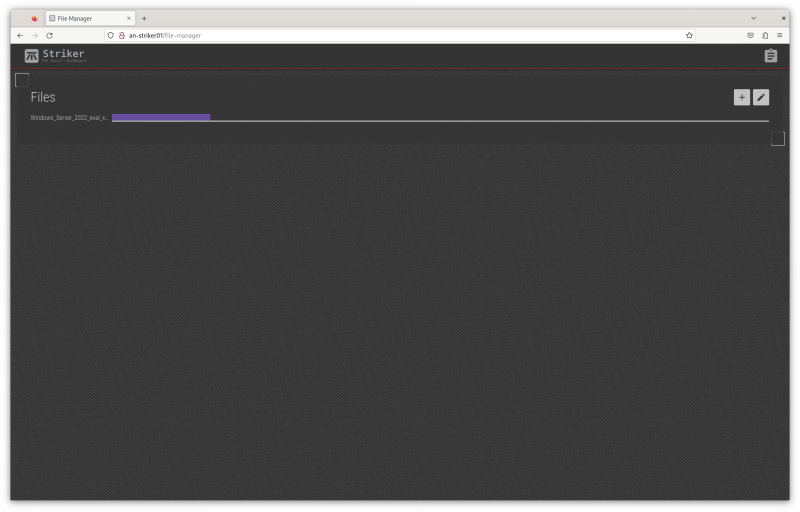
[[image:an-striker01-rhel8-m3-file-upload-05.png|thumb|center|800px|The file is uploading]] | |||
As the file uploads, you'll the see the progress. How long this takes depends on the file size and the bandwidth between your computer and the Striker dashboard. | |||
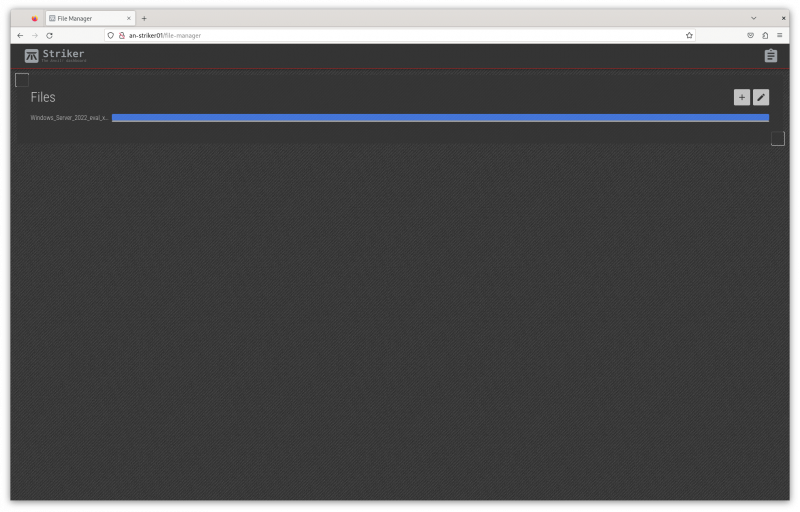
[[image:an-striker01-rhel8-m3-file-upload-06.png|thumb|center|800px|The file is uploaded]] | |||
The progress bar changes colour when the file is finished uploading. | |||
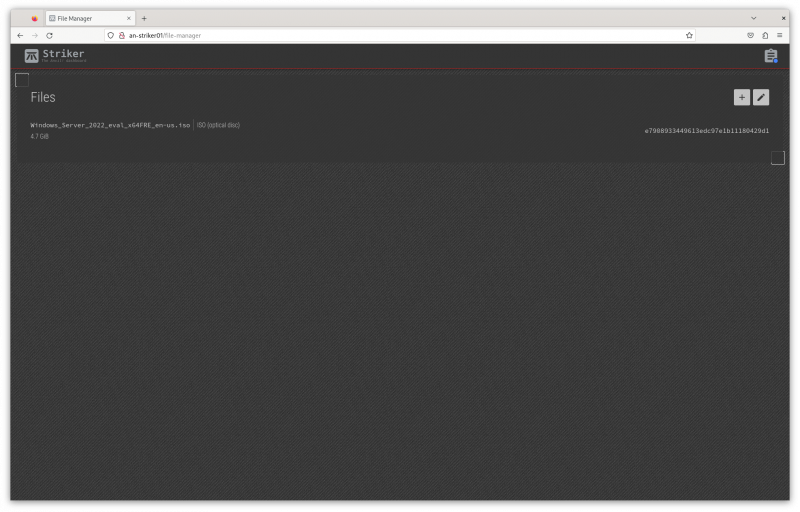
[[image:an-striker01-rhel8-m3-file-upload-07.png|thumb|center|800px|The file is now shown in the file list.]] | |||
After the file is actually uploaded, it needs to be added to the cluster's shared storage. This starts by calculating an [[md5sum]] sum of the file, adding it to the database, and then it starts sending it out to the various machines in the cluster. | |||
Once the sum is calculated, you will see the file appear in the file list. | |||
[[image:an-striker01-rhel8-m3-file-upload-08.png|thumb|center|800px|The second ISO is uploaded.]] | |||
Repeat the process to upload the virtio driver ISO. | |||
{{note|1=It can take a few minutes for the files to be copied to all the machines in the Anvil! cluster, particularly if there are many nodes in the cluster.}} | |||
= Provisioning Servers = | |||
Now, finally, we're at the most fun part! | |||
== Building 'srv01-primary-dc' == | |||
Lets build our first server. It won't actually do anything, but lets pretend it's going to be an Active Directory controller. | |||
[[image:m3-new-server_srv01-sql-01.png|thumb|center|800px|Going back to the main dashboard.]] | |||
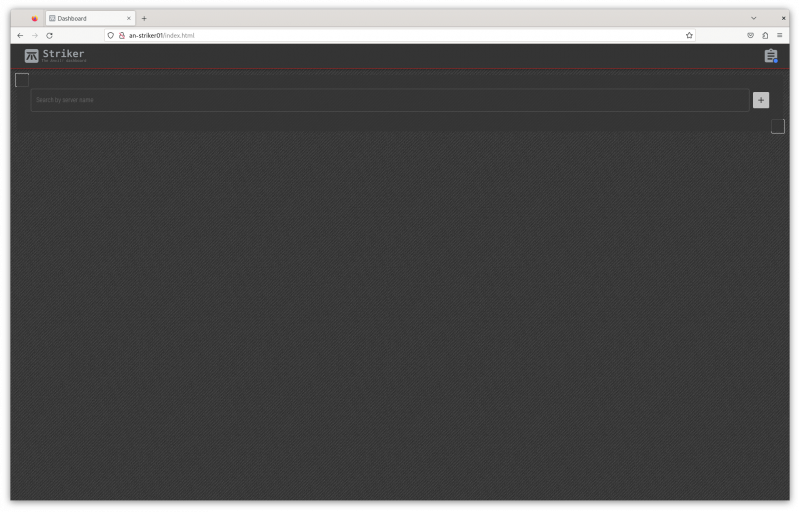
Click on the Striker logo and select ''Dashboard''. | |||
[[image:m3-new-server_srv01-sql-02.png|thumb|center|800px|The main dashboard, very bare.]] | |||
At this point, there's nothing to see yet, so the dashboard is pretty bare. Click on the '''+''' on the right of the search bar to start provisioning (building) the first server. | |||
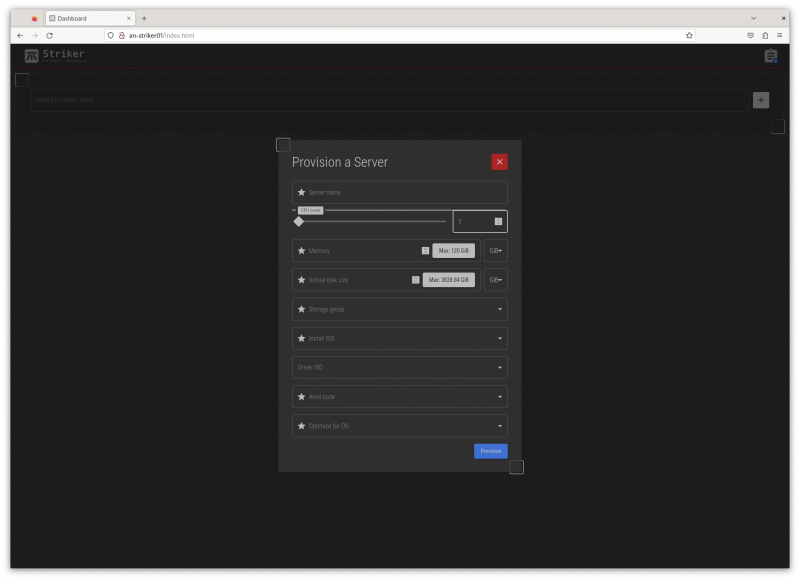
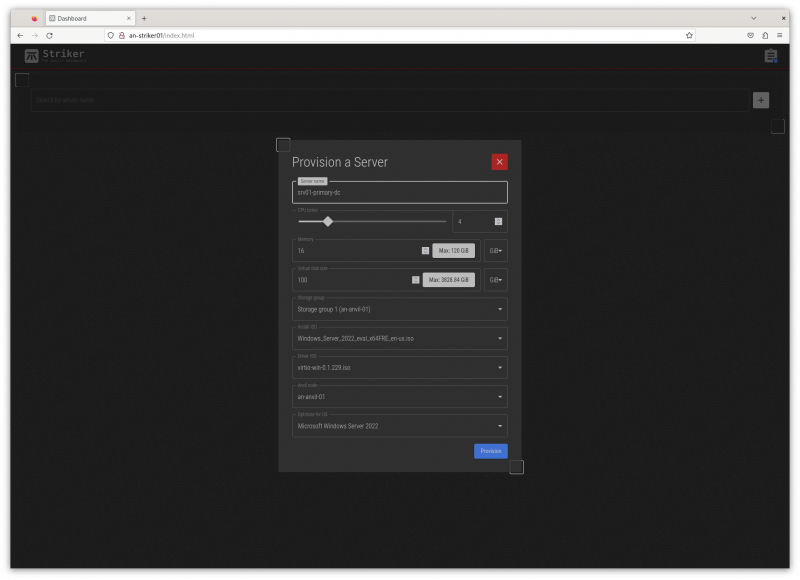
[[image:m3-new-server_primary-dc-01-sql-03.png|thumb|center|800px|"Provision a Server" menu.]] | |||
This is where you get to decide what resources are allocated to your new server. | |||
{| class="wikitable" style=" | Fields; | ||
{| class="wikitable" | |||
!style="white-space:nowrap; text-align:left;"|Server name | |||
|This is the name of the server. It can be any string of letters, numbers, hyphens and underscore characters. It's not at all required, but we generally use the format '<span class="code">srvXX-<description></span>', and we will use that here. This works for us because the <span class="code">srvXX-</span> prefix is incremented constantly, which means that if a new server is replacing an old server, the descriptive part can be the same without conflict. | |||
|- | |||
!style="white-space:nowrap; text-align:left;"|CPU Cores | |||
|This is how many CPU cores you want to allocate to this server. Please see the note below! | |||
|- | |||
!style="white-space:nowrap; text-align:left;"|Memory | |||
|This is the amount of RAM to allocate to this server | |||
|- | |||
!style="white-space:nowrap; text-align:left;"|Disk Size | |||
|This is the size of the (first) drive on the server. If you want a second drive, you can add it after the server has been created. | |||
|- | |||
!style="white-space:nowrap; text-align:left;"|[[Storage Group]] | |||
|This allows you to choose which storage group to use when provisioning this new server. In most cases, there is only one storage group. In some cases, a node might have two storage arrays, for example, one that is smaller, more high performance and anther which is large, but slower. | |||
|- | |||
!style="white-space:nowrap; text-align:left;"|Install ISO | |||
|This is the ISO uploaded earlier to use for the OS installation. | |||
|- | |- | ||
! | !style="white-space:nowrap; text-align:left;"|Driver ISO | ||
|This is the optional driver disk needed to complete the OS install. Generally this is not needed for Linux servers, and is required for the [[virtio]] drivers for Windows servers. | |||
|- | |- | ||
!style="white-space:nowrap; text-align:left;"|Anvil Node | |||
|If your Anvil! cluster has multiple nodes, this is allows you to manually choose which node will host the new server. | |||
|- | |- | ||
!style="white-space:nowrap; text-align:left;"|Optimize for OS | |||
|'''Important''': This gives you the chance to optimize the [[hypervisor]], that is the component that emulates the hardware the server will run on, for the OS you plan to install. Selecting this properly can significantly help (or hurt) the performance of your server. | |||
|- | |- | ||
|} | |} | ||
{{warning|1=The Anvil! does not allow over-provisioning of resources, ''except'' for the CPU core count. This means that it is up to you to be mindful of how much CPU resources servers can consume. If too many servers try to place too high of a load on the CPU cores, it's possible (though unlikely) to cause the back-end cluster stack to start to time out, leading to subnode ejection. We recommend allocating the fewest number of cores you think a server will need, and increasing the number as servers prove the need for them. Note also that the the number of available cores is the sum of real cores plus hyperthreaded cores. It is strongly advised to NOT allocate to a single server more than N-2 of the host node's real cores. That is to say, if your nodes have 16 real cores, the recommended core limit for a single VM is 14. This way, if something causes that server to consume all available CPU power, some CPU will be available for the host and other servers.}} | |||
[[image:m3-new-server_srv01-primary-dc-04.png|thumb|center|800px|Provisioning our first server.]] | |||
For our first server, we're going to create a server called <span class="code">srv01-primary-dc</span>. We'll give it 4 cores, 16 GiB of RAM and 100 GiB of disk space. Once you're happy with your selection, press ''Provision''. | |||
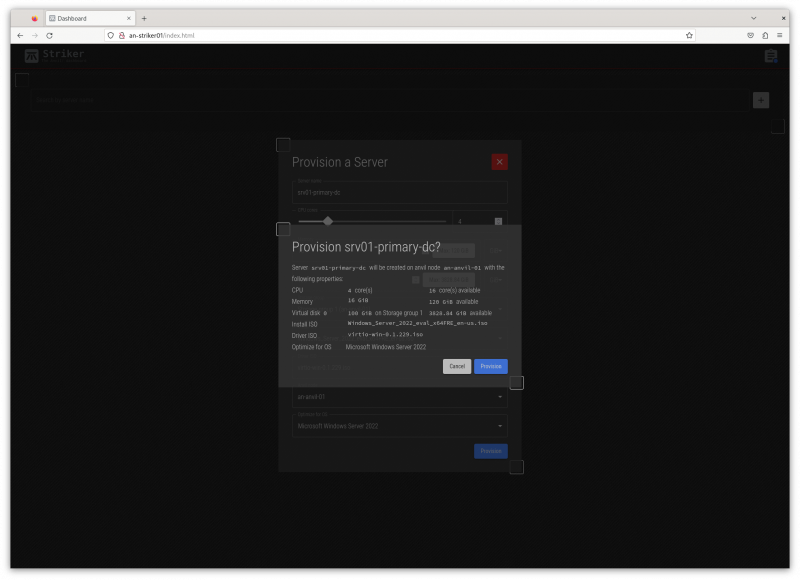
[[image:m3-new-server_srv01-primary-dc-05.png|thumb|center|800px|Confirming the new server.]] | |||
You will see a summary of the server that is about to be created. Confirm that all is well, and then click on ''Privision'' to confirm. | |||
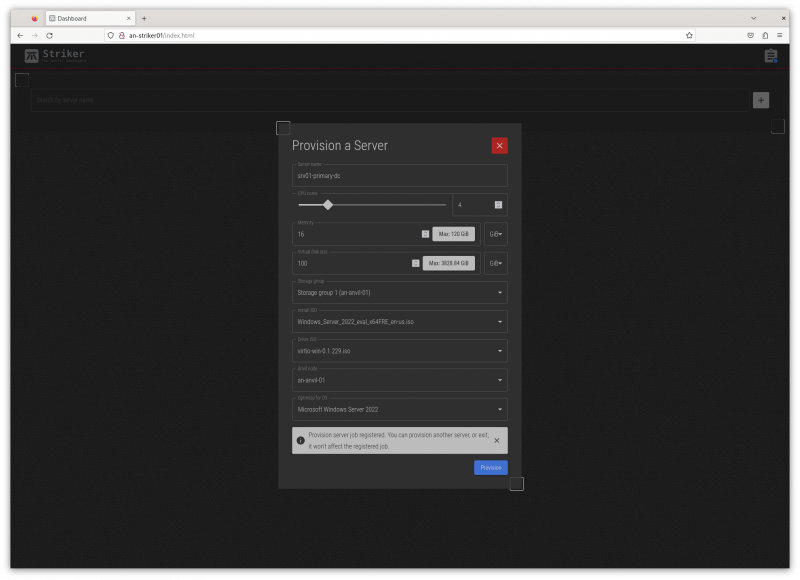
[[image:m3-new-server_srv01-primary-dc-06.png|thumb|center|800px|The provision job is saved.]] | |||
The job has been saved. | |||
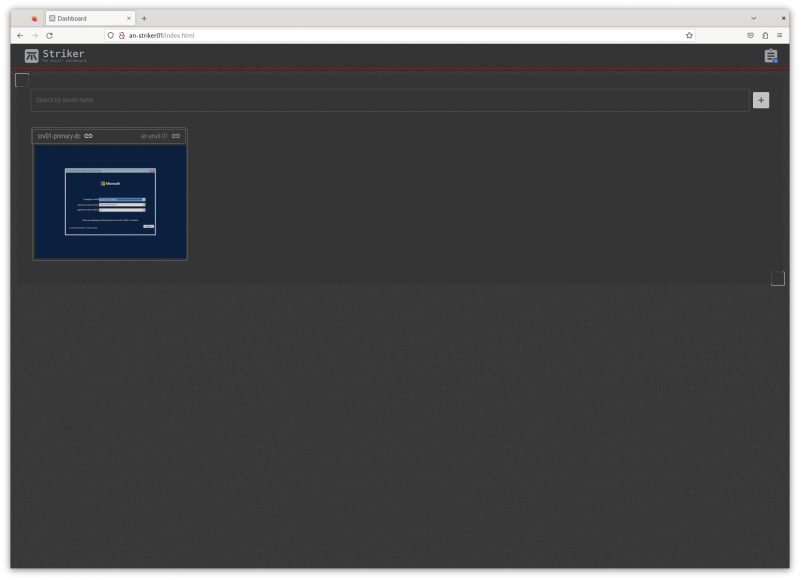
[[image:m3-new-server_srv01-primary-dc-07.png|thumb|center|800px|The new server is on the dashboard.]] | |||
It will take a minute or two for the node to prepare and provision the server, but after a minute, it will show up on the main dashboard page. | |||
[[image:m3-new-server_srv01-primary-dc-08.png|thumb|center|800px|Connecting to the new server.]] | |||
Click on the server and it will open up to in-browser terminal access to the new server. | |||
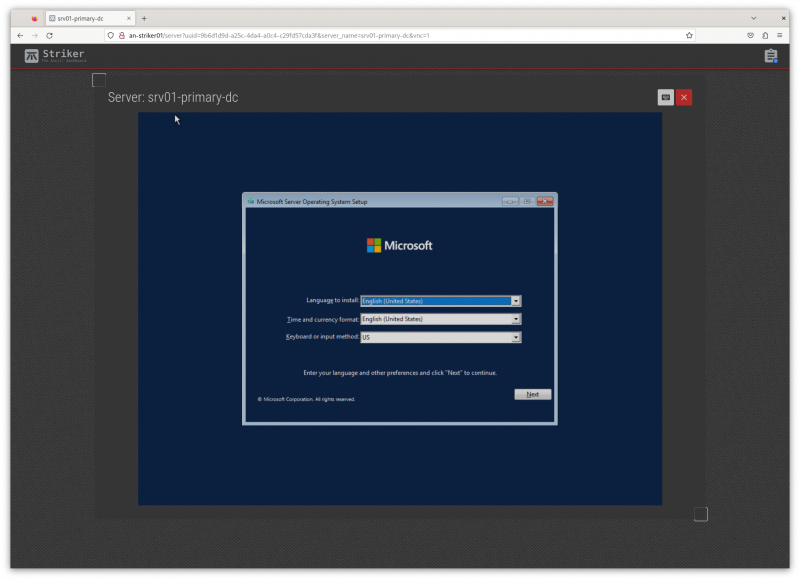
This access is just like having a monitor plugged into a real physical machine. You are essentially using a keyboard and mouse plugged into the server. No network connection is required on the guest (as there can't be at this stage of the OS install), and you will be able to watch the full boot up and shutdown sequence of the server, without any client being installed. | |||
[[image:m3-new-server_srv01-primary-dc-09.png|thumb|center|800px|The "send a key" list.]] | |||
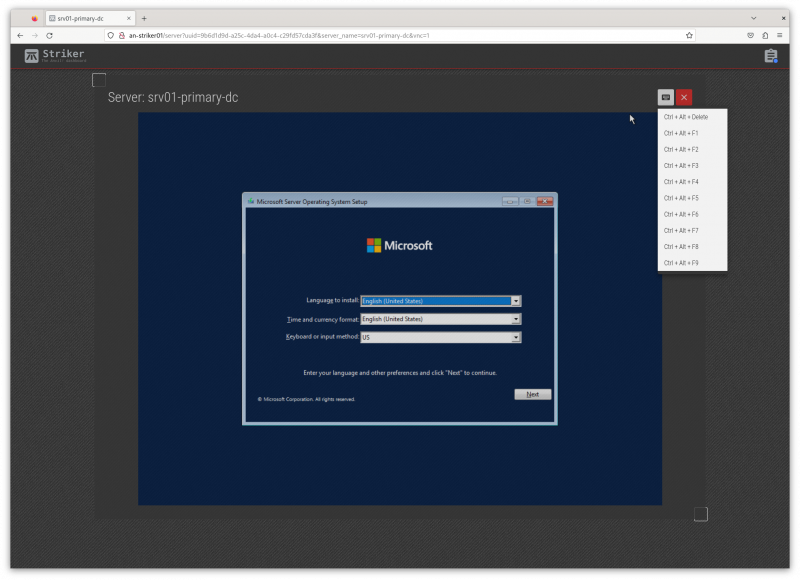
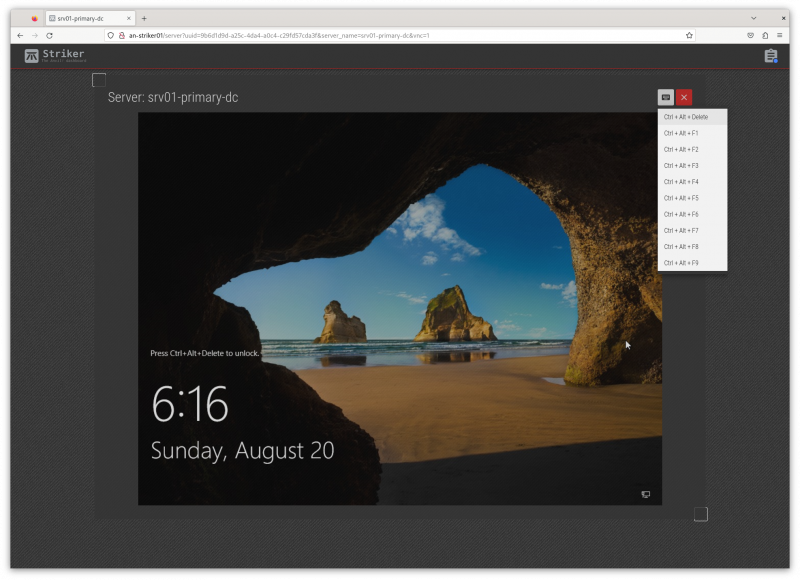
It's not needed yet, but it's important to show that you can click on the keyboard icon on the top-right to send special key combinations, like "<span class="code"><ctrl> + <alt> + <del></span>" to the guest. This will be needed later to login after the OS is installed. | |||
{{note|1=From this point on, we're doing a standard Windows Server OS install. We're not showing all the steps, but we will show key steps.}} | |||
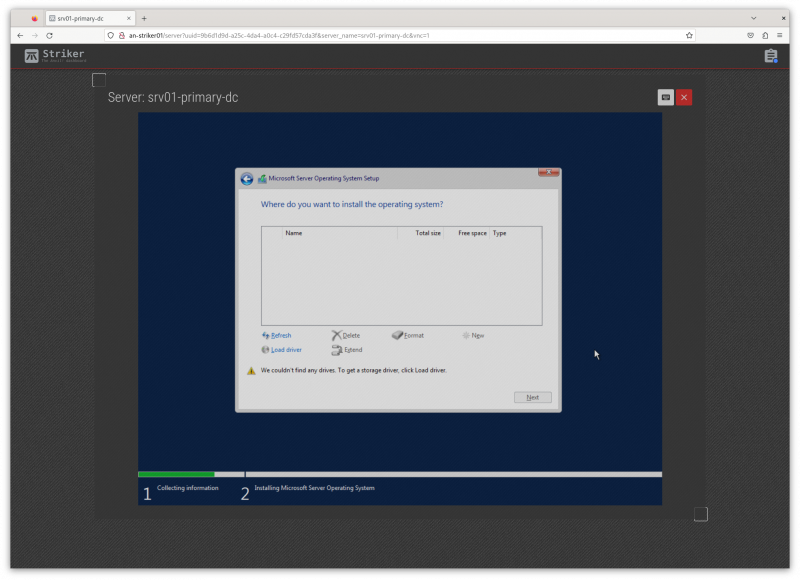
[[image:m3-new-server_srv01-primary-dc-10.png|thumb|center|800px|Storage not found in Windows.]] | |||
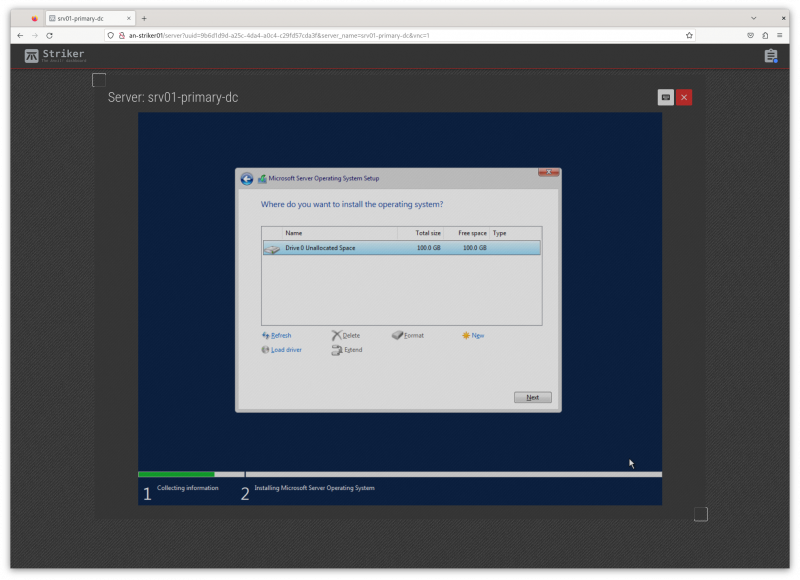
Recall that we included the "virtio" driver disk? This is the step where that comes in. For optimal performance, the hypervisor creates a "[[virtio-block]]" storage controller that is optimized for performance in a virtual environment. Microsoft doesn't include the driver for this natively, so when we get to the storage section, it initially sees no hard drive. | |||
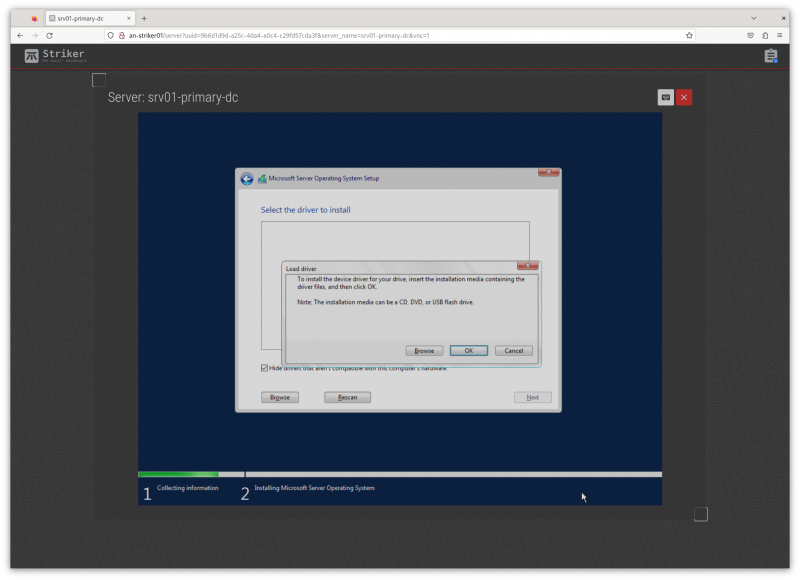
[[image:m3-new-server_srv01-primary-dc-11.png|thumb|center|800px|Click on "Load Driver".]] | |||
Click on the "Load Driver" button on the lower left. | |||
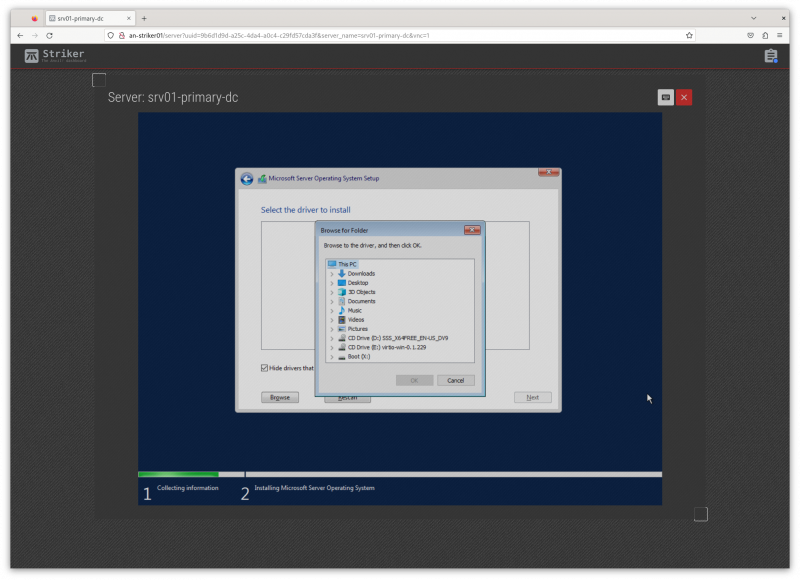
[[image:m3-new-server_srv01-primary-dc-12.png|thumb|center|800px|Click on "Browse".]] | |||
Click on "Browse". | |||
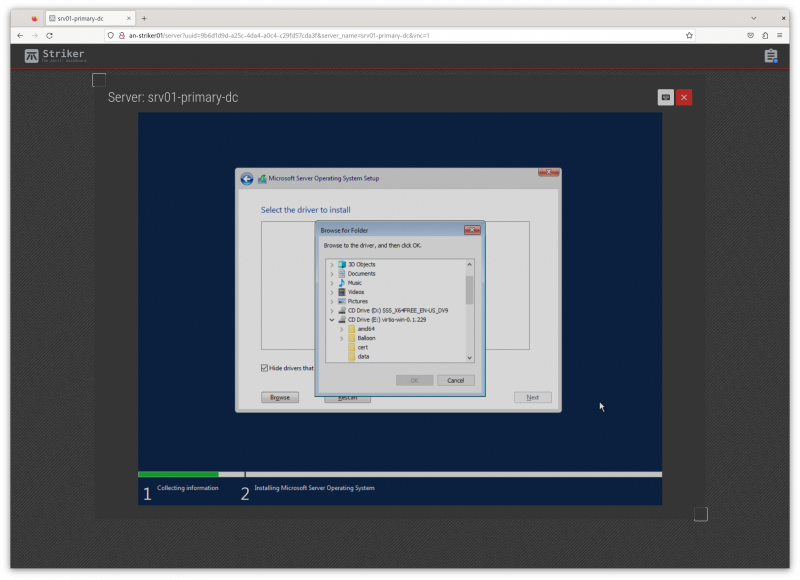
[[image:m3-new-server_srv01-primary-dc-13.png|thumb|center|800px|Expand "<span class="code">CD Drive (E:) virtio-win-0.1.229</span>".]] | |||
Click to expand "<span class="code">CD Drive (E:) virtio-win-0.1.229</span>" drive. | |||
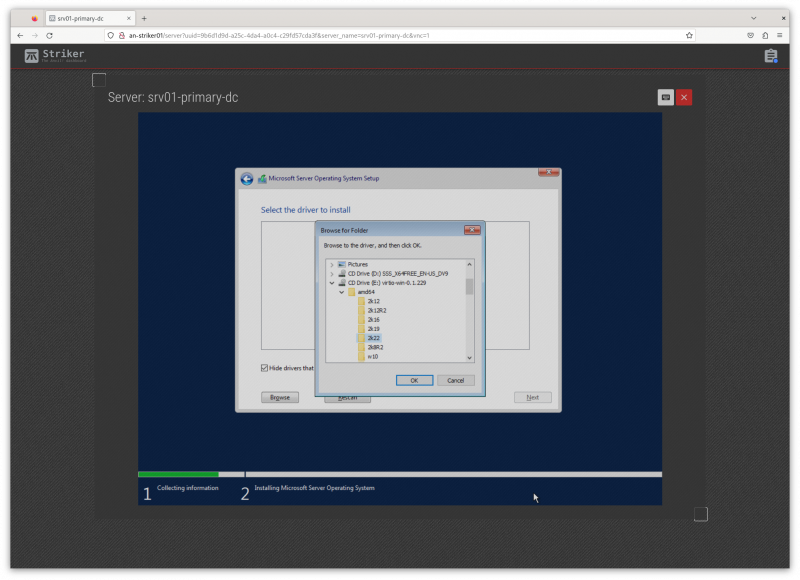
[[image:m3-new-server_srv01-primary-dc-14.png|thumb|center|800px|Select "<span class="code">E:\amd64\2k22</span>".]] | |||
{{note|1=This example is for Windows 2022 server, if you're installing a different version, choose the directory that best applies. Note that "<span class="code">amd64</span>" really just means "64-[[bit]]". Use that regardless of the make of your physical CPU if you're installing a 64-bit Windows OS, as most are these days.}} | |||
Select the "<span class="code">E:\amd64\2k22</span>". and then click "OK". | |||
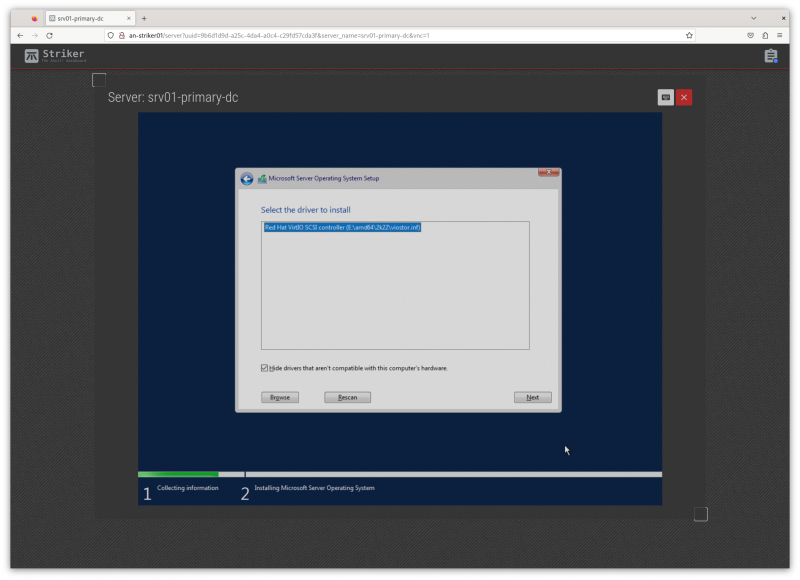
[[image:m3-new-server_srv01-primary-dc-15.png|thumb|center|800px|The "Red Hat VirtIO SCSI controller (E:\amd64\2k22\viostor.inf)" option appears.]] | |||
The "Red Hat VirtIO SCSI controller (E:\amd64\2k22\viostor.inf)" option will appear, and this is the storage controller driver we want. Click on "Next" on the lower-right corner. | |||
[[image:m3-new-server_srv01-primary-dc-16.png|thumb|center|800px|The "Drive 0" appears!]] | |||
The driver will load, and after a moment, the "Drive 0 Unallocated Space" will appear. At this point, you can proceed with the OS install as you normally would. | |||
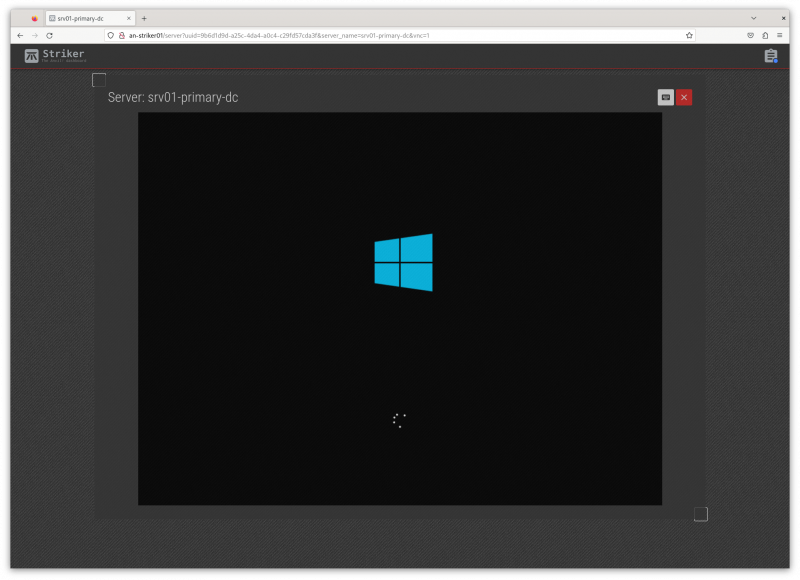
[[image:m3-new-server_srv01-primary-dc-17.png|thumb|center|800px|Watching the new server boot!]] | |||
This screen shot isn't particularly important from the OS install process, but it shows how you're able to see the server even during the boot process. It helps show that we're talking to the (virtual) video card, not any software on the guest. | |||
[[image:m3-new-server_srv01-primary-dc-18.png|thumb|center|800px|The login screen!]] | |||
Now we're at the login screen! Click on the keyboard icon we mentioned earlier, and choose <span class="code">ctrl + alt + del</span>. to sent that key combination to bring up the login prompt. | |||
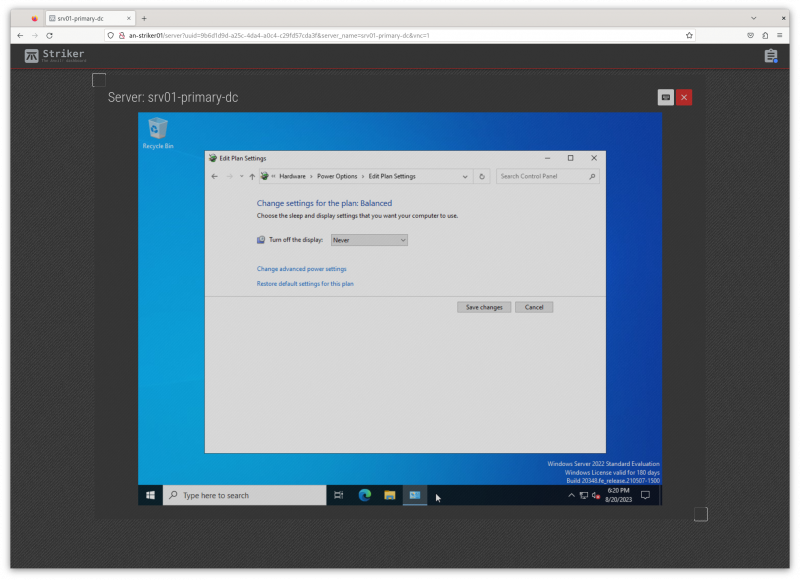
[[image:m3-new-server_srv01-primary-dc-19.png|thumb|center|800px|'''Important''': Disabling powering off the display.]] | |||
{{warning|1=This step is very important! Windows will ignore power button events when it things it has powered down the display. It does this to prevent someone accidentally powering off a computer that the user things is already off. This blocks [[Scancore]]'s ability to gracefully shut down the server when needed!}} | |||
Windows, by default, turns off the power to the display (monitor) after ten minutes. This is a problem as Windows will then ignore power button events. The Anvil! has no agents that run inside the guest (we treat your servers as black boxes), so the only way we can request a power off is by (virtually) pressing the power button. | |||
It is very important that Windows shuts down when the power button is pressed! | |||
Imagine the scenario where power has been lost, and the [[UPS]]es powering the node the server is on are about to die. [[Scancore]] will press the power button to gracefully shut the server down. If windows ignores this, there's nothing more the Anvil! can do, and the node will stay up and running until the power runs out, resulting in a hard shut down. | |||
=== Optional Windows Install Steps === | |||
From here on, the steps shown are optional. Depending on your needs and policies, you may well choose to only do some of the things here. Consider this section a list of suggestions. | |||
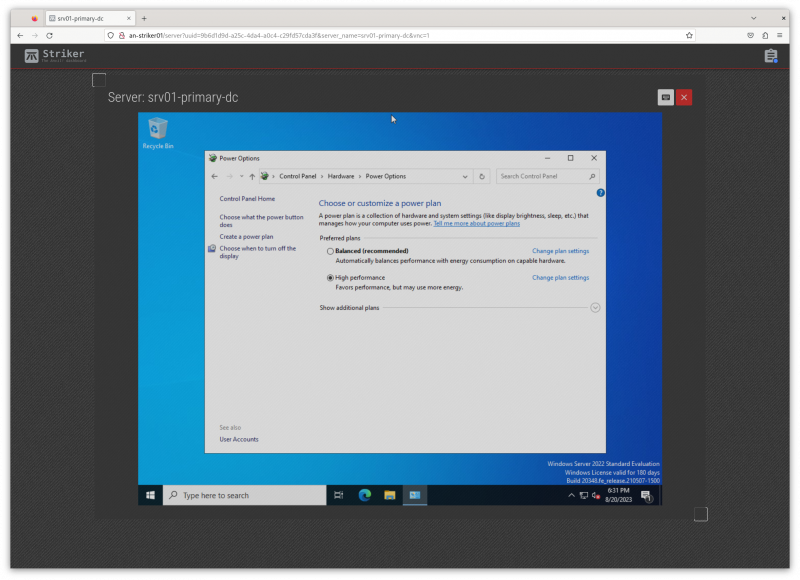
[[image:m3-new-server_srv01-primary-dc-20.png|thumb|center|800px|Setting the ''High Performance'' power option.]] | |||
Depending on your needs, you may wish to select the ''High Performance'' power configuration. Of course, this will consume more electricity and generate more heat, but it's good to know this is an option for servers that are more performance-oriented. | |||
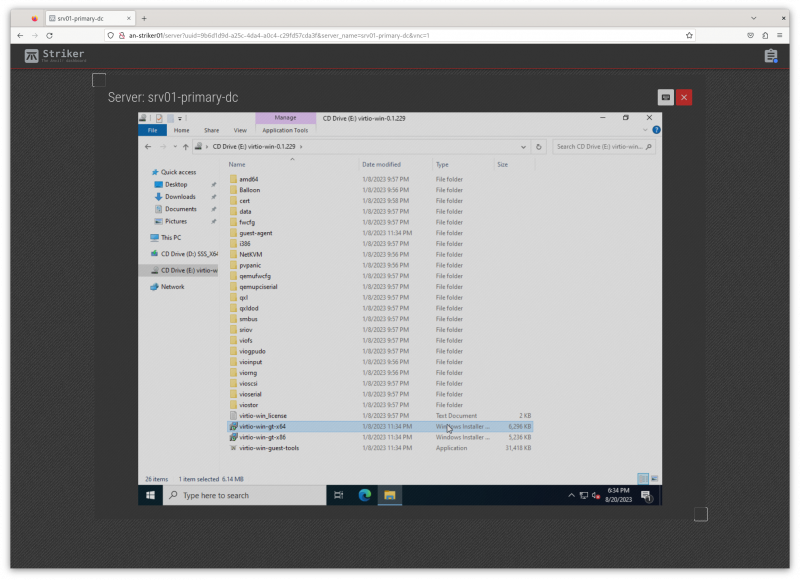
[[image:m3-new-server_srv01-primary-dc-21.png|thumb|center|800px|Installing the "<span class="code">virtio-win-gt-x64</span>" driver pack.]] | |||
If you browse to <span class="code">E:\virtio-win-gt-x64</span> and run it, you will be able to install additional drivers. This will allow you to change the desktop resolution to a higher resolution, in particular. | |||
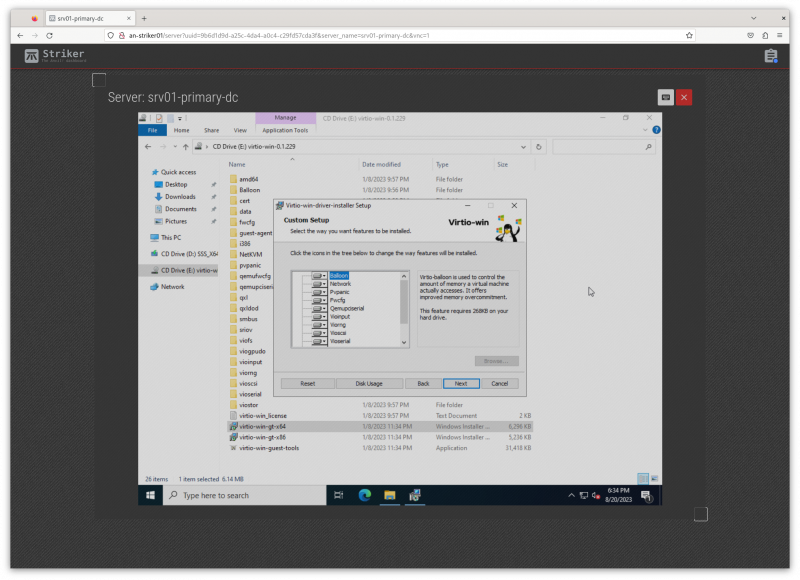
[[image:m3-new-server_srv01-primary-dc-22.png|thumb|center|800px|Installing the virtio driver pack.]] | |||
Installing all the additional virtio driver pack. | |||
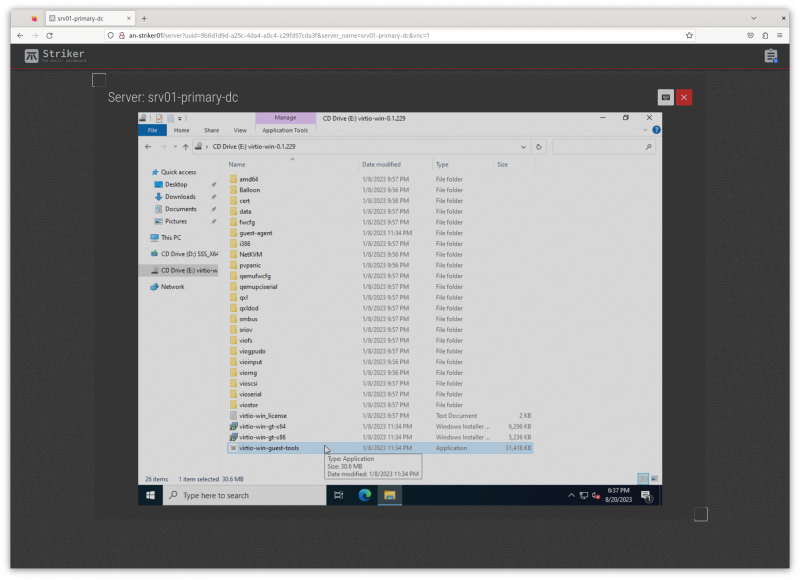
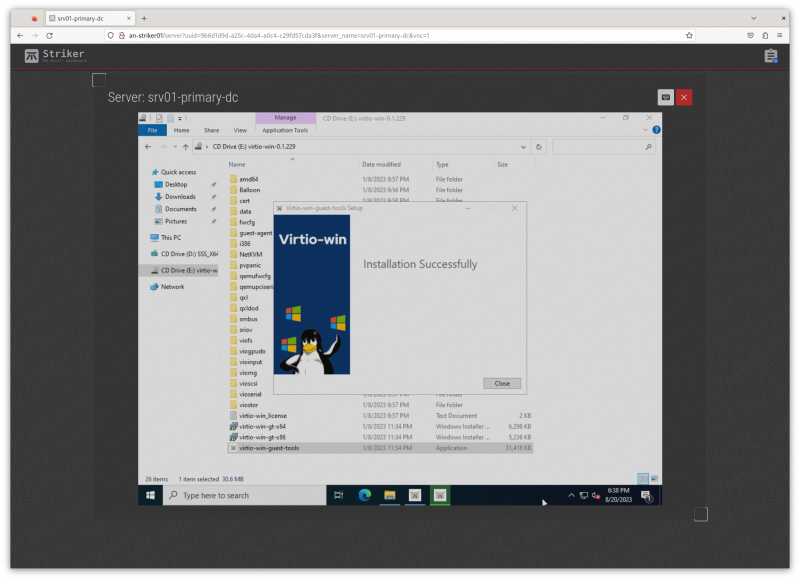
[[image:m3-new-server_srv01-primary-dc-23.png|thumb|center|800px|Installing the "<span class="code">virtio-win-guest-tools</span>" applications.]] | |||
If you browse to <span class="code">E:\virtio-win-guest-tools</span> and run it, you will be able to install the windows guest tools. | |||
[[image:m3-new-server_srv01-primary-dc-24.png|thumb|center|800px|Windows guest tools installed.]] | |||
And that's it! From this point on, proceed with your windows server setup as you normally would. | |||
<span class="code"></span> | |||
<syntaxhighlight lang="bash"> | <syntaxhighlight lang="bash"> | ||
</syntaxhighlight> | </syntaxhighlight> | ||
Latest revision as of 22:39, 8 February 2024
|
Alteeve Wiki :: How To :: Build an M3 Anvil! Cluster |
| Warning: This is a work in progress document. While this header is here, please do not consider this article complete or accurate. |
First off, what is an Anvil!?
In short, it's a system designed to keep servers running through an array of failures, without need for an internet connection.
Think about ship-board computer systems, remote research facilities, factories without dedicated IT staff, un-staffed branch offices and so forth. Where most hosted solutions expect for technical staff to be available in short order, and Anvil! is designed to continue functioning properly for weeks or months with faulty components.
In these cases, the Anvil! system will predict component failure and mitigate automatically. It will adapt to changing threat conditions, like cooling or power loss, including automatic recovery from full power loss. It is designed around the understanding that a fault condition may not be repaired for weeks or months, and can do automated risk analysis and mitigation.
That's an Anvil! cluster!
An Anvil! cluster is designed so that any component in the cluster can fail, be removed and a replacement installed without needing a maintenance window. This includes power, network, compute and management systems.
Components
The minimum configuration needed to host servers on an Anvil! is this;
| Management Layer | |
|---|---|
| Striker Dashboard 1 | Striker Dashboard 2 |
| Anvil! Node | |
| Node 1 | |
| Subnode 1 | Subnode 2 |
| Foundation Pack 1 | |
| Ethernet Switch 1 | Ethernet Switch 2 |
| Switched PDU 1 | Switched PDU 2 |
| UPS 1 | UPS 2 |
With this configuration, you can host as many servers as you would like, limited only by the resources of Node 1 (itself made of a pair of physical nodes with your choice of processing, RAM and storage resources).
Scaling
To add capacity for hosted servers, individual nodes can be upgraded (online!), and/or additional nodes can be added. There is no hard limit on how many nodes can be in a given cluster.
Each 'Foundation Pack' can handle as many nodes as you'd like, though for reasons we'll explain in more detail later, it is recommended to run two to four nodes per foundation pack.
Management Layer; Striker Dashboards
The management layer, the Striker dashboards, have no hard limit on how many Node Blocks they can manage. All node-blocks record their data to the Strikers (to offload processing and storage loads). There is a practical limit to how many node blocks can use the Strikers, but this can be accounted for in the hardware selected for the dashboards.
Nodes
An Anvil! cluster uses one or more nodes, with each node being a pair of matched physical subnodes configured as a single logical unit. The power of a given node block is set by you and based on the loads you expect to place on it.
There is no hard limit on how many node blocks exist in an Anvil! cluster. Your servers will be deployed across the node blocks and, when you want to add more servers than you currently have resource for, you simple add another node block.
Foundation Packs
A foundation pack is the power and ethernet layer that feeds into one or more node blocks. At it's most basic, it consists of three pairs of equipment;
- Two stacked (or VLT-domain'ed) ethernet switches.
- Two switched PDUs (network-switched power bars
- Two UPSes.
Each UPS feeds one PDU, forming two separate "power rails". Ethernet switches and all sub-nodes are equipped with redundant PSUs, with one PSU fed by either power rail.
In this way, any component in the foundation pack can fault, and all equipment will continue to have power and ethernet resources available. How many Anvil! node-pairs can be run on a given foundation pack is limited only by the sizing of the selected foundation pack equipment.
Configuration
| Note: This is SUPER basic and minimal at this stage. |
Striker Dashboards
Striker dashboards are often described as "cheap and cheerful", generally being a fairly small and inexpensive device, like a Dell Optiplex 3090, Intel NUC, or similar.
You can choose any vendor you wish, but when selecting hardware, be mindful that all Scancore data is stored in PostgreSQL databases running on each dashboard. As such, we recommend an Intel Core i5 or AMD Ryzen 5 class CPU, 8 GiB or more of RAM, a ~250 GiB SSD (mixed use, decent IOPS) storage and two ethernet ports.
Striker Dashboards host the Striker web interface, and act as a bridge between your IFN network and the Anvil! cluster's BCN management network. As such, they must have a minimum of two ethernet ports.
Node Pairs
An Anvil! Node Pair is made up of two identical physical machines. These two machines act as a single logical unit, providing fault tolerance and automated live migrations of hosted servers to mitigate against predicted hardware faults.
Each sub-node (a single hardware node) must have;
- Redundant PSUs
- Six ethernet ports (eight recommended). If six, use 3x dual-port. If eight, 2x quad port will do.
- Redundant storage (RAID level 1 (mirroring) or level 5 or 6 (striping with parity). Sufficient capacity and IOPS to host the servers that will run on each pair.
- IPMI (out-of-band) management ports. Strongly recommend on a dedicated network interface.
- Sufficient CPU core count and core speed for expected hosted servers.
- Sufficient RAM for the expected servers (note that the Anvil! reserves 8 GiB).
Disaster Recovery (DR) Host
Optionally, a "third node" of a sort can be added to a node-pair. This is called a DR Host, and should (but doesn't have to be) identical to the node pair hardware it is extending.
A DR (disaster recovery) Host acts as a remotely hosted "third node" that can be manually pressed into service in a situation where both nodes in a node pair are destroyed. A common example would be a DR Host being in another building on a campus installation, or on the far side of the building / vessel.
A DR host can in theory be in another city, but storage replication speeds and latency need to be considered. Storage replication between node pairs is synchronous, where replication to DR can be asynchronous. However, consideration of storage loads are required to insure that storage data can keep up with the rate of data change.
Foundation Pack Equipment
The Anvil! is, fundamentally, hardware agnostic. That said, the hardware you select must be configured to meet the Anvil! requirements.
As we are hardware agnostic, we've created three linked pages. As we validate hardware ourselves, we will expand hardware-specific configuration guides. If you've configured foundation pack equipment not in the pages below, and you are willing, we would love to add your configuration instructions to our list.
Striker, Node and DR Host Configuration
In UEFI (BIOS), configure;
- Striker Dashboards to power on after power loss in all cases.
- Configure Subnodes to stay powered off after power loss in all cases.
- Configure any machines with redundant PSUs to balance the load across PSUs (don't use "hot spare" where only one PSU is active carrying the full load)
If using RAID
- If you have two drives, configure RAID level 1 (mirroring)
- If using 3 to 8 drives, configure RAID level 5 (striping with N-1 parity)
- If using 9+ drives, configure RAID level 6 (striping with N-2 parity)
Note that a server on a given node-pair will have it's data mirrored, effectively creating a sort of RAID level 11 (mirror of mirrors), 15 (mirror of N-1 stripes) or 16 (mirror of N-2 stripes). This is why we're comfortable pushing RAID level 5 to 8 disks.
Installation of Base OS
For all three machine types; (striker dashboards, node-pair sub-node, dr host), begin with a minimal RHEL 8 or CentOS Stream 8 install.
| Note: This tutorial assumes an existing understanding of installed RHEL 8. If you are new to RHEL, you can setup a free Red Hat account, and then follow their installation guide. |
Base OS Install
| Note: Every effort has been made in the development of the Anvil! to ensure it will work with localisations. However, parsing of command output has been tested with Canadian and American English. As such, it is recommended that you install using one of these localisations. If you use a different localisation, and run into any problems, please let us know and we will try to add support. |
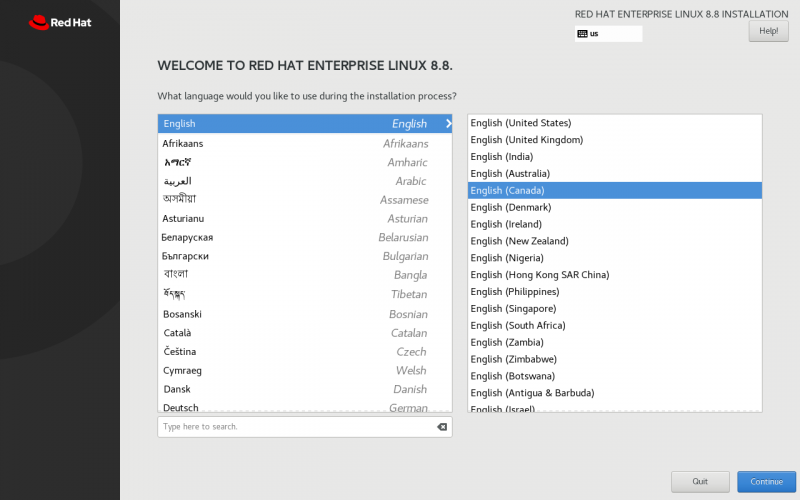
Localisation
Choose your localisation;
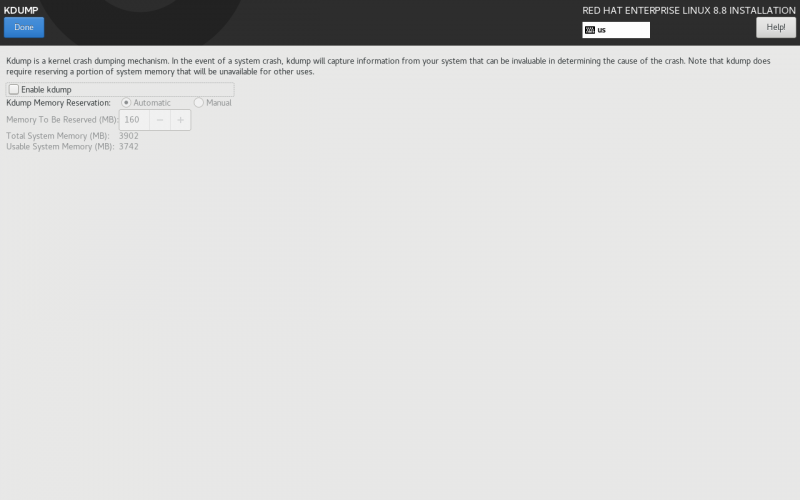
KDUMP
Disable kdump; This prevents kernel dumps if the OS crashes, but it means the host will recover faster. If you want to leave kdump enabled, that is fine, but be aware of the slower recovery times. Note that a subnode getting fenced will be forced off, and so kernel dumps won't be collected regardless of this configuration.
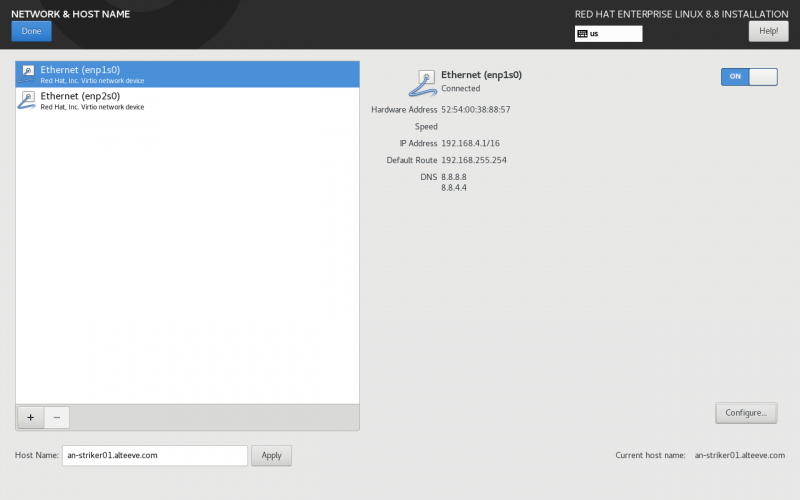
Network & Host Name
Set the host name for the machine. It's useful to do this before configuring the network, so that the volume group name includes the host's short host name. This doesn't effect the operation of the Anvil! system, but it can assist with debugging down the road.
| Note: Don't worry about configuring the network, this will be handles by the Anvil! later. Setting the IFN IP at this stage can be useful, but is not required. |
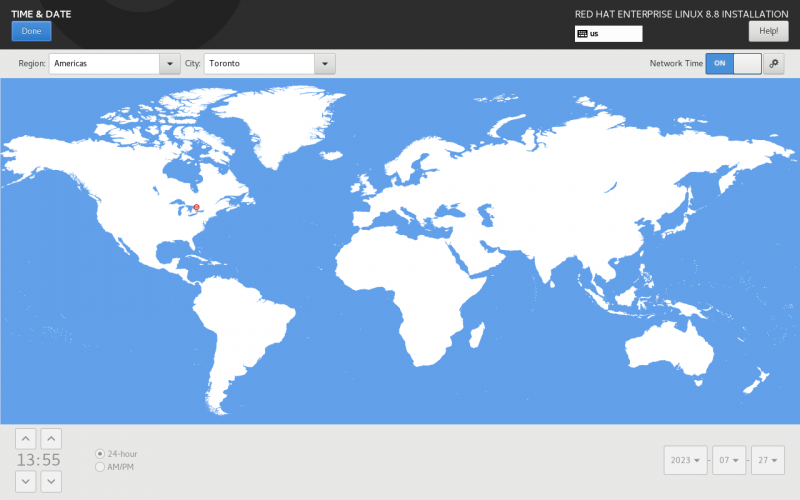
Time & Date
Setting the timezone is very much specific to you and your install. The most important part is that the time zone is set consistently across all machines in the Anvil! cluster.
Software Selection
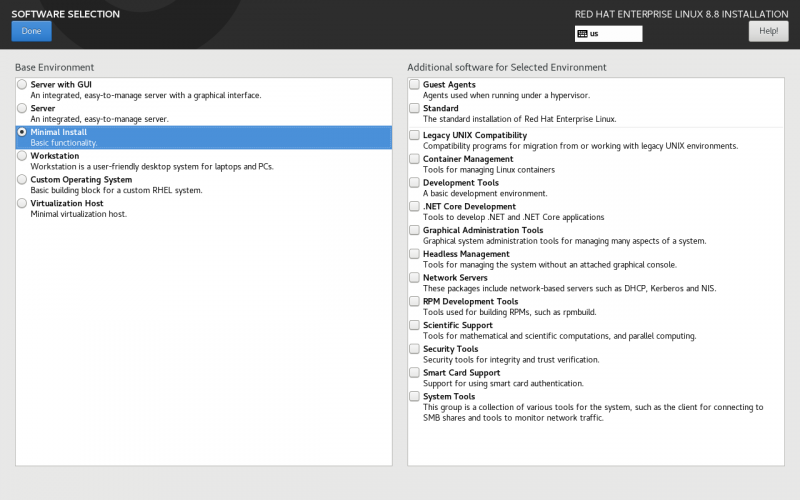
All machines can start with a Minimal Install. On Strikers, if you'd prefer to use Server With GUI, that is fine, but it is not needed at this step. The anvil-striker RPM will pull in the graphical interface.
| Note: If you select a graphical install on a Striker Dashboard, create a user called admin and set a password for that user. |
Installation Destination
| Note: It is strongly suggested to set the host name before configuring storage. |
| Note: This is where the installation of a Striker dashboard will differ from an Anvil! Node's sub-node or DR host |
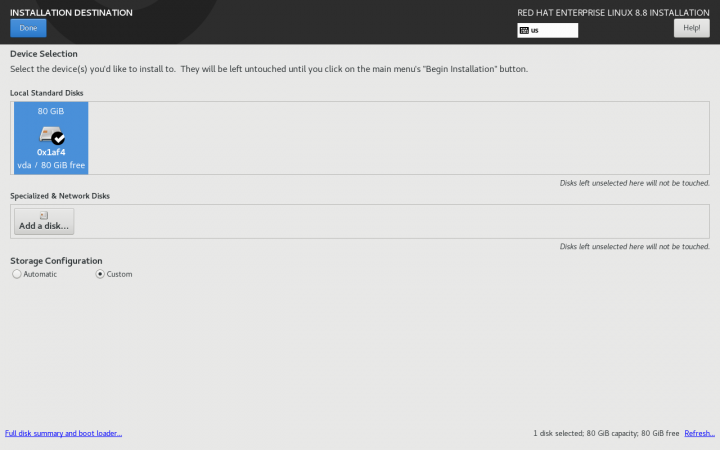
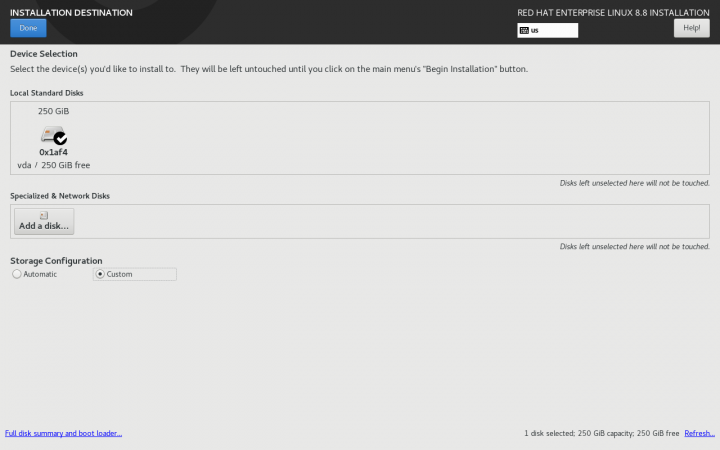
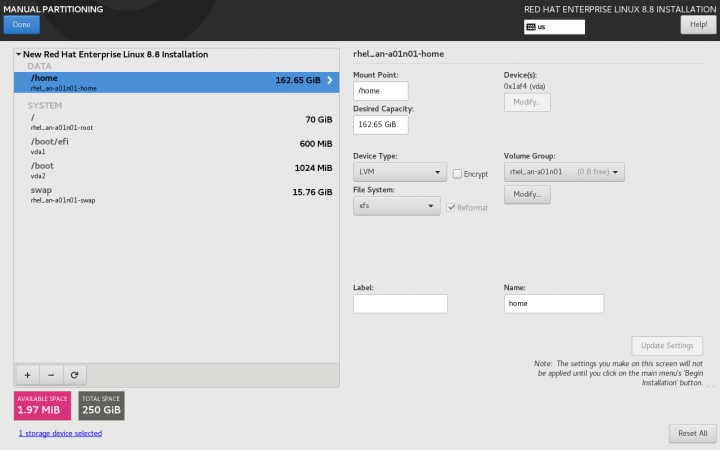
In this example, there is a single hard drive that will be configured. It's entirely valid to have a dedicated OS drive, and using a second drive for hosting servers. If you're planning to use a different storage plan, then you can ignore this stage. The key requirement is that there is unused space sufficiently large to host the servers you plan to run on a given node or DR host.
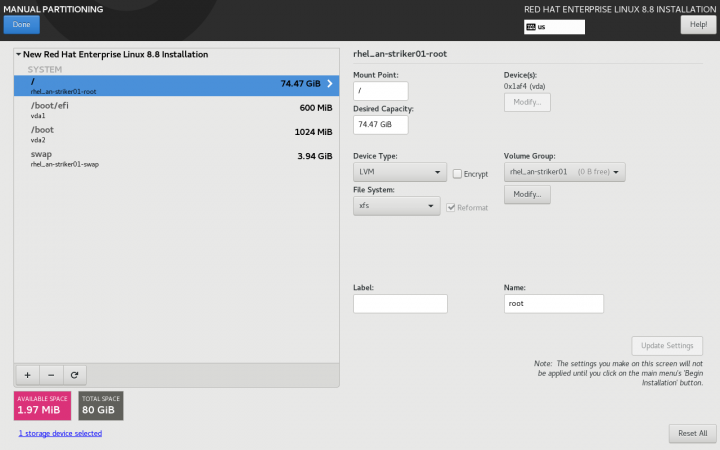
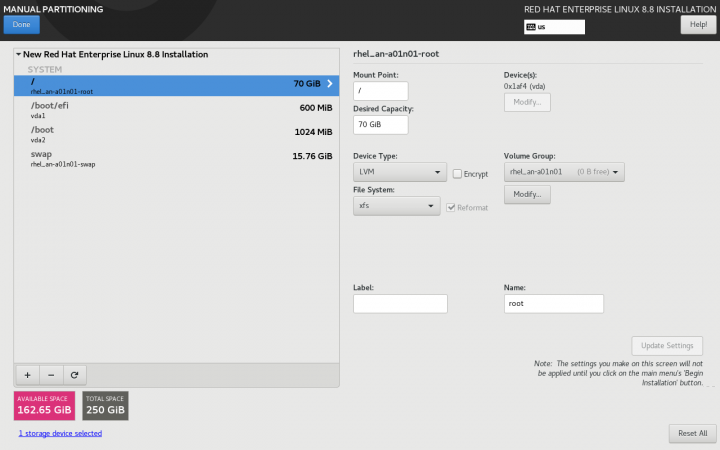
| Striker Dashboards | Anvil! Subnodes and DR Hosts |
|---|---|
Click on Click here to create them automatically. This will create the base storage configuration, which we will adapt.
| Striker Dashboards | Anvil! Subnodes and DR Hosts |
|---|---|
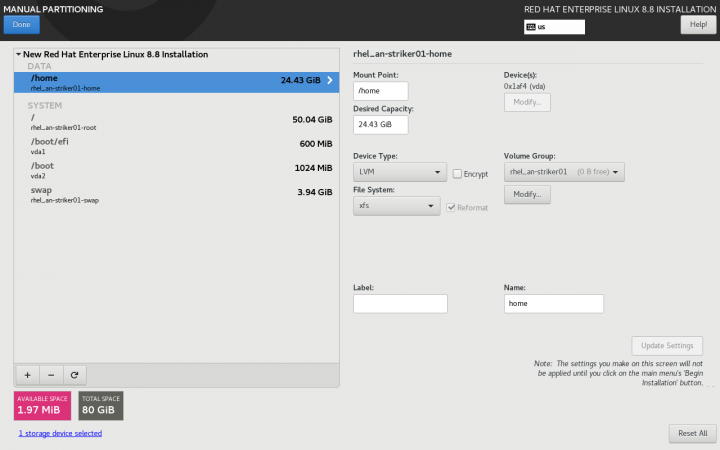
In all cases, the auto-created /home logical volume will be deleted.
- For Striker dashboards, after deleting /home, assign the freed space to the / partition. To do this, select the / partition, and set the Desired Capacity to some much larger size than is available (like 1TiB), and click on Update Setting. The size will change to the largest valid value.
- For Anvil! subnodes and DR hosts, simply delete the /home partition, and do not give the free space to /. The space freed up by deleting /home will be used later for hosting servers.
| Striker Dashboards | Anvil! Subnodes and DR Hosts |
|---|---|
From this point forward, the rest of the OS install is the same for all systems.
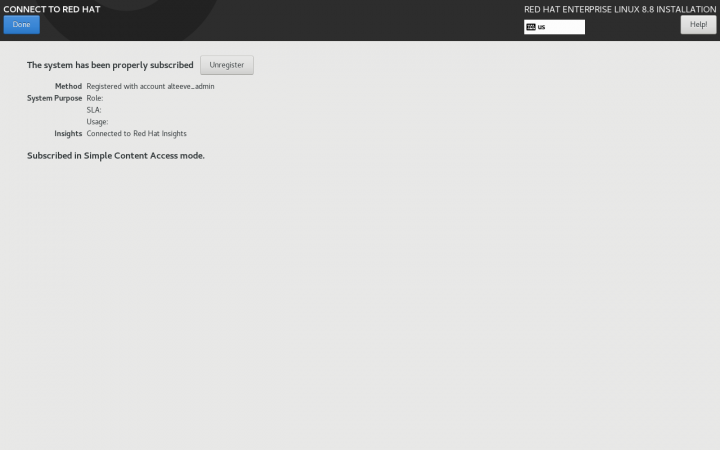
Optional; Connect to Red Hat
If you are installing RHEL 8, as opposed to CentOS Stream 8, you can register the server during installation. If you don't do this, the Anvil! will give you a chance to register the server during the installation process also.
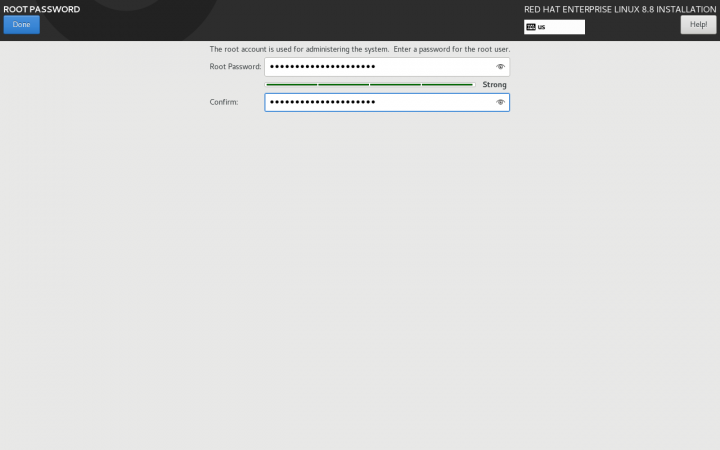
Root Password
Set the root user password.
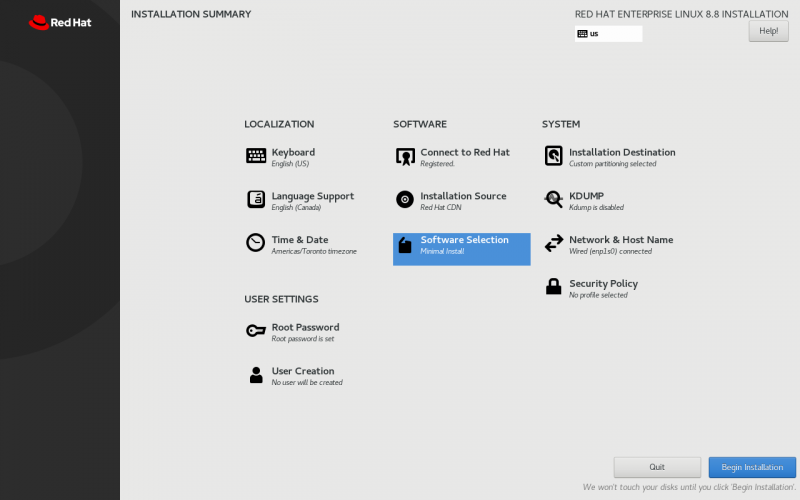
Begin Installation
With everything selected, click on Begin Installation. When the install has completed, reboot into the minimal install.
Post OS Install Configuration
Setting up the Alteeve repos is the same, but after that, the steps start to diverge depending on which machine type we're setting up in the Anvil! cluster.
Installing the Alteeve Repo
| Note: Our repo pulls in a bunch of other packages that will be needed shortly. |
There are two Alteeve repositories that you can install; Community and Enterprise. Which is used is selected after the repository RPM is installed. Lets install the repo RPM, and then we will discuss the differences before we select one.
dnf install https://alteeve.com/an-repo/m3/alteeve-release-latest.noarch.rpm
Updating Subscription Management repositories.
Last metadata expiration check: 0:39:42 ago on Fri 28 Jul 2023 04:21:39 PM EDT.
anvil-release-latest.noarch.rpm                                                                    59 kB/s |  12 kB     00:00
Dependencies resolved.
==================================================================================================================================
 Package                         Arch      Version                                      Repository                           Size
==================================================================================================================================
Installing:
 alteeve-release                 noarch    0.1-2                                        @commandline                         12 k
Installing dependencies:
 dwz                             x86_64    0.12-10.el8                                  rhel-8-for-x86_64-appstream-rpms    109 k
 efi-srpm-macros                 noarch    3-3.el8                                      rhel-8-for-x86_64-appstream-rpms     22 k
 ghc-srpm-macros                 noarch    1.4.2-7.el8                                  rhel-8-for-x86_64-appstream-rpms    9.4 k
 go-srpm-macros                  noarch    2-17.el8                                     rhel-8-for-x86_64-appstream-rpms     13 k
 make                            x86_64    1:4.2.1-11.el8                               rhel-8-for-x86_64-baseos-rpms       498 k
 ocaml-srpm-macros               noarch    5-4.el8                                      rhel-8-for-x86_64-appstream-rpms    9.5 k
 openblas-srpm-macros            noarch    2-2.el8                                      rhel-8-for-x86_64-appstream-rpms    8.0 k
 perl                            x86_64    4:5.26.3-422.el8                             rhel-8-for-x86_64-appstream-rpms     73 k
<...snip...>
 perl-version                    x86_64    6:0.99.24-1.el8                              rhel-8-for-x86_64-appstream-rpms     67 k
 python-rpm-macros               noarch    3-45.el8                                     rhel-8-for-x86_64-appstream-rpms     16 k
 python-srpm-macros              noarch    3-45.el8                                     rhel-8-for-x86_64-appstream-rpms     16 k
 python3-pyparsing               noarch    2.1.10-7.el8                                 rhel-8-for-x86_64-baseos-rpms       142 k
 python3-rpm-macros              noarch    3-45.el8                                     rhel-8-for-x86_64-appstream-rpms     15 k
 qt5-srpm-macros                 noarch    5.15.3-1.el8                                 rhel-8-for-x86_64-appstream-rpms     11 k
 redhat-rpm-config               noarch    131-1.el8                                    rhel-8-for-x86_64-appstream-rpms     91 k
 rust-srpm-macros                noarch    5-2.el8                                      rhel-8-for-x86_64-appstream-rpms    9.3 k
 systemtap-sdt-devel             x86_64    4.8-2.el8                                    rhel-8-for-x86_64-appstream-rpms     88 k
 unzip                           x86_64    6.0-46.el8                                   rhel-8-for-x86_64-baseos-rpms       196 k
 zip                             x86_64    3.0-23.el8                                   rhel-8-for-x86_64-baseos-rpms       270 k
Installing weak dependencies:
 perl-Encode-Locale              noarch    1.05-10.module+el8.3.0+6498+9eecfe51         rhel-8-for-x86_64-appstream-rpms     22 k
 perl-IO-Socket-SSL              noarch    2.066-4.module+el8.3.0+6446+594cad75         rhel-8-for-x86_64-appstream-rpms    298 k
 perl-Mozilla-CA                 noarch    20160104-7.module+el8.3.0+6498+9eecfe51      rhel-8-for-x86_64-appstream-rpms     15 k
 perl-TermReadKey                x86_64    2.37-7.el8                                   rhel-8-for-x86_64-appstream-rpms     40 k
Enabling module streams:
 perl                                      5.26
 perl-IO-Socket-SSL                        2.066
 perl-libwww-perl                          6.34

Transaction Summary
==================================================================================================================================
Install  159 Packages

Total size: 23 M
Total download size: 23 M
Installed size: 64 M
Is this ok [y/N]:
Downloading Packages:
(1/158): perl-Scalar-List-Utils-1.49-2.el8.x86_64.rpm                                             173 kB/s |  68 kB     00:00
(2/158): perl-Data-Dumper-2.167-399.el8.x86_64.rpm                                                147 kB/s |  58 kB     00:00
(3/158): perl-PathTools-3.74-1.el8.x86_64.rpm                                                     155 kB/s |  90 kB     00:00
(4/158): perl-threads-shared-1.58-2.el8.x86_64.rpm                                                127 kB/s |  48 kB     00:00
(5/158): perl-Unicode-Normalize-1.25-396.el8.x86_64.rpm                                           431 kB/s |  82 kB     00:00
(6/158): zip-3.0-23.el8.x86_64.rpm                                                                896 kB/s | 270 kB     00:00
(7/158): perl-MIME-Base64-3.15-396.el8.x86_64.rpm                                                 101 kB/s |  31 kB     00:00
(8/158): perl-Pod-Simple-3.35-395.el8.noarch.rpm                                                  879 kB/s | 213 kB     00:00
<...snip...>
(156/158): python-srpm-macros-3-45.el8.noarch.rpm                                                  65 kB/s |  16 kB     00:00
(157/158): perl-open-1.11-422.el8.noarch.rpm                                                      818 kB/s |  78 kB     00:00
(158/158): perl-utils-5.26.3-422.el8.noarch.rpm                                                   269 kB/s | 129 kB     00:00
----------------------------------------------------------------------------------------------------------------------------------
Total                                                                                             1.6 MB/s |  23 MB     00:14
Running transaction check
Transaction check succeeded.
Running transaction test
Transaction test succeeded.
Running transaction
  Preparing        :                                                                                                          1/1
  Installing       : perl-Digest-1.17-395.el8.noarch                                                                        1/159
  Installing       : perl-Digest-MD5-2.55-396.el8.x86_64                                                                    2/159
  Installing       : perl-Data-Dumper-2.167-399.el8.x86_64                                                                  3/159
  Installing       : perl-libnet-3.11-3.el8.noarch                                                                          4/159
  Installing       : perl-Net-SSLeay-1.88-2.module+el8.6.0+13392+f0897f98.x86_64                                            5/159
<...snip...>
  Installing       : perl-CPAN-2.18-397.el8.noarch                                                                        156/159
  Installing       : perl-Encode-devel-4:2.97-3.el8.x86_64                                                                157/159
  Installing       : perl-4:5.26.3-422.el8.x86_64                                                                         158/159
  Installing       : alteeve-release-0.1-2.noarch                                                                         159/159
  Running scriptlet: alteeve-release-0.1-2.noarch                                                                         159/159
  Verifying        : perl-Scalar-List-Utils-3:1.49-2.el8.x86_64                                                             1/159
  Verifying        : perl-PathTools-3.74-1.el8.x86_64                                                                       2/159
  Verifying        : perl-Data-Dumper-2.167-399.el8.x86_64                                                                  3/159
  Verifying        : perl-threads-shared-1.58-2.el8.x86_64                                                                  4/159
  Verifying        : perl-Encode-4:2.97-3.el8.x86_64                                                                        5/159
<...snip...>
  Verifying        : python-srpm-macros-3-45.el8.noarch                                                                   155/159
  Verifying        : perl-SelfLoader-1.23-422.el8.noarch                                                                  156/159
  Verifying        : perl-open-1.11-422.el8.noarch                                                                        157/159
  Verifying        : perl-utils-5.26.3-422.el8.noarch                                                                     158/159
  Verifying        : alteeve-release-0.1-2.noarch                                                                         159/159
Installed products updated.

Installed:
  alteeve-release-0.1-2.noarch                                    dwz-0.12-10.el8.x86_64
  efi-srpm-macros-3-3.el8.noarch                                  ghc-srpm-macros-1.4.2-7.el8.noarch
<...snip...>
  redhat-rpm-config-131-1.el8.noarch                              rust-srpm-macros-5-2.el8.noarch
  systemtap-sdt-devel-4.8-2.el8.x86_64                            unzip-6.0-46.el8.x86_64
  zip-3.0-23.el8.x86_64

Complete!
Selecting a Repository
There are two released version of the Anvil! cluster. There are pros and cons to both options;
Community Repo
The Community repository is the free repo that anyone can use. As new builds pass our CI/CD test infrastructure, the versions in this repository are automatically built.
This repository always has the latest and greatest from Alteeve. We use Jenkins and a suite of proprietary test suite to ensure that the quality of the releases is excellent. Of course, Alteeve is a company of humans, and there's always a small chance that a bug could get through. Our free community repository is community supported, and it's our wonderful users who help us improve and refine our Anvil! platform.
Enterprise Repo
The Enterprise repository is the paid-access repository. The releases in the enterprise repo are "cherry picked" by Alteeve, and subjected to more extensive testing and QA. This repo is designed for businesses who want the most stable releases.
Using this repo opens up the option of active monitoring of your Anvil! cluster by Alteeve, also!
If you choose to get the Enterprise repo, please contact us and we will provide you with a custome repository key.
Configuring the Alteeve Repo
To configure the repo, we will use the alteeve-repo-setup program that was just installed.
You can see a full list of options, including the use of the --key <uuid> to enable to Enterprise Repo. For this tutorial, we will configure the community repo.
alteeve-repo-setup
You have not specified an Enterprise repo key. This will enable the community
repository. We work quite hard to make it as stable as we possibly can, but it
does lead Enterprise.
Proceed? [y/N]:
Writing: [/etc/yum.repos.d/alteeve-anvil.repo]...
Repo: [rhel-8] created successfuly.

This is RHEL 8. Once subscribed, please enable this repo;
# subscription-manager repos --enable codeready-builder-for-rhel-8-x86_64-rpms

NOTE: On *nodes*, also add the High-Availability Addon repo as well;
# subscription-manager repos --enable rhel-8-for-x86_64-highavailability-rpms
If you are installing using CentOS Stream 8, you are done now and can move on.
RHEL 8 Additional Repos
If you are using RHEL 8 proper, with the system now subscribed, we now need to enable additional repositories
On all systems;
subscription-manager repos --enable codeready-builder-for-rhel-8-x86_64-rpms
Repository 'codeready-builder-for-rhel-8-x86_64-rpms' is enabled for this system.
On Anvil! subnodes only, not Striker dashboards or DR hosts.
subscription-manager repos --enable rhel-8-for-x86_64-highavailability-rpms
Repository 'rhel-8-for-x86_64-highavailability-rpms' is enabled for this system.
Is this ok [y/N]:
Running transaction check
Transaction check succeeded.
Running transaction test
Transaction test succeeded.
Running transaction
  Preparing        :                                                                                                          1/1
  Erasing          : biosdevname-0.7.3-2.el8.x86_64                                                                           1/1
  Running scriptlet: biosdevname-0.7.3-2.el8.x86_64                                                                           1/1
  Verifying        : biosdevname-0.7.3-2.el8.x86_64                                                                           1/1
Installed products updated.

Removed:
  biosdevname-0.7.3-2.el8.x86_64

Complete!
Installing Anvil! Packages
This is the step where, from a software perspective, Anvil! cluster systems differentiate to become Striker Dashboards, Anvil! subnodes, and DR hosts. Which a given machine becomes depends on which RPM is installed. The three RPMs that set a machine's role are;
| Striker Dashboards: | anvil-striker |
|---|---|
| Anvil! Subnodes: | anvil-node |
| DR Hosts: | anvil-dr |
Removing biosdevname
| Note: When M3 is ported to EL9, the network interfaces will no longer be renamed in the same manner, and removing biosdevname will no longer be required. |
Before we can install these RPMs, though, we need to remove the package called biosdevname. Anvil! M3 on EL8 renames the network interfaces to reflect their role. By default, network interfaces are named using predictive names based on their physical location in the machine. Removing this package disables that feature and allows us to rename the interfaces
dnf remove biosdevname
Is this ok [y/N]:
Updating Subscription Management repositories.
Dependencies resolved.
-=================================================================================================================================
 Package                    Architecture          Version                     Repository                                     Size
-=================================================================================================================================
Removing:
 biosdevname                x86_64                0.7.3-2.el8                 @rhel-8-for-x86_64-baseos-rpms                 67 k

Transaction Summary
-=================================================================================================================================
Remove  1 Package

Freed space: 67 k
Striker Dashboards; Installing anvil-striker
Now we're ready to install!
| Note: Given the install of the OS was minimal, these RPMs pull in a lot of RPMs. The output below is truncated. |
Thus, let's install the RPMs on our systems.
dnf install anvil-striker
Updating Subscription Management repositories.
Last metadata expiration check: 0:07:31 ago on Fri 28 Jul 2023 06:00:20 PM EDT.
Dependencies resolved.
-=================================================================================================================================
 Package                         Arch   Version                                    Repository                                Size
-=================================================================================================================================
Installing:
 anvil-striker                   noarch 2.90-1.2704.25b460.el8                     anvil-community-rhel-8                   3.7 M
Installing dependencies:
 GConf2                          x86_64 3.2.6-22.el8                               rhel-8-for-x86_64-appstream-rpms         1.0 M
 ModemManager-glib               x86_64 1.20.2-1.el8                               rhel-8-for-x86_64-baseos-rpms            338 k
 NetworkManager-initscripts-updown
                                 noarch 1:1.40.16-3.el8_8                          rhel-8-for-x86_64-baseos-rpms            143 k
 SDL                             x86_64 1.2.15-39.el8                              rhel-8-for-x86_64-appstream-rpms         218 k
<...snip...>
 telnet                          x86_64 1:0.17-76.el8                              rhel-8-for-x86_64-appstream-rpms          72 k
 vino                            x86_64 3.22.0-11.el8                              rhel-8-for-x86_64-appstream-rpms         461 k
 xorg-x11-server-Xorg            x86_64 1.20.11-15.el8                             rhel-8-for-x86_64-appstream-rpms         1.5 M
Enabling module streams:
 llvm-toolset                           rhel8
 nodejs                                 10
 perl-App-cpanminus                     1.7044
 perl-DBD-Pg                            3.7
 perl-DBI                               1.641
 perl-YAML                              1.24
 postgresql                             10
 python36                               3.6

Transaction Summary
-=================================================================================================================================
Install  686 Packages

Total download size: 601 M
Installed size: 2.1 G
Is this ok [y/N]:
Downloading Packages:
(1/686): htop-3.2.1-1.el8.x86_64.rpm                                                              549 kB/s | 172 kB     00:00
(2/686): perl-Algorithm-C3-0.11-6.el8.noarch.rpm                                                  457 kB/s |  29 kB     00:00
(3/686): perl-Class-C3-0.35-6.el8.noarch.rpm                                                      781 kB/s |  37 kB     00:00
<...snip...>
(684/686): webkit2gtk3-jsc-2.38.5-1.el8_8.5.x86_64.rpm                                            3.7 MB/s | 3.7 MB     00:00
(685/686): webkit2gtk3-2.38.5-1.el8_8.5.x86_64.rpm                                                7.7 MB/s |  21 MB     00:02
(686/686): firefox-102.13.0-2.el8_8.x86_64.rpm                                                    5.5 MB/s | 109 MB     00:19
----------------------------------------------------------------------------------------------------------------------------------
Total                                                                                             6.0 MB/s | 601 MB     01:40
Anvil Community Repository (rhel-8)                                                               1.6 MB/s | 1.6 kB     00:00
Importing GPG key 0xD548C925:
 Userid     : "Alteeve's Niche! Inc. repository <support@alteeve.ca>"
 Fingerprint: 3082 E979 518A 78DD 9569 CD2E 9D42 AA76 D548 C925
 From       : /etc/pki/rpm-gpg/RPM-GPG-KEY-Alteeve-Official
Is this ok [y/N]: y
Key imported successfully
Running transaction check
Transaction check succeeded.
Running transaction test
Transaction test succeeded.
Running transaction
  Running scriptlet: npm-1:6.14.11-1.10.24.0.1.module+el8.3.0+10166+b07ac28e.x86_64                                           1/1
  Preparing        :                                                                                                          1/1
  Installing       : gdk-pixbuf2-2.36.12-5.el8.x86_64                                                                       1/686
  Running scriptlet: gdk-pixbuf2-2.36.12-5.el8.x86_64                                                                       1/686
  Installing       : atk-2.28.1-1.el8.x86_64                                                                                2/686
  Installing       : libwayland-client-1.21.0-1.el8.x86_64                                                                  3/686
<...snip...>
  Verifying        : bind-utils-32:9.11.36-8.el8_8.1.x86_64                                                               684/686
  Verifying        : webkit2gtk3-jsc-2.38.5-1.el8_8.5.x86_64                                                              685/686
  Verifying        : webkit2gtk3-2.38.5-1.el8_8.5.x86_64                                                                  686/686
Installed products updated.

Installed:
  GConf2-3.2.6-22.el8.x86_64
  ModemManager-glib-1.20.2-1.el8.x86_64
  NetworkManager-initscripts-updown-1:1.40.16-3.el8_8.noarch
<...snip...>
  yum-utils-4.0.21-19.el8_8.noarch
  zenity-3.28.1-2.el8.x86_64
  zlib-devel-1.2.11-21.el8_7.x86_64

Complete!
Done!
Setting the Anvil! Password
| Note: This step is required on Striker dashboards only. There will be a chance to change the password on the other machines later. |
On Striker dashboards, you need to set the initial password. Generally this will be the same as what you set for the root user during the OS install earlier. It doesn't have to be, of course, but if you use a different password in this step, note that the root user password will change to the new password.
To update the password, run the anvil-change-password too.
anvil-change-password --new-password "super secret password"
About to update the local passwords (shell users, database and web interface).
Proceed? [y/N] y
Updating the Striker user: [admin] password... Set-Cookie:anvil_user_uuid=; expires=-1d;
Set-Cookie:anvil_user_hash=; expires=-1d;
Done.
Updating the database user: [postgres] password... Done.
Updating the database user: [admin] password... Done.
Updating the local config file: [super secret password] database password... Done.
Updating the shell user: [admin] password... Done.
Updating the shell user: [root] password... Done.
Finished!

NOTE: You must update the password of any other system using this host's
      database manually!
This is the same tool you will use later on if you ever want to change the password for the Striker Dashboard, or for any Anvil! node (using the --anvil <name> switch).
Done!
Anvil! Subnode; Installing anvil-node
dnf install anvil-node
Updating Subscription Management repositories.
Last metadata expiration check: 0:00:47 ago on Fri 28 Jul 2023 06:10:29 PM EDT.
Dependencies resolved.
-=================================================================================================================================
 Package                         Arch   Version                                    Repository                                Size
-=================================================================================================================================
Installing:
 anvil-node                      noarch 2.90-1.2704.25b460.el8                     anvil-community-rhel-8                    25 k
Installing dependencies:
 NetworkManager-initscripts-updown
                                 noarch 1:1.40.16-3.el8_8                          rhel-8-for-x86_64-baseos-rpms            143 k
 akmod-drbd                      x86_64 9.2.4-1.el8                                anvil-community-rhel-8                   1.3 M
 akmods                          noarch 0.5.7-8.el8                                anvil-community-rhel-8                    34 k
 alsa-lib                        x86_64 1.2.8-2.el8                                rhel-8-for-x86_64-appstream-rpms         497 k
<...snip...>
 rubygem-io-console              x86_64 0.4.6-110.module+el8.6.0+15956+aa803fc1    rhel-8-for-x86_64-appstream-rpms          68 k
 rubygem-rdoc                    noarch 6.0.1.1-110.module+el8.6.0+15956+aa803fc1  rhel-8-for-x86_64-appstream-rpms         457 k
 telnet                          x86_64 1:0.17-76.el8                              rhel-8-for-x86_64-appstream-rpms          72 k
Enabling module streams:
 idm                                    client
 llvm-toolset                           rhel8
 perl-App-cpanminus                     1.7044
 perl-DBD-Pg                            3.7
 perl-DBI                               1.641
 perl-YAML                              1.24
 postgresql                             10
 python36                               3.6
 ruby                                   2.5

Transaction Summary
-================================================================================================================================
Install  489 Packages

Total download size: 330 M
Installed size: 1.3 G
Is this ok [y/N]:
Downloading Packages:
(1/489): akmods-0.5.7-8.el8.noarch.rpm                                                            115 kB/s |  34 kB     00:00
(2/489): anvil-node-2.90-1.2704.25b460.el8.noarch.rpm                                             602 kB/s |  25 kB     00:00
(3/489): akmod-drbd-9.2.4-1.el8.x86_64.rpm                                                        2.6 MB/s | 1.3 MB     00:00
<...snip...>
(487/489): perl-Devel-StackTrace-2.03-2.el8.noarch.rpm                                            180 kB/s |  35 kB     00:00
(488/489): perl-Specio-0.42-2.el8.noarch.rpm                                                      410 kB/s | 159 kB     00:00
(489/489): perl-File-DesktopEntry-0.22-7.el8.noarch.rpm                                           137 kB/s |  27 kB     00:00
----------------------------------------------------------------------------------------------------------------------------------
Total                                                                                             5.7 MB/s | 330 MB     00:57
Anvil Community Repository (rhel-8)                                                               1.6 MB/s | 1.6 kB     00:00
Importing GPG key 0xD548C925:
 Userid     : "Alteeve's Niche! Inc. repository <support@alteeve.ca>"
 Fingerprint: 3082 E979 518A 78DD 9569 CD2E 9D42 AA76 D548 C925
 From       : /etc/pki/rpm-gpg/RPM-GPG-KEY-Alteeve-Official
Is this ok [y/N]:
Key imported successfully
Running transaction check
Transaction check succeeded.
Running transaction test
Transaction test succeeded.
Running transaction
  Preparing        :                                                                                                          1/1
  Installing       : ruby-libs-2.5.9-110.module+el8.6.0+15956+aa803fc1.x86_64                                               1/489
  Installing       : telnet-1:0.17-76.el8.x86_64                                                                            2/489
  Installing       : rubygem-io-console-0.4.6-110.module+el8.6.0+15956+aa803fc1.x86_64                                      3/489
<...snip...>
  Verifying        : perl-Devel-StackTrace-1:2.03-2.el8.noarch                                                            487/489
  Verifying        : perl-namespace-clean-0.27-7.el8.noarch                                                               488/489
  Verifying        : perl-File-DesktopEntry-0.22-7.el8.noarch                                                             489/489
Installed products updated.

Installed:
  NetworkManager-initscripts-updown-1:1.40.16-3.el8_8.noarch
  abattis-cantarell-fonts-0.0.25-6.el8.noarch
  akmod-drbd-9.2.4-1.el8.x86_64
<...snip...>
  yum-utils-4.0.21-19.el8_8.noarch
  zlib-devel-1.2.11-21.el8_7.x86_64
  zstd-1.4.4-1.el8.x86_64

Complete!
Disaster Recovery Host; Installing anvil-dr
dnf install anvil-dr
Updating Subscription Management repositories.
Last metadata expiration check: 0:00:46 ago on Fri 28 Jul 2023 06:10:37 PM EDT.
Dependencies resolved.
-=================================================================================================================================
 Package                         Arch   Version                                    Repository                                Size
-=================================================================================================================================
Installing:
 anvil-dr                        noarch 2.90-1.2704.25b460.el8                     anvil-community-rhel-8                   8.5 k
Installing dependencies:
 NetworkManager-initscripts-updown
                                 noarch 1:1.40.16-3.el8_8                          rhel-8-for-x86_64-baseos-rpms            143 k
 SDL                             x86_64 1.2.15-39.el8                              rhel-8-for-x86_64-appstream-rpms         218 k
 akmod-drbd                      x86_64 9.2.4-1.el8                                anvil-community-rhel-8                   1.3 M
 akmods                          noarch 0.5.7-8.el8                                anvil-community-rhel-8                    34 k
<...snip...>
 geolite2-country                noarch 20180605-1.el8                             rhel-8-for-x86_64-appstream-rpms         1.0 M
 openssl-devel                   x86_64 1:1.1.1k-9.el8_7                           rhel-8-for-x86_64-baseos-rpms            2.3 M
 telnet                          x86_64 1:0.17-76.el8                              rhel-8-for-x86_64-appstream-rpms          72 k
Enabling module streams:
 idm                                    client
 llvm-toolset                           rhel8
 perl-App-cpanminus                     1.7044
 perl-DBD-Pg                            3.7
 perl-DBI                               1.641
 perl-YAML                              1.24
 postgresql                             10
 python36                               3.6

Transaction Summary
-=================================================================================================================================
Install  459 Packages

Total download size: 315 M
Installed size: 1.3 G
Is this ok [y/N]:
Downloading Packages:
(1/459): akmods-0.5.7-8.el8.noarch.rpm                                                            123 kB/s |  34 kB     00:00
(2/459): anvil-dr-2.90-1.2704.25b460.el8.noarch.rpm                                               229 kB/s | 8.5 kB     00:00
(3/459): anvil-core-2.90-1.2704.25b460.el8.noarch.rpm                                             1.9 MB/s | 1.0 MB     00:00
<...snip...>
(457/459): perl-Capture-Tiny-0.46-4.el8.noarch.rpm                                                107 kB/s |  39 kB     00:00
(458/459): perl-Devel-StackTrace-2.03-2.el8.noarch.rpm                                            125 kB/s |  35 kB     00:00
(459/459): perl-File-DesktopEntry-0.22-7.el8.noarch.rpm                                           277 kB/s |  27 kB     00:00
----------------------------------------------------------------------------------------------------------------------------------
Total                                                                                             6.4 MB/s | 315 MB     00:48
Anvil Community Repository (rhel-8)                                                               1.6 MB/s | 1.6 kB     00:00
Importing GPG key 0xD548C925:
 Userid     : "Alteeve's Niche! Inc. repository <support@alteeve.ca>"
 Fingerprint: 3082 E979 518A 78DD 9569 CD2E 9D42 AA76 D548 C925
 From       : /etc/pki/rpm-gpg/RPM-GPG-KEY-Alteeve-Official
Is this ok [y/N]:
Key imported successfully
Running transaction check
Transaction check succeeded.
Running transaction test
Transaction test succeeded.
Running transaction
  Preparing        :                                                                                                          1/1
  Installing       : telnet-1:0.17-76.el8.x86_64                                                                            1/459
  Installing       : nspr-4.34.0-3.el8_6.x86_64                                                                             2/459
  Running scriptlet: nspr-4.34.0-3.el8_6.x86_64                                                                             2/459
<...snip...>
  Verifying        : perl-Devel-StackTrace-1:2.03-2.el8.noarch                                                            457/459
  Verifying        : perl-namespace-clean-0.27-7.el8.noarch                                                               458/459
  Verifying        : perl-File-DesktopEntry-0.22-7.el8.noarch                                                             459/459
Installed products updated.

Installed:
  NetworkManager-initscripts-updown-1:1.40.16-3.el8_8.noarch
  SDL-1.2.15-39.el8.x86_64
  abattis-cantarell-fonts-0.0.25-6.el8.noarch
<...snip...>
  yum-utils-4.0.21-19.el8_8.noarch
  zlib-devel-1.2.11-21.el8_7.x86_64
  zstd-1.4.4-1.el8.x86_64

Complete!
Configuring the Striker Dashboards
| Note: The admin user will automatically be created by anvil-daemon after anvil-striker is installed. You don't need to create this account manually. |
There are no default passwords on Anvil! systems. So the first step is to set the password for the admin user.
passwd admin
Changing password for user admin.
Enter the password you want to use twice.
New password:
Retype new password:
passwd: all authentication tokens updated successfully.
Now we can switch to the graphical interface!
Striker Dashboard
| Note: If you don't see the graphical login, either reboot the machine, or run systemctl isolate graphical.target. |
Log in to the Anvil! user account with the password you set above.
Click on Activities on the top-left corner, and then click on the Firefox icon to open the browser.
In Firefox, enter the URL http://localhost. This will load the initial Striker configuration page where we'll start configuring the dashboard.
Fields;
| Organization name | This is a descriptive name for the given Anvil! cluster. Generally this is a company, organization or site name. |
|---|---|
| Domain name | This is the domain name that will be used when setting host names in the cluster. Generally this is the domain of the organization who use the Anvil! cluster. |
| Prefix | This is a short, generally 2~5 characters, descriptive prefix for a given Anvil! cluster. It is used as the leading part of a machine's short host name. |
| Striker # | Most Anvil! clusters have two Striker dashboards. This sets the sequence number, so the first is '1' and the second is '2'. If you have multiple Anvil! clusters, the first Striker on the second Anvil! cluster would be '3', etc. |
| Host name | This is the host name for this striker. Generally it's in the format of <prefix>-striker0<sequence>.<domain>. |
| Admin Password | This is the cluster's password, and should generally be the same password set when you set the password for the 'admin' user. |
| Confirm Password | Re-enter the password to confirm the typo you entered doesn't have a typo. |
| Note: It is strongly recommended that you keep the "Organization Name", "Domain Name", "Prefix" and "Admin Passwords" the same on Strikers that will be peered together. |
Network Configuration
One of the "trickier" parts of configuring an Anvil! machine is figuring out which physical network interface are to be used for which job.
There are found networks used in Anvil! clusters. If you're not familiar with the networks, you may want to read this first;
The middle section shows the existing network interfaces, enp1s0 and enp2s0 in the example above. In the screenshot above, both interfaces show their State as "On". This shows that both interfaces are physically connected to a network switch.
Which physical interface you want to use for a given task will be up to you, but above is an article explaining how Alteeve does it, and why.
In this example, the Striker has two interfaces, one plugged into the BCN, and one plugged into the IFN. To find which one is which, we'll unplug the cable going to the interface connected to the BCN, and we'll watch to see which interface state changes to "Down".
When we unplug the network cable going to the BCN interface, we can see that the enp2s0 interface has changed to show that it is "Down". Now that we know which interface is used to connect to the BCN, we can reconnect the network cable.
To configure the enp2s0 interface for use as the "Back-Channel Network 1" interface, click or press on the lines to the left of the interface name, and drag it, into the Link 1 box.
This striker dashboard only has two network interfaces, so we know that obviously enp1s0 must be the IFN interface.
| Note: If you want redundancy on the Striker dashboard, you can use four interfaces, and you will see two links per network. Unplug the cables connected to the first switch, and they become Link 1. The interface for the second switch will go to Link 2. Configuring bonds this way will be covered when we configure subnodes. |
Once you're sure that the IPs you want are set, click on Initialize to send the new configuration.
If you're happy with the values set, click Initialize again, and it will send
After a moment, the Striker will reboot!
First Login
After the dashboard reboots, log back in as you did before and restart Firefox.
| Note: If the browser tries to reload the last page, it will go back to the configuration page (note the Failed to enable the network mapping API message and the url being http://localhost/init). If this happens, ignore the page. The data will be stale an inaccurate. |
Example of the old config page being loaded. Ignore this and go to the base url http://localhost.
Login with the user name admin and use the password you set earlier.
The main page looks really spartan at first, but later this is where you'll find all the servers hosted on you Anvil! node(s).
Peering Striker Dashboards
| Note: For redundancy, we recommend having two Striker dashboards. Repeat the steps above to configure the other dashboard. Once both are configured, we will peer them together. Once peered, you can use either dashboard, they will be kept in sync and one will always be redundant for the other. |
With two configured strikers ready, lets peer them. For this example, we'll be working on an-striker01, and peering with an-striker02 which has the BCN IP address 10.201.4.2.
Click on the Striker logo at the top left, which opens the Striker menu.
Click on the Configure menu item.
Here we see the menu for configuring (or reconfiguring) the Striker dashboard.
Click on the title of Configure Striker Peers to expand the peer menu.
Click on the "+" icon on the top-right to open the new peer menu.
In almost all cases, the Striker being peered is on the same BCN as the other. As such, we'll connect as the admin user to the peer striker's BCN IP address, 10.201.4.2 in this example. We can leave the (postgres) database and ssh ports blank (which then default to 5432 and 22, respectively).
Once filled out, click Add and the job to peer will be saved. Give it a minute or two, and the peering should be complete.
After a couple minutes, you will see the peer striker appear in the list. At this point, the two Strikers now operate as one. Should one ever fail, the other can be used in its place.
Configuring the First Node
An Anvil! node is a pair of subnodes acting as one machine, providing full redundancy to hosted servers.
The process of configuring a node is; 1. Initialize each subnode 2. Configure backing UPSes/PDUs 3. Create an "Install Manifest" 4. Run the Manifest
Initializing Subnodes
To initialize a node (or DR host), we need to enter it's current IP address and current root password. This is used to allow striker to log into it and update the subnode's configuration to use the databases on the Striker dashboards. Once this is done, all further interaction with the subnodes will be via the database.
Click on the Striker logo to open the menu, and then click on Anvil.
| Note: There are two options below, Node and Disaster Recovery (DR) Host. We're working on creating an Anvil! node, which is a matched pair of subnodes, so we'll select that. We'll look at DR hosts later. |
We're initializing a subnode, so click on Node.
The IP address is the one that you assigned during the initial install of the OS on the subnode. If you left it as DHCP, you can check to see what the IP address is using the ip addr list command on the target subnode. In the example above, we see the IP is set to 192.168.10.1.
Enter the IP address and password, and then click Test Access.
In this example, the existing hostname is, an-a01n01.alteeve.com which helps to confirm that we connected to node 1's first subnode. If you have an enterprise support key, enter it in this form. In our example, we'll be using the Alteeve community repo.
We're happy with this, click on Prepare Host.
The plan to initialize is present, if you're happy, click on Prepare. The job will be saved, and you can then repeat until your subnodes are initialized.
You'll see that the job has been saved!
To initialize a new subnode, just change the Host IP Address to the next IP, and the form will revert to test the new connection.
From there, you proceed as you did above.
Mapping Configuration
| Note: In the examples below, you will see an-a01dr01. This is a DR node that will be discussed later in the tutorial. |
With the two subnodes initialized, we can now configure their networks!
Subnodes must used redundant (specifically, active-passive bonds). They must have a network connections in the Back-Channel, Internet-Facing and Storage Networks. In our example here, we're going to also create a connection in the Migration Network as wel, as we've got 8 interfaces to work with.
With our subnodes initialized, we can now click on Prepare Network. This opens up a list of subnodes and DR hosts that are unconfigured. In our case, there are three unconfigured hosts; an-a01n01, an-a01n02 and the DR host an-a01dr01. The subnode an-a01n01 is already selected, so we'll begin with it.
This works the same way as how we configured the Striker, except for two things. First, and most obvious, there are a lot more interfaces to work with.
| Note: The ordering should show you which interface most recently link cycled, allowing the user to see which interface cycled during loss of connection. See github issue #424. |
Second, and more importantly, when we unplug the cable that the Striker dashboard is using to talk to the node, we will lose communication for a while. If that happens, you will not see the interface go down. When this happens, plug the interface back in, and move on to the next interface. When you're done mapping the network, only one interface and one slot will be left.
Knowing this, if you want to unplug and plug in all interfaces in a known order (ie, "BCN1 - Link 1", "BCN 1 - Link 2", "IFN 1 - Link 1", "IFN 1 - Link 2" ... etc), you can do so, then return to the web interface and map the Order number to the order you cycled interfaces, and know which is which.
For this tutorial though, we're going to plug cycle the interfaces one at a time.
Lets start! Here, the network interface we want to make "BCN 1 - Link 1" is unplugged. With the cable unplugged, we can see that the enp3s0 interface is down. So we know that is the link we want. Click and drag it to the "Back-Channel Network 1" -> "Link 1" slot.
Next we see that enp4s0 is unplugged. So now we can drag that to the "Back-Channel Network 1" -> "Link 2" slot.
Now, we ran into the issue mentioned above. When we unplugged the cable to the interface we want to make "Internet-Facing Network, Link 1", we lost connection to the subnode, and could not see the interface go offline. For now, we'll skip it, plug it back in, and unplug the interface we want to be "Internet-Facing Network, Link 2".
Next we see that enp2s0 is unplugged. So now we can drag that to the "Internet-Facing Network 1" -> "Link 2" slot.
Next, we'll unplug the cable going to the network interface we want to use as "Storage Network, Link 1". We see that enp5s0 is down, so we'll drag that to the "Internet-Facing Network 1" -> "Link 1" slot.
Next, we'll unplug the cable going to the network interface we want to use as "Storage Network, Link 2". We see that enp6s0 is down, so we'll drag that to the "Internet-Facing Network 1" -> "Link 2" slot.
| Note: In the near future, the Migration Network panel will auto-display when 8+ interfaces exist. |
We need to add the "Migration Network" panel, and to do that, click on the "+" icon at the lower left. It will add the panel, and then click on the "Network Name" to select "Migration Network 1".
Now we can get back to mapping, and here we've unplugged the network cable going to the "Migration Network, Link 1" and we see enp7s0 is down. So we can drag that into the "Migration Network 1" -> "Link 1" slot.
Lastly, we unplugged the network cable going to the "Migration Network, Link 2" and we see enp8s0 is down. So we can drag that into the "Migration Network 1" -> "Link 2" slot.
With that, the only interface still not mapped is ens1p0, so we can confirm that it is the interface we couldn't map earlier, and so it can be dragged into the "Internet-Facing Network" -> "Link 1" slot.
The last step is to assign IP addresses. The subnet prefixes for all but the IFN are set, so you can add the IPs you want. Given this is Anvil! node 1, the IPs we want to set are:
| host | Back-Channel Network 1 | Internet-Facing Network 1 | Storage Network 1 | Migration Network 1 |
|---|---|---|---|---|
| an-a01n01 | 10.201.10.1/16 | 192.168.10.1/16 | 10.101.10.1/16 | 10.199.10.1/16 |
| an-a01n02 | 10.201.10.2/16 | 192.168.10.2/16 | 10.101.10.2/16 | 10.199.10.2/16 |
| an-a01dr01 | 10.201.10.3/16 | 192.168.10.3/16 | 10.101.10.3/16 | n/a |
| Note: You don't need to specify which network is the default gateway. The IP you enter will be matched against the IP and subnet masks automatically to determine which network the gateway belongs to. |
| Note: You can specify multiple DNS servers using a comma to separate them, like 8.8.8.8,8.8.4.4. The order they're written will become the order they're searched. |
Double-check everything, and when you're happy, click on Prepare Network. You will be given a summary of what will be done.
After a few moments, you should see the mapped machine, an-a01n01 in this case, reboot.
You do not need to log into it or do anything else at this point. If you're curious or want to confirm though, you can log into an-a01n01 and run either nmcli connection show (as seen above) or ip addr list to see the new configuration.
| Note: Map the network on the other subnode(s) and DR host(s). Once all are mapped, we're ready to move on! |
Adding Fence Devices
Before we begin, lets review why fence devices are so important. Here's an article talking about fencing and why it's important;
If you've working with High-Availability Clusters before, you may have heard that you need to have a third "quorum" node for vote tie breaking. We humbly argue this is wrong, and explain why here;
In our example Anvil! cluster, the subnodes have IPMI BMCs, and those will be the primary fence method. IPMI are special in that the Anvil! cluster can auto-detect and auto-configure BMCs. So even though we're going to configure fence devices here, we do not need to configure them manually.
So our secondary method of fencing is using APC branded PDUs. These are basically smart power bars which, via a network connection, can be logged into and have individual outlets (ports) powered down or up on command. So, if for some reason the IPMI fence failed, the backup would be to log into a pair of PDUs (one per PSU on the target subnode) and cut the power. This way, we can sever all power to the target node, forcing it off.
| Warning: PDUs do not have a mechanism for confirming that down-stream devices are off. So it's critical that the subnodes are actually plugged into the given PDU and outlet that we configure them to be on! |
At this point, we're not going to configure nodes and ports. The purpose of this stage of the configuration is simply to define which PDUs exist. So lets add a pair.
We're going to be configuring a pair of APC AP7900B PDUs.
Clicking on the Manage Fence Devices section of the top bar will open the Fence menu.
Click on the + icon on the right to open the new fence device menu.
| Note: There are two fence agents for APC PDUs. Be sure to select 'scan_apc_snmp'! |
Every fence agent has a series of parameters that are required, and some that are optional. The required fields are displayed first, and the optional fields can be displayed by clicking on Optional Parameters to expand the list of those parameters.
In our example, we'll first add an-pdu01 as the name, we will leave action as reboot, and we'll set the IP address to 10.201.2.1.
We do not need to set any of the optional parameters, but above we show what the menu looks like. Note how mousing over a field will display it's help (as provided by the fence agent itself).
Click on Add and the summary of what you entered. Check it over, and if you're happy, click on Add to save it.
The new device is saved!
Go back up and change the name and IP, and we can save the second PDU.
As before, review and confirm the new values are correct.
And saved! Now click Cancel to close the menu.
Now we can see the two new fence devices that we added!
Adding UPSes
The UPSes provide emergency power in the case mains power is lost. As important though, Scancore uses the power status to monitor for power problems before they turn to power outages.
We're going to be configuring a pair of APC SMT1500RM2U UPSes.
Clicking on the Manage UPSes tab brings up the UPSes menu.
Click on + to add a new UPS.
| Note: At this time, only APC brand UPSes are supported. If you would like a certain brand to be supported, please contact us and we'll try to add support. |
Select the APC and then enter the name and IP address. For our first UPS, we'll use the name an-ups01 and the IP address 10.201.3.1.
Click on Add and confirm that what you entered it accurate.
Click on Add again to save the new UPS.
Edit the name and IP for the second UPS.
Confirm the data for the second UPS is accurate, the click Add again to save.
The second UPS has been saved!
Press Cancel to close the form and you will see your new UPSes!
Creating an 'Install Manifest'
Before we start, we need to discuss what an "Install Manifest" is.
In the simplest form, an Install Manifest is a "recipe" that defines how a node is to be configured. It links specific machines to be subnodes, sets their host names and IPs, and links subnodes to fence devices and UPSes.
So lets start.
Click on the "Install Manifest" tab to open the manifest menu.
The manifest menu has several fields. Lets look at them;
Fields;
| Prefix | This is a prefix, 1 to 5 characters long, used to identify where the node will be used. It's a short, descriptive string attached to the start of short host names. |
|---|---|
| Domain Name | This is the domain name used to describe the owner / operator of the node. |
| Sequence | Starting at '1', this indicated the node's sequence number. This will be used to determine the IP addresses assigned to the subnodes. See Anvil! Networking for how this works in detail. |
| Networks Group | The first three network fields define the subnets, and are not where actual IPs are assigned. Below the default three networks is a + button to add additional networks. |
| DNS | This is where the DNS IP(s) can be assigned. You can specify multiple by using a comma-separated list, with no spaces. (ie: 8.8.8.8,8.8.4.4). |
| NTP | If you run your own NTP server, particularly if you restrict access to outside time servers, define your NTP servers here, as a comma-separated list if there are multiple. |
| MTU | If you are certain that your network supports MTUs over 1500, you can set the desired MTU here. NOTE: This is not well tested yet, and it's use is not yet advised. It is planned to add per-network MTU support later. See Issue #435. |
| Subnode 1 and 2 | This section is where you can set the IP address, a selection of which UPSes power the subnodes, and where needed, fence device ports used to isolate the subnode in an emergency. |
Below this are the networks being used on this Anvil! node. The BCN, SN and IFN are always defined. In our case, we also have a MN, so we'll click on the + to add it.
| Note: In our example, we're using APC PDUs. It's critical that the ports entered into the fence device port correspond accurately to the numbered outlets on the PDUs! The ports specified must map to the outlets powering the subnode. |
Click Add, and you'll see a summary of the manifest. Review the summary carefully.
If you're happy, click Add. You'll see the saved message, and then you can click on the red X to close the menu.
Now we see the new an-anvil-01 install manifest!
Running an Install Manifest
Now we're ready to create our first Anvil! node!
To build an Anvil! node, we use the manifest to take the config we want, and apply them to the physical subnodes we prepared earlier. This will take those two unassigned subnodes and tie them together into an Anvil! node.
Click on the play icon to the left of the manifest you want to run. In our case, there's only an-anvil-01. This will open the manifest menu.
Fields;
| Description | This is a free-form field where you can describe this node. |
|---|---|
| (Confirm) Password | Enter the password you want to set for this node. In general, you should use the same password on all nodes. |
| Subnode 1/2 | There are two drop-down boxes where you can choose with subnodes will be in this node. All machines initialized as "nodes" (that is, have anvil-node installed) will be available. If you are building a new node, as we are here, select the two newly initialized nodes. If you're rebuilding a node, select the two subnodes already in the node to rebuild. If you're replacing a subnode, select the surviving subnode and the replacement subnode. |
| Note: When running a manifest to rebuild a failed node, the existing node with servers will not be modified, save for updating access information for the replacement node. This is designed to run on a production node. That said, understanding nothing is perfect, when a maintenance window is available, rebuilding during that window is recommended. |
This form is pretty simple, because most of our work was done in previous steps. Simply enter a description, the password to set, and select the two subnodes we prepared earlier.
Verify that you're about to run the right manifest against the right subnodes. When done, click Run.
The job to run the manifest and assemble the two subnods into a node is now saved. It will take a few minutes for the job to complete, but it should now be underway.
Something we've not looked at yet, but that is useful here, is the job progress icon. At the top-right, there's a clipboard icon with a blue dot. Clicking on it shows the progress of running jobs. This shows all jobs that are running, or that finished in the last five minutes.
In the example above, the join anvil node 1 and join anvil node 2 are already complete!
We're now ready to provision servers!
Provision Servers
The fundamental goal has been to build servers, and now with our first node built, we're ready to do so!
Uploading Install Media
Before we can build our first server, we need to upload the install media the OS will install from.
The vast majority of Anvil! users run windows, so we're going to install a Windows Server 2022 machine. For this, we'll also need the latest virtio drivers.
Getting the Windows 2022 ISO (DVD image) will require purchasing or getting an evaluation version from Microsoft at the link above.
Getting the latest stable virtio drivers can be downloaded from here, which is version 0.1.229 at the time of writing.
With these two files downloaded on your local computer, we're ready to upload them to the cluster.
Click on the Striker logo to open the menu, and then click on the Files option.
Click on the + on the right to upload the first file.
Clicking the + button, your operating system's file browser. Use it to find the Windows ISO you will upload.
Once you select the file to upload, you will see what's going to be uploaded. If you're happy, click Upload.
As the file uploads, you'll the see the progress. How long this takes depends on the file size and the bandwidth between your computer and the Striker dashboard.
The progress bar changes colour when the file is finished uploading.
After the file is actually uploaded, it needs to be added to the cluster's shared storage. This starts by calculating an md5sum sum of the file, adding it to the database, and then it starts sending it out to the various machines in the cluster.
Once the sum is calculated, you will see the file appear in the file list.
Repeat the process to upload the virtio driver ISO.
| Note: It can take a few minutes for the files to be copied to all the machines in the Anvil! cluster, particularly if there are many nodes in the cluster. |
Provisioning Servers
Now, finally, we're at the most fun part!
Building 'srv01-primary-dc'
Lets build our first server. It won't actually do anything, but lets pretend it's going to be an Active Directory controller.
Click on the Striker logo and select Dashboard.
At this point, there's nothing to see yet, so the dashboard is pretty bare. Click on the + on the right of the search bar to start provisioning (building) the first server.
This is where you get to decide what resources are allocated to your new server.
Fields;
| Server name | This is the name of the server. It can be any string of letters, numbers, hyphens and underscore characters. It's not at all required, but we generally use the format 'srvXX-<description>', and we will use that here. This works for us because the srvXX- prefix is incremented constantly, which means that if a new server is replacing an old server, the descriptive part can be the same without conflict. |
|---|---|
| CPU Cores | This is how many CPU cores you want to allocate to this server. Please see the note below! |
| Memory | This is the amount of RAM to allocate to this server |
| Disk Size | This is the size of the (first) drive on the server. If you want a second drive, you can add it after the server has been created. |
| Storage Group | This allows you to choose which storage group to use when provisioning this new server. In most cases, there is only one storage group. In some cases, a node might have two storage arrays, for example, one that is smaller, more high performance and anther which is large, but slower. |
| Install ISO | This is the ISO uploaded earlier to use for the OS installation. |
| Driver ISO | This is the optional driver disk needed to complete the OS install. Generally this is not needed for Linux servers, and is required for the virtio drivers for Windows servers. |
| Anvil Node | If your Anvil! cluster has multiple nodes, this is allows you to manually choose which node will host the new server. |
| Optimize for OS | Important: This gives you the chance to optimize the hypervisor, that is the component that emulates the hardware the server will run on, for the OS you plan to install. Selecting this properly can significantly help (or hurt) the performance of your server. |
| Warning: The Anvil! does not allow over-provisioning of resources, except for the CPU core count. This means that it is up to you to be mindful of how much CPU resources servers can consume. If too many servers try to place too high of a load on the CPU cores, it's possible (though unlikely) to cause the back-end cluster stack to start to time out, leading to subnode ejection. We recommend allocating the fewest number of cores you think a server will need, and increasing the number as servers prove the need for them. Note also that the the number of available cores is the sum of real cores plus hyperthreaded cores. It is strongly advised to NOT allocate to a single server more than N-2 of the host node's real cores. That is to say, if your nodes have 16 real cores, the recommended core limit for a single VM is 14. This way, if something causes that server to consume all available CPU power, some CPU will be available for the host and other servers. |
For our first server, we're going to create a server called srv01-primary-dc. We'll give it 4 cores, 16 GiB of RAM and 100 GiB of disk space. Once you're happy with your selection, press Provision.
You will see a summary of the server that is about to be created. Confirm that all is well, and then click on Privision to confirm.
The job has been saved.
It will take a minute or two for the node to prepare and provision the server, but after a minute, it will show up on the main dashboard page.
Click on the server and it will open up to in-browser terminal access to the new server.
This access is just like having a monitor plugged into a real physical machine. You are essentially using a keyboard and mouse plugged into the server. No network connection is required on the guest (as there can't be at this stage of the OS install), and you will be able to watch the full boot up and shutdown sequence of the server, without any client being installed.
It's not needed yet, but it's important to show that you can click on the keyboard icon on the top-right to send special key combinations, like "<ctrl> + <alt> + " to the guest. This will be needed later to login after the OS is installed.
| Note: From this point on, we're doing a standard Windows Server OS install. We're not showing all the steps, but we will show key steps. |
Recall that we included the "virtio" driver disk? This is the step where that comes in. For optimal performance, the hypervisor creates a "virtio-block" storage controller that is optimized for performance in a virtual environment. Microsoft doesn't include the driver for this natively, so when we get to the storage section, it initially sees no hard drive.
Click on the "Load Driver" button on the lower left.
Click on "Browse".
Click to expand "CD Drive (E:) virtio-win-0.1.229" drive.
| Note: This example is for Windows 2022 server, if you're installing a different version, choose the directory that best applies. Note that "amd64" really just means "64-bit". Use that regardless of the make of your physical CPU if you're installing a 64-bit Windows OS, as most are these days. |
Select the "E:\amd64\2k22". and then click "OK".
The "Red Hat VirtIO SCSI controller (E:\amd64\2k22\viostor.inf)" option will appear, and this is the storage controller driver we want. Click on "Next" on the lower-right corner.
The driver will load, and after a moment, the "Drive 0 Unallocated Space" will appear. At this point, you can proceed with the OS install as you normally would.
This screen shot isn't particularly important from the OS install process, but it shows how you're able to see the server even during the boot process. It helps show that we're talking to the (virtual) video card, not any software on the guest.
Now we're at the login screen! Click on the keyboard icon we mentioned earlier, and choose ctrl + alt + del. to sent that key combination to bring up the login prompt.
| Warning: This step is very important! Windows will ignore power button events when it things it has powered down the display. It does this to prevent someone accidentally powering off a computer that the user things is already off. This blocks Scancore's ability to gracefully shut down the server when needed! |
Windows, by default, turns off the power to the display (monitor) after ten minutes. This is a problem as Windows will then ignore power button events. The Anvil! has no agents that run inside the guest (we treat your servers as black boxes), so the only way we can request a power off is by (virtually) pressing the power button.
It is very important that Windows shuts down when the power button is pressed!
Imagine the scenario where power has been lost, and the UPSes powering the node the server is on are about to die. Scancore will press the power button to gracefully shut the server down. If windows ignores this, there's nothing more the Anvil! can do, and the node will stay up and running until the power runs out, resulting in a hard shut down.
Optional Windows Install Steps
From here on, the steps shown are optional. Depending on your needs and policies, you may well choose to only do some of the things here. Consider this section a list of suggestions.
Depending on your needs, you may wish to select the High Performance power configuration. Of course, this will consume more electricity and generate more heat, but it's good to know this is an option for servers that are more performance-oriented.
If you browse to E:\virtio-win-gt-x64 and run it, you will be able to install additional drivers. This will allow you to change the desktop resolution to a higher resolution, in particular.
Installing all the additional virtio driver pack.
If you browse to E:\virtio-win-guest-tools and run it, you will be able to install the windows guest tools.
And that's it! From this point on, proceed with your windows server setup as you normally would.
| Any questions, feedback, advice, complaints or meanderings are welcome. | ||||
| Us: Alteeve's Niche! | Support: Mailing List | IRC: #clusterlabs on Libera Chat | ||
| © Alteeve's Niche! Inc. 1997-2023 | Anvil! "Intelligent Availability™" Platform | |||
| legal stuff: All info is provided "As-Is". Do not use anything here unless you are willing and able to take responsibility for your own actions. | ||||
